- REVIEWS
Camera Reviews 
More Reviews Mobile Reviews Photography Reviews - GALLERIES
- VIDEOS
- BUYER'S GUIDES
What’s WORSE: Under- or Overexposed Photos? How to Fix Both (VIDEO)

Photography is no different than other creative pursuits, in that mistakes happen regardless of one’s skills. That’s often true with exposure, particularly under difficult lighting conditions.
So what’s the worst error when you have to rehabilitate a poorly exposed shot; one that’s too dark or too light? In the video below, one of our favorite image-editing experts provides his view on this topic, and he explains how to fix both under- and overexposed images in Lightroom.
Instructor Anthony Morganti pulls up two photos he made of the statue of King Neptune at sunrise—just moments apart. As you’ll see, they look like they were shot at totally different times of day, with one photo too dark and the other overly bright. While neither of Morganti’s images are acceptable as is, he demonstrates a quick Lightroom method that works great for all sorts of exposure mistakes. He begins with the underexposed shot and gets to work.
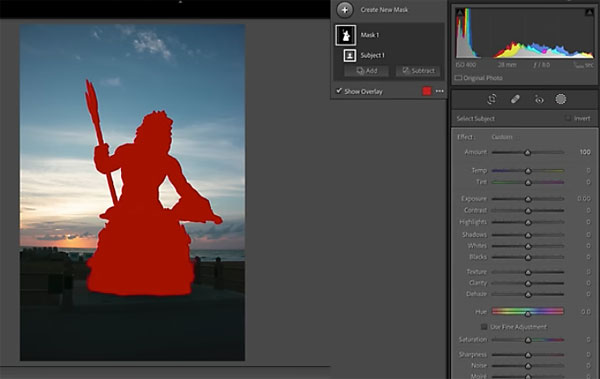
The first step is navigating to Lightroom’s Basic tab, and moving the exposure slider to the right. As you’ll see, this helps with the sky but the shadows are still crushed—leaving the sculpture and background virtually black.
Morganti continues by creating and refining a mask that he uses to open up the deep shadows. What follows is surprisingly effective and simple to accomplish. While brightening the statue he also adds saturation, clarity and texture, and the photo now looks pretty good. He then adds a second mask for the sky and easily balances the tones, while enhancing the warm colors on the horizon.

Next up is the overexposed shot that creates a different set of problems and solutions, but Morganti shows you how to fix that one too. So which mistake creates the more difficult challenge? Watch the video and find out.
There are more helpful editing tips and tricks like this on Morganti’s YouTube channel. So pay a visit and subscribe.
You may also want to check out another Morganti tutorial we posted earlier, explaining an easy way to use Lightroom’s Calibration controls for better edits.
- Log in or register to post comments


![]()
Get the Latest Photo Tips, News & Reviews from Shutterbug!
| Camera Reviews Other Reviews | Mobile Reviews Photography Reviews Columns | News | Features | How-To | Resources |
 © 2025 Shutterbug
AVTech Media Americas Inc., USA
All rights reserved