- REVIEWS
Camera Reviews 
More Reviews Mobile Reviews Photography Reviews - GALLERIES
- VIDEOS
- BUYER'S GUIDES
Using Adobe’s Photoshop Elements 3.0
Page 2
Immediately below the Contrast section of slider adjustments is a four slider set of tools that can be used to adjust different dimensions of color quality, including: Saturation, Hue, Temperature, and Tint. The first two, Saturation and Hue are derivatives of the Hue/Saturation tool dialog in the Standard Edit pane, while Temperature and Tint adjust color similarly to controls that were introduced in Photoshop's Camera Raw plug-in a couple of years ago. Probably the most advantageous new addition is the ability to apply a color shift on the red/blue Color Temperature axis.
 |
|
|
Two common examples of the advantage are with people pictures when flesh tones
are pale and pasty looking, which often benefit from adding a little warming
to the image plus possibly a little more saturation; and the even more frequent
situation of pictures taken close to noon, at high altitude, and by illumination
by open, blue sky, which also benefit by moving the slider to the warm side.
The Tint slider, however, adjusts the color balance on the green/magenta axis.
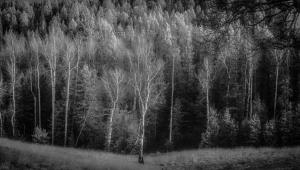
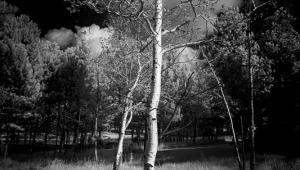
I found, as an example, the Tint slider applies readily to natural landscapes
with foliage, especially if the image needed and got a warming adjustment to
reduce excess blue. The result of the warming may dull the greens in the image,
so moving the Tint slider a little to the green side will brighten and intensify
foliage color.
One control I found less desirable, located at the top of the Quick Fix column
of slider and automatic adjustment tools, is Smart Fix. I consider it the least
useful, and it has the greatest potential for actually diminishing image values
and attributes. The reason I believe that it is not helpful is that the combined
overall automatic image adjustment it affects is based on the assumption that
the image is typical, like a snapshot with a balanced distribution of colors
and tonal values. Applied to individual images that contain different kinds
of coloration and a less usual balance of lights and darks, Smart Fix generally
does not favor the subject. Indeed, I found Smart Fix was pretty dumb and unable
to adjust the values to make an optimum interpretation of many subjects.
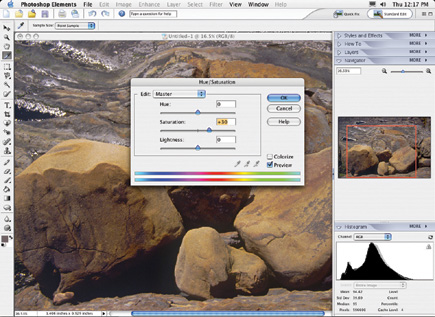
I'll give you a typical example, a shot I made very late in the day (sweet
light) of some beach rocks at Point Lobos, California. The rocks had a golden
glow from the low sun, and after applying Smart Fix the golden glow disappeared.
Apparently Smart Fix assumed the coloration was an erroneous color cast and
not an intended and desired attribute of the image.
 |
|
|
The Standard Edit alternative work space contains much that is in common with
Photoshop CS. However, the work space layout has been redesigned both for efficiency
as well as consistency with the Quick Fix work space, now with a Palette "bin"
on the right, which can be popped out or hidden with a single mouse click. There
is also another bin available at the bottom that shows thumbnails of open images
that have been minimized, a useful feature when you are making a composite or
building a series for a slide show, etc. I found the Palette bin particularly
advantageous as it gives you a full view of two or three key Palettes like Histogram,
Navigator, and Layers, all arranged in one space that can be popped up as needed
while still filling the entire work space with the open image you are working
on.
The Standard Edit work space is the choice to finalize editing even when much
of it is done first in Quick Fix. For example, it provides an easy access with
Navigator to zoom in and examine the open image more carefully to do things
like apply a fuller selection of sharpening options like Unsharp Mask. Standard
Edit is also the logical space to open digital camera files with Camera Raw,
and to then apply any final tweaking after the image is opened in Element's
work space.
For cleaning dust marks and fixing flaws Adobe has a new Spot Healing Brush,
which is highly effective and efficient to remove small bits of dirt, scratches,
and defects in images, all with a single mouse click. Unlike the Healing Brush,
which I found to be no significant advantage over the Rubber Stamp brush tool,
the new Spot Healing Brush is direct, easy, and requires fewer mouse clicks
and no keyboard commands to clean up an image. It cuts retouching time to a
fraction of what had been required.
Although its function is to some extent duplicated in Quick Fix, the Shadows/Highlights
menu option under Enhancements provides a way to reduce the effect of too much
lighting contrast by opening up shadows very effectively. This largely substitutes
for the Curves dialog full version users have relied on to adjust overall image
contrast with much greater ease and assured effectiveness. Although Quick Fix
offers very effective global color adjustment, Standard Edit's access
to the Hue/Saturation color dialog extends support for selective color HSL adjustment
so you can tweak skin tones to perfection, for instance, without affecting any
other colors in the image.
 |
|
|
Elements Supports Using Your Photo Images
Quite a few questions I get from readers of Digital Help ask how to make use
of their photos, from embedding in
e-mail to outputting slide shows. Sending photos attached to e-mail is nothing
new, and Elements 3.0 makes the re-sizing and configuration even easier. But
have you ever wondered how you could make that embedded e-mail photo more secure
so the recipient could view the image but could not appropriate it for their
own use? With Elements 3.0 in the print driver you can select to output an image
in Acrobat .PDF format and then apply the security functions to limit uses like
editing and printing. Once an image is a secured .PDF file, just drag it into
an e-mail you are creating.
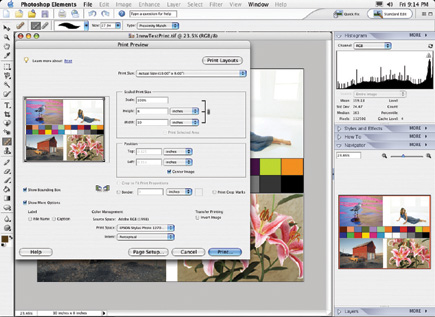
Among the many new options added to Elements 3.0 are an easier, more sophisticated
slide show facility and the capability to create calendars, cards, panoramas,
and photo albums. Better web gallery support and an easier, more flexible Picture
Package printing facility are also included. In addition, the media you can
save to are now much more extensive, like VideoCD that supports most DVD players,
even TiVo, as well as support for handhelds and picture cell phones.
Overall Evaluation And Recommendation
The first consideration of a version upgrade is whether it is worth making the
change and the investment. In the past I have frequently been more than a little
conflicted about making positive upgrade recommendations. Even though I find
some features of Elements 3.0 of dubious value, it still leaves me without any
doubt about its strong advantages. And, as I have suggested, I am sure I will
use Elements 3.0 much more in the future, maybe even more than the full version
of Photoshop CS. In fact, I'll go a step further--I would urge every
photographer and Photoshop user to take a serious look at Adobe's Photoshop
Elements 3.0. I believe that if you use all of its capabilities you are likely
to agree that it is a must-have application for the digital darkroom. At a cost
of under $100 it is surely the best investment in terms of use and benefit.
For more information, visit Adobe's website at: www.adobe.com.
|
| |||||||||
- Log in or register to post comments


![]()
Get the Latest Photo Tips, News & Reviews from Shutterbug!
| Camera Reviews Other Reviews | Mobile Reviews Photography Reviews Columns | News | Features | How-To | Resources |
 © 2025 Shutterbug
AVTech Media Americas Inc., USA
All rights reserved