Transform Your Photos Into Art With Corel's Painter 8
Draw And Trace Over Your Original Photos Or Use Automatic Commands To Create Artistic Effects

1
Photos © 2003, Howard Millard, All Rights Reserved

Corel Painter, now in Version 8, has been among the world's top painting and drawing programs for more than a decade. So what does this mean for photographers? Painter 8 includes powerful, controllable commands to convert your photos to look like realistic traditional art media including woodcut, silk-screen, pencil drawing, even mosaic tiles. Combining artistic effects with your photographs may give you an extra edge in portrait, wedding, and commercial work. Use your photo as a background and trace over it digitally with pen, pencil, brushes, watercolor, crayons, or chalk--any of scores of different media. Then remove the original photo entirely, or blend it with the painting effects. Finally, you can create from scratch with hundreds of brushes in 30 different mediums on a huge library of paper and canvas surfaces. Furthermore, the price of Version 8 has been cut significantly to under $300.

2

The New Interface
Let's take a closer look at the new face of Painter 8 (#1). On the left side of the screen is a familiar (to Adobe software users) toolbox with selection, cropping, and type tools. Below this lies the Color Selector. Next down, the Content Selector is where you can choose papers, patterns, gradients, hoses, nozzles, and weaves. Across the top of the screen, just below the menu bar, is a context-sensitive Property Bar. The options here change according to the tool you're working with.

In line with the Property Bar, just to its right, is the Brush Selector. Much simplified compared to previous versions, it contains two drop-down options: on top, the Brush Category Selector (groups of similar brushes and media) and below it the Brush Variant Selector (to choose a specific type within the category). For example, if you choose Chalk as the Brush Category, you have a number of choices in the Brush Variant Selector including square chalk, large chalk, sharp chalk, dull grainy chalk, and tapered artist's chalk.

3

Now look at the right-hand side of the screen. Below the Brush Selector is the Color Palette where you can choose the hue from the outer ring of color, and then the saturation with the center triangle. Next in this palette are the Mixer, Color Sets, Color Info, Color Variability, and Color Expression choices. Below these are the Layers Palette and the Channels Palette. While there are more than 20 palettes available, most of the tools and features you'll use frequently are available in this default screen interface.

Power And Depth
If you want to draw or paint to create prints (or images for multimedia and the web) that really look like they were made with traditional art media, Painter is the premier program because of its power, depth, and versatility. Whether starting from scratch or tracing (on screen) over a photo, the results are visually compelling, with a wide range of options.

One of the drawbacks with earlier versions of Painter was that, because it is so feature-rich and powerful, your screen was crammed with palettes. In Version 8, Corel has radically changed and streamlined the interface, making it similar in layout to Adobe's Photoshop. To show the media choices to the far right, for example, you can move the Color Palette group one column to the left. Normally it is to the far right and the media choices drop down in front of it, making for a more simplified interface.

4

As a result, the look, feel, and usability of Version 8 have been significantly simplified. The Floating Tool Palettes have been downsized, the main toolbox is now vertical and defaults to the left of the screen, as in Photoshop. However, placement of the palettes is fully customizable, so you can re-position and group or ungroup them to suit your individual working style.

Layers And Channels
Enhanced compatibility in Version 8 makes it easier to combine Painter's images and files with images in other programs, including Adobe's. You can now work with industry-standard layer masks and layer sets to hide and reveal sections of your image without making any permanent changes. If you save your Painter 8 image in the .psd format, these layers are recognized by Photoshop. One limitation in Painter, though, is that you cannot convert the background layer to a floating layer. Next, the new Channels Palette helps save and manage masks and selections to modify, separate, and preserve specific areas of your work.

Brush Up
Beyond its new look, Painter 8 has more than 400 new brush variants distributed among the 32 brush categories. These encompass oils, acrylics, pens, pencils, charcoal, chalks, sponges, air brushes, conté crayons, felt pens, gouache, palette knives, and watercolor.

With the Brush Creator, you can design and modify your own brushes interactively. The Randomizer feature generates 12 stroke variations on the current brush that are displayed in the dialog box. A slider lets you control the degree of variation, and, at any time, you can see how your brush stroke is going to look by painting with it in the Scratchpad. Also within the Brush Creator, the Transposer allows you to define effects with two brushes---the stroke can begin with one brush and end with a different type.

5

Finally, the Stroke Designer gives you ultimate control over many aspects of any brush. Depending on the one you select, you can edit: general, size, spacing, angle, bristle, well, rake, random, mouse, cloning, impasto, image hose, air brush, water, digital water, and liquid ink. For your individual working style, you can create a set of the brushes you use most often and save them as a platform independent group.

Tracker Palette
While it may sound like the History Palette in Photoshop, Painter's Tracker Palette is much more limited, though still very helpful. It keeps a record of the last 25 brushes you used, so you can call up any one of them again. While it remembers the style, you need to choose the size and color. For animation effects, you can use scripts to record all your brush strokes, paper and ink selections and then play the script with the original media, or choose new brush and paper settings to achieve a totally different look.

In The Mix
Like a real world painter's palette, the new Mixer Palette lets you mix your own paint colors interactively. Use brush and palette knife tools to smear and blend colors on the on-screen Scratchpad to achieve the precise hue you need. At the top of this palette are color wells where you can store the colors you're using for a particular picture. Further, you can move these color sets from one project to another.

Also new, the Info Palette shows numerical color information--in actual percentage or RGB values--from the precise point you sample. This is valuable when you need to match color precisely.

6

Digital Watercolor
In the new brush department, you'll find the Digital Watercolor type. This gives a transparent watercolor effect that can be used effectively to create hand-painted drawings, combine painterly technique with photographs, or apply simple watercolor washes (transparent color, such as you get when diluting watercolor). Another new tool, the Sketch Effect, purports to "easily convert photographs to simple pencil drawings." A great idea, but although it offers four sliders for control options, I found that it gave lackluster results on most of the images I tried, even when I pumped up the contrast of the original photo first. No matter how I set the sliders, the outlines it drew were too faint, and virtually all detail within the subject was lost. For my taste, Photoshop filters such as Find Edges do a much better job for this effect.

Beneath It All
Beyond the huge choice of brushes, pens, and media, Painter 8 also offers a tremendous selection of substrates--smooth papers, textured papers, handmade papers, canvas, pebbled leather, even a Graphic pattern from the 1950s--about 20 choices in all. Select Window>Paper Type to view them. What's really impressive, though, is that Painter makes these textures interact with the brush or pen you use so that the finished art looks like it would in the real world. If you use charcoal on a textured paper, for example, the texture of the paper will show through in the strokes. Further, the papers are customizable. It's easy to modify the scale of the paper grain, as well as its brightness and contrast.

7

Let's Get To Work: Woodcuts
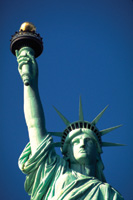
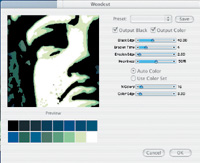
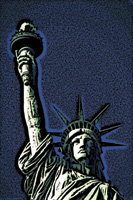
Here's how I used Painter 8 to transform some of my photographs. Starting with a photo of the Statue of Liberty (#2), I opened it in Painter 8 and chose Effects>Surface Control>Woodcut. Image #3 shows the dialog box controls available for this effect, described in the extensive 482 page manual that ships with the software. In addition to six slider controls, you select color or black and white, and a specific color set or auto color, which takes colors from the original photo. One complaint I have is that the preview is a fixed size--being able to control its magnification factor should be an option.

Once I set the sliders for the look I wanted, clicking OK rendered the effect quickly. The result (#4) is a dramatic, richly colored graphic that would have taken hours to create by hand. Some Painter processes can take a while on machines with a slow chip, but the effects are definitely worth the wait. Also, more RAM speeds up many operations.

Mosaic Effects
I've always been fascinated by mosaics, images made of ceramic tiles fitted together to form a picture. To try Painter's Mosaic effect, I began with a portrait photo (#5). After cloning the photo in Painter, I chose Canvas>Make Mosaic. In this dialog box (#6) you choose the size and color of the tiles and the grout (cement-like substance between them). I used the tracing paper option to "paint" over my original photo with mosaic tiles created on the fly by Painter. In other words, as I brushed over the photo, Painter laid down tiles based on the colors in the original.

After clicking "Done," Painter rendered the mosaic. Saving it as a resolution-independent RIFF file, you can re-size it at any time without any loss of quality. Next, I made a duplicate, saved it in .psd format, and then used Photoshop 7 to increase the color saturation with a Hue/Saturation adjustment layer (#7).

8

Distress Test
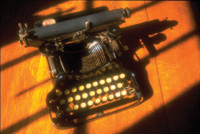
The last effect I want to show here is called Distress. As my starting point, I selected a photo of an antique typewriter (#8). Choosing Effects>Surface Control>Distress brings up the dialog box (#9) where five sliders offer control over such variables as edge size and smoothing. The type of distress can be based on a selected paper grain or a pattern. Once I had set the controls for the effect I wanted, clicking OK rendered the graphic transformation of my original typewriter photo (#10).

Color Issues
Painter 8 incorporates a new color management scheme, which is an important issue for professionals and anyone who wants controllable color. If you work in Windows or in the sRGB color space on a Mac, you don't really have to do anything--the defaults work for you. Many pros, though, myself included, work in the Adobe RGB color space, which is not available as an option in Painter 8's color management system out of the box.

I followed tech support instructions to load the Adobe RGB color profile into Painter 8, but although it then appeared as a choice, the on-screen appearance of my photos (in Adobe RGB color space) was still washed out, lacking in color saturation and contrast. The author of the Painter 8 book, which I recommend later, does work successfully in this Adobe color space, so I hope with some tweaking that this can be resolved.

9

Try A Tablet Workspace
If you're serious about working with Painter, you should consider getting a graphics tablet. This is a plastic slate with a work area from 4x5" up and a cordless lightweight pen. You connect the tablet to your Mac or PC via a USB cable and draw on the tablet with the pen. Most professional artists and photo retouchers work with one of these tablets. Why? Because doing fine work with a mouse is like drawing with a bar of soap.

Furthermore, in programs like Painter 8 and Photoshop, the tablet is sensitive to the pressure and angle of the pen, just like drawing or painting with real art media. If you press harder, you see a broader stroke, and the appearance of the brush stroke changes with the angle of the pen. With a pen and tablet, it's easier to draw a selection, retouch small areas, and trace a photo or other artwork that you can lay on top of the tablet.

The graphics tablets most used by professionals are made by a company called Wacom, www.wacom.com. Their newest line of Graphire3 tablets include both a pen and a mouse (which must be used on the tablet surface). In the 4x5" size, they list under $100, while a 6x8" is priced under $200. Larger sizes are available in Wacom's Intuos line. The new Graphire3 models come bundled with Adobe's Elements 1.0, Painter Classic (not 8), and penPalette LE from nik multimedia. You can keep your regular mouse connected along with the graphics tablet.

10

Read This Book
Whether you're an absolute beginner or an old hand, if you're serious about this program, I strongly recommend The Painter 8 Wow! Book by Cher Threinen-Pendarvis, $49.99 from Peachpit Press, including a CD. Lavishly illustrated and divided into short, easy to follow sections, the book will both show and tell you how to create all sorts of marvelous art, beginning from scratch and with photos. It is filled with examples by the author and scores of other prominent professionals from around the world. As we went to press, another helpful reference was published--Painter 8 Creativity: Digital Artist's Handbook by Jeremy Sutton. From Focal Press, this 322-page $49.99 guide with CD covers getting started, portraits, transforming photographs, collage, and animation.

In summary, if you want to apply software effects to your photos, Painter has some good ones, but Photoshop offers far more. On the other hand, if you want to digitally draw or paint to create images that really look like they were made with traditional art media, Painter 8 is the premier program because of its power, depth, and versatility.

System Requirements
Windows: 2000 or XP, 200MHz or faster processor.
Mac: OS 9.2.2 or higher or OS X, 10.2, or higher; Power Mac G3 or higher.
Both: 128MB RAM, 1024x728 display, 24-bit color, CD-ROM drive, mouse (Wacom tablet recommended).

For more information contact Corel by calling (800) 772-6735 or visit their website at www.corel.com/painter8.

X