- REVIEWS
Camera Reviews 
More Reviews Mobile Reviews Photography Reviews - GALLERIES
- VIDEOS
- BUYER'S GUIDES
Seeing Pictures: Mental Preparation, Optical And Compositional Considerations


All Photos © Sean Arbabi
One of my goals as a nature photographer is to make the places I photograph speak to the viewer—whether through the beauty of the land, the isolation of a place, the power or feel of a subject. Granted, we all see in different ways, but I always begin the process of “seeing” by first getting an overview of the place where I’m going to work (not start shooting as soon as I arrive) and observing the potential light and seasonal subject matter that may play a part in my photography.
Then there’s discovery—wandering can play a big part in the decision making process, as it did when I came across this misty forest scene in Kauai (#2). My goal was to reach the Kalalau Lookout, a famous overlook in Waimea Canyon, but as I drove into low hanging rain clouds the landscape changed, resulting in one of my favorite shots of the trip.

Visualization
Before arriving at any location, I always like to visualize what I might photograph as I did when visiting Glacier National Park (#3). I left my cabin a few hours before sunrise to drive to this specific location in the hope of capturing a dramatic sunrise after 2 weeks of rain. The clouds broke for just a few minutes right as the sun crested the eastern sky—this is the shot I had hoped to capture.

Visualization is giving your mind time to think about where you’re traveling, wondering about what kind of images you may capture, considering what type of weather you may encounter, preparing with gear and practicing camera functions and, in the mix, thinking about how much time you really can spend in a locale.
Visualization places me in a solid photographic state of mind. A National Geographic wildlife photographer once said he needed at least 3 days to get into the right photographic frame of mind. Could he walk out of his home and still produce great images? I’m sure he could, but the additional time allowed him to hone his focus. You may not have this long to prepare, and most likely you interpret the world in a different way, but if you can find the time to focus your thoughts it may help you better convey your photographic “messages.”
Scanning The Landscape
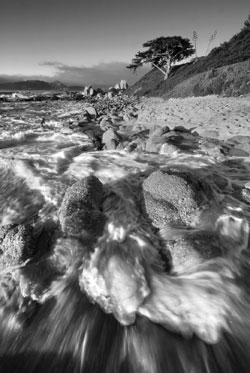
Once I come to a place where I want to photograph, I first scan a landscape in search of interesting views. Then I follow my gut, which is part technical experience, part creative knowledge, part feel and emotion. It’s a kind of melding of body, eye and mind. I applied this approach along the central California coast one morning (#4). As I strolled with my gear along the rocky coastline, I noticed some rocks being battered as the incoming waves rushed in and out and immediately knew this area could create an interesting and unique photograph.
Of course, every outing is different, but when I locate a scene I decide which lens I might use, if I need a tripod, consider moving a certain direction for a better angle and determine how much time I have before the scene is gone. I also begin to think about my exposure and how it may affect the final image.
The Seasonal Search
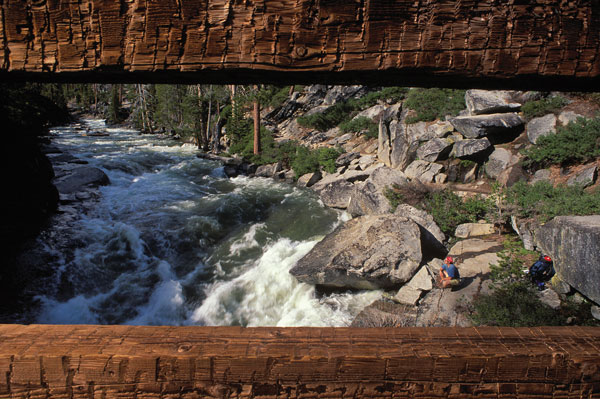
Another part of the compositional process can be based around distinctive seasonal changes in nature—searching for a colorful fall tree that may stand out in a landscape, patterns in the snow that make a compelling foreground or the spring melt that fills a fast-flowing river. While shooting during autumn in Yosemite Valley (#5), with the rivers low, the wildflowers gone and the snow yet to arrive. I took advantage of the myriad colors along the banks of the Merced, framing the south valley wall and sunbeams casting down onto the river.

In general, I can’t tell you how to see, so you must study the way you look at things—how you interpret them into a frame and what you find interesting. The more you spend time on this, the better your compositions become.
Compositional Guidelines
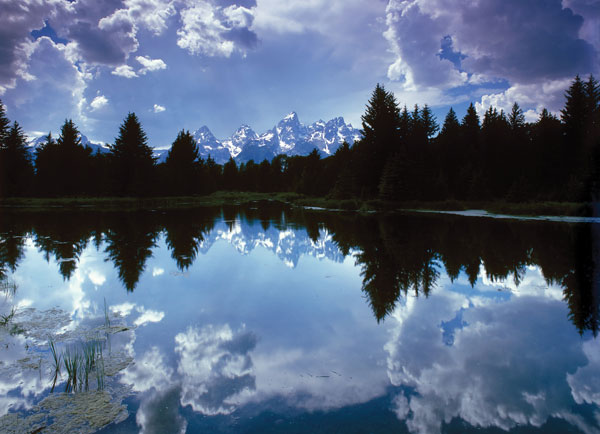
Creating a outdoor image is not only about the placement of subject matter throughout a frame, but the weight of the elements—the balance of shapes, the effect of color influences and the spatial relationship of subject matter as well as the direction of light. Work toward designing an almost perfect parallel to the order of things—similar to the phrase, everything has its place in nature—and this may come through in your photographs. As mentioned earlier, when creatively editing the world around you, choosing the elements you wish to remove is just as important as the ones you wish to keep in your final rendition. As the painter Paul Cezanne once wrote, “All art is selected detail.”
There are a number of compositional guidelines you can follow to begin—the rule of thirds, attention to balance and symmetry—like the reflections on this lake in the Tetons Range (#6)—creating patterns, leading lines and even finding order in chaos. Look at the photos throughout this issue and you’ll see many of these basic rules applied.
From Angles To Anchors
Outdoor photography is all about angles—removing your camera from that 5-6 foot eye-level range to find a more interesting perspective, one not usually seen by the viewer, like in these comparative photos of a Belding ground squirrel (#7 and #8). When I first noticed the squirrel popping in and out of its den, I shoot a quick frame from where I was standing. Pointing down, the angle was a typical view and a bit boring, the shorter lens didn’t do much for me either so I altered my position. By lying in the grass as low as I could and using a longer lens I got down on the squirrel’s level and not only created a much more interesting shot, but also eliminated the distracting blades of grass by using selective focus and minimal depth-of-field.


Locating the optimal point of view also helps a viewer step into the setting or see something they might not have seen without looking at your photos. If done well, great angles can create visual dominance and negate poor lighting by placing simpler subject matter in the background, blocking elements like the sun, and emphasizing foreground subject matter. You can even move rainbows into position by moving to a different spot. This choice of a low angle (#9) in Point Reyes, California, helped separate the flower from the green hillside and created a strong sense of what the subject was without losing a sense of context. Finding a way to look over, under or down on something to obtain the best angle is of prime importance when creating consistently strong recreations of nature.

Anchors place a main subject or a “point of interest” in the frame that either helps to lead the viewer’s eyes to it or assists in creating a nice flow to the overall composition. Applying the rule of thirds is one way to do this. In fact, this compositional tactic is so popular that your camera might even have a viewfinder with an optional “grid” display that divides the frame into 9 equal parts. Look at where these lines meet; those points are considered powerful anchors in any composition. The lines can also separate elements such as the fore, middle and background.
A slight variation of the rule of thirds, what I like to call the 4 corners rule, take your subject out of dead center and place it in one of the 4 corners—not all the way at the edge, but somewhere half way between the center and the edge. I applied this technique by placing my main subject, the backpacker, at bottom right (#10). Hovering over a wading moose in Maine (#11) I did the opposite by placing it in the upper left corner, and in this winter scene (#12) I placed the cross-country skier in the upper right.


You can also vary from this guideline to create negative space or asymmetry, as I did in these photos (#13 and #14) using the moon and the sun. Neither are in the exact spot where the rule of thirds lines intersect (and might dictate), yet both work to produce a nice flow to the image, proving that rules are indeed made to be broken.


POV And Sense Of Scale
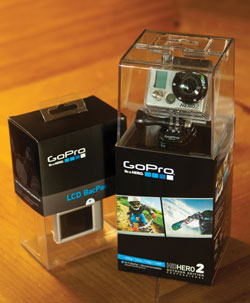
Another way to add a special look to your scenes is to offer a unique point of view (POV), like this photo I made using GoPro’s HD Hero 2 (http://gopro.com, #15) while mountain biking through a state park near my home (#16).

Point of view might also include showing grandeur through scale, that is, using size comparisons to give a feeling of where you are. While snowshoeing past Sequoia trees in southern Yosemite (#17) these figures give the viewer an idea of the size of these giants. Depending on how close or how far you are away from your subjects, you can use any lens, from a wide angle to a telephoto, to achieve this grand and impressive effect.

Building A Foreground
Landscapes can be challenging because you have so many elements to include—possibly a mix of trees or foliage, water, sky, clouds, land and light. However, if you find a strong foreground you have a better chance of a more interesting shot.
Here’s how I work: first, I look for an interesting middle and background, such as nice sky, a lake, possibly strong light on a mountain range and then I search for a foreground subject—a patch of wildflowers, an interesting rock outcropping or sand formation, or a stream heading off into the distance. I found this group of rocks along McClures Beach (#18). Using them for my foreground, I made sure to wait for the right moment to capture the crashing waves.

Edge To Edge
On occasion we all miss details—small branches coming into frame, part of a National Park sign obstructing the view—but practice this awareness, fill your boundaries with essential material and your compositions will be more pleasing and less distracting. When I look through the camera I am not looking at an outdoor scene to document, I am looking at a composition that will create a complete photograph. Pay attention to straight horizons, edge-to-edge detail and the overall flow of your scenes. I captured this group of elephant seals along the California coast (#19), zooming in to crop out the beach, the cliffs and the ocean nearby to focus solely on the group huddling together. The composition produced a wonderful pattern of round bodies and rich tones of fur.

Optics And Composition
By understanding the strength of each lens you can react and pick the best one for each moment. The distance of your subjects, the spots you choose to shoot from and the lens used have a big influence on the arrangement of elements in the scene. (Editor’s note: the focal lengths used here are equivalent to 35mm format angles of view, known as FX or “full frame” in digital cameras. If you do not have a full frame digital camera find the matching angle of view by using your sensor’s “multiplication factor” found in your camera’s instruction book.)
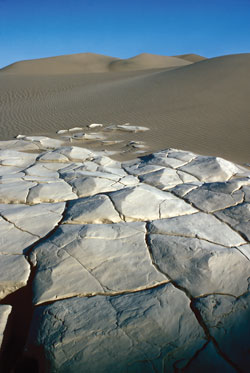
Super-wides and wide angles (12mm- 35mm) are often used for landscapes since they cover the broadest views (44°-120° angle of view) offering a chance to document everything from a close foreground to a distance mountain in one shot. Wide angle lenses also provide the most depth-of-field potential, in very wide angle lenses from inches to infinity. You can see this in the photo of salt deposits rising out of sand dunes in Death Valley (#20) that was shot with a 24mm lens.
Standard/Portrait and Macro lenses (50mm– 105mm—15°-30°) can be used to capture vignettes of nature, isolating on certain sections of the terrain. They give a perspective and peripheral vision similar to our own. I used a 50mm when I photographed the world’s largest tree in Sequoia National Park (#21) from about 75 yards away.

Longer lenses such as telephotos (135mm–600mm) give you the chance to focus in on one single area (3°-14°), great for wildlife or isolating a small distant section of a landscape. They also tend to “compact” a scene, giving the feeling that one object is right next to another when they may actually be miles apart, such as the feeling that all these ridges are together (#22) in this sunset shot using a 500mm lens.

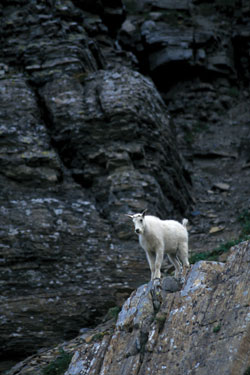
If you want to practice composition and only carry one lens, a zoom lens is the way to go. Chronicling a herd of mountain goats in Glacier National Park (#23), I used an 80mm-200mm lens to produce a variety of compositions as they closed in on my location. I use my zooms to edit specific elements that sit on the edge of the frame—parts of a scene that may sidetrack a viewer from my main subject. But zooms should not be a way to avoid moving about. You should never rely solely on your original position to be the best vantage point to capture a moment.


![]()
Get the Latest Photo Tips, News & Reviews from Shutterbug!
| Camera Reviews Other Reviews | Mobile Reviews Photography Reviews Columns | News | Features | How-To | Resources |
 © 2025 Shutterbug
AVTech Media Americas Inc., USA
All rights reserved