Quick Tips
The Nighttime Is The Right Time For Dramatic Pictures
Quick question: What's
one of the key ingredients for a dramatic picture? One more question: Where
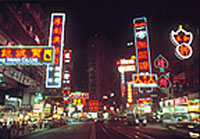
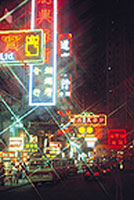
and when can you almost always find dramatic lighting? So, you have lights, your camera, and sometimes the action of moving cars--all the ingredients you need for dramatic shots. But how do you capture nighttime scenes on film? My final answer (I couldn't resist, Regis): Check out the following quick tips for shooting at night. Don't Shoot At Night. Hey, I'm only half kidding. Let me explain. If you shoot city scenes at dusk, shortly after the sun has set, the pale sky will make a nice backdrop for illuminated buildings. For a jet black sky, which can add drama to nighttime photographs, wait a bit longer. Think Fast Film Speed. I use Kodak E200 transparency film, often pushed one or two stops (ISO 400 or 800) for my nighttime pictures. I like the "warm" quality of the pictures this daylight-balanced film produces. For perhaps a more accurate color rendition of the scene, you might want to try tungsten-balanced slide film, but I think you'll be happier with daylight film. I find that a fast film speed is often needed because the city lights, although they may look nice and bright, are, relatively speaking, not that bright. In addition, with a fast film speed, I can hand hold most of my shots because I'm using a fast (f/2.8 or faster) lens. Of course, if you have an image stabilizer lens, which reduces camera shake, your worries about hand holding a camera are greatly reduced. Because I use transparency film, which does not have a wide exposure latitude, and because nighttime scenes have a lot of contrast, I bracket my exposures; that is, I take three exposures: one at the recommend setting, one at one stop over that setting, and one at one stop under that setting. By taking three exposures, I'm bound to get one picture I like. If you shoot color print film, you don't really have to bracket because even if your negative is a bit too dark or light, you can still get a very good print. That's because color print film, technically called, color negative film, has a wide exposure latitude. Tote A Tripod. If you want to use slow film, or if you want to use slow shutter speeds to blur the moving lights on passing cars, then you'll need a tripod. With your camera mounted securely atop a tripod, you can take exposures for several seconds, or even minutes, and get beautiful streaks in your scenes. Experiment with different shutter speeds, say from 1 to 10 sec, to see how they affect the degree to which moving lights are blurred. Pack A Few Lenses. I like shooting nighttime scenes with my 17-35mm zoom. This lens lets me capture the whole scene--buildings, cars, and streets. For tight shots of neon signs and individual buildings, I shoot with a 70-200mm zoom. Don't Forget A Filter. You've probably seen nighttime photographs that show points of light as beautiful starbursts. This effect is easily created with a starburst filter. Simply attach the starburst filter to your lens and rotate it until the streaks of light are in the desired position. See The Light. Nighttime scenes are often filled with color, detail, drama, and contrast. To ensure a good exposure when shooting slide film, I always take exposures one stop over and one stop under the recommended meter reading. If you shoot color print film, there's really no need to take the extra exposures because color print film has a wide exposure latitude, which means your exposure can be "off" a few stops and you will still get a good print. Listen To Your Mother. "Wear white at night," is what my mother would always tell me when I rode my bicycle at night. Well, that was good advice, and if you are shooting near or in the street, you should follow this advice, too, because you need to be seen! For added safety, wear a reflector vest, the kind runners wear at night. And Finally. (My Favorite), have fun--taking, making, and sharing your pictures. |
