QPcard's QPcolorkit 1
Custom Color Profile Creation For All Digital Cameras

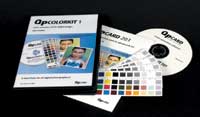
The QPcolorkit 1 package includes five QPcard 201 color targets, Owners Manual, and a Mac and Windows CD-ROM.
Photos © 2003, Jay Abend, All Rights Reserved

As more and more photographers are going partially or even totally digital, we're all starting to learn the elements that make for a great image. At first we're all wrapped up in pixel count, lens sharpness, zoom range, and battery life. After a few dozen ho-hum images it becomes painfully obvious that a great color photograph is often more about contrast and color balance than anything else.

While all modern digital cameras feature fairly sophisticated auto white balance circuitry as well as a menu of preset white balance settings, every device has its own color signature. Even if you're very, very careful about creating well-balanced photographs with your digital camera, you'll always be stuck with your particular camera's color sense. Some are cool, some are warm, some are hard, and some are flat.

Customized Camera Profiles
One of the great pro tricks is to have a custom profile created for your camera. Now when images are opened in Photoshop or another suitable image editor, the profile can be applied and the resulting image should be fairly "neutral." This works great for the controlled conditions of the original calibration image, but what about all of the different lighting situations that a typical photographer encounters?

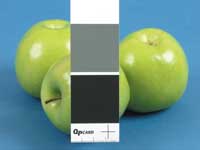
My "never leave them at home" accessory--the QPcard 101 gray cards. I've used these for a while to create a good neutral color balance on all of my assignment work.

Manual White Balance
As I've written in the past, I religiously shoot all of my digital cameras, even my little Olympus and Fuji point-and-shoots, in manual white balance mode. In general I tend to use daylight balance a lot and try to include an established gray reference card in the first image of every scene. This gives me a way to create a neutral gray balance when I'm color correcting, and once you have a good gray you're halfway there.
I've fallen for these slick little cards from QPcard, a very clever Swedish company located in Gothenburg. Like all good gray cards, the QPcard 101 cards do not use offset printing, but rather their white, gray, and black patches are solid custom mixed pigment, and the little 15 packs of self-stick calibration targets are always with me whenever I shoot.

Repeatable Results
Now, of course, a consistent reference card is great, but it does not create any sort of a repeatable profile to correct a batch of images. Sure, I create a custom levels setting and use Photoshop's batch feature to apply the correct color settings, but without a full color calibration target and the ability to color correct the entire spectrum of colors, I'm only fixing some of the image.

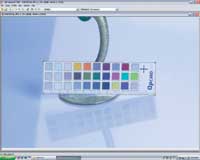
Here is the card photographed within a scene. As you can see, the outline of the card I traced shows me where the color patches fall in relation to the pre-marked squares. Once this is done it's a one-click matter to create a reusable profile.

There are any number of very elaborate and expensive ways to create a calibration file at the beginning of each session, the best conceived one being Kodak's brilliant calibration routine for the DCS Pro Back series of camera backs. Shoot a standard Macbeth ColorChecker, open the file in Kodak's Camera Manager software, create a calibration file and you're all set. There is nothing as simple and elegant as that available for non-Kodak cameras, but I recently learned that QPcard has released a very nice and inexpensive method to create a repeatable color correction profile.

The QPcolorkit 1
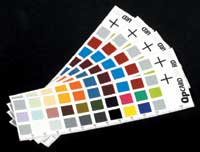
The QPcolorkit 1 arrives in a standard DVD case, with a sleeve of five color reference targets, a dual platform, Windows XP and Mac OS X compatible install disk, a very brief Owners Manual, and an install serial number. The cards themselves are what set this system apart. Like the famed Macbeth ColorChecker, each card presents a range of fixed, calibrated color samples. Since the colors are actual pigmented ink prints rather than CMYK process color images, you're assured of perfect, repeatable colors. The 30 color patches run the gamut from white through the typical range of colors, including typical grass, blue sky, Caucasian flesh, and then solid black. As with the little QPcard gray cards, there is a clear plastic piece on the back--peeling it reveals a multi-use adhesive patch, similar to a stickier Post-it Note.

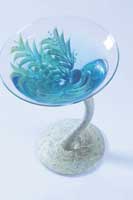
Here is the image as it was shot. I switched to tungsten light balance on purpose to create a very poorly color balanced original image.

I have to say that I love this size, and I love the fact that the $150 kit includes five of them. Since I have a mini version of another color chart (that had no software with it) that set me back $80, it's sort of a bargain. (And QPcard sells replacement packs of five cards.) I have mounted one card to a like-sized piece of black cardboard, and I keep it wrapped in an old lens tissue sleeve. This card is always in my camera bag. I keep another one around the studio, where it sticks easily to tabletop product shots and is easily hand holdable by models.

Check The CD For The PDF
On the CD you'll find a PDF of a more complete instruction manual. A thorough read through reveals the major shortcoming of this inexpensive system. Unlike the more expensive and professional packages, QPcolorkit 1 is not capable of creating color profiles that are usable system wide, on either platform. The color profile is strictly usable within the QPcolorsoft 501 software. Forget about creating custom Photoshop profiles for your digital camera--not with QPcolorkit 1. In addition, the slick QPcolorsoft 501 software is not usable with any camera's raw image format which seems like an odd contradiction. If you're serious enough to use a system like this then it seems that you're also serious enough to shoot in your camera's raw mode. Oh well, it's simple enough to either shoot in JPEG or simply create a batch process of all of your raw files in "As Shot" mode.

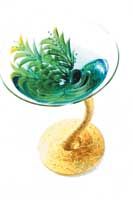
Here is my best attempt at color balancing using the simple tools in Photoshop. If you think that a standard white or gray balance can fix an image like this, well here's your answer. Notice how flat and desaturated the gold base of this hand-painted glass looks.

Some Extra Steps Needed
With the noted limitations in mind it's still clear that a really good way to create neutral, realistic, and repeatable color is well worth the few extra steps needed. In order to fit this product into my digital workflow I set up a small test shoot. To really see if tough color corrections could be effected, I broke into the middle of a product shoot I was doing for a client and set my Canon EOS-1Ds camera to Tungsten White Balance, even though we were shooting with 5600K strobes. The resulting images would be terribly blue, and bringing the color back is nearly impossible without some very intricate color channel tweaks. Wouldn't it be great, I thought, if the QPcolorsoft 501 software could just magically fix the problem?

Once I had everything set up I put one of the QPcard 201 targets into the scene and took a standard exposure, then I removed the card and shot normally. Back at the computer I had Phase One's Capture One raw conversion software take the raw files, and using the default settings, create workable 8-bit TIFF files. Now I was sure that the target image and the files that followed would all have the exact same uncorrected color balance.

The next step was to start with the target image and create a color profile. I used the QPcolorsoft 501 software on a Windows XP machine and a Mac G4 running OS 10.2, and on both platforms it is extremely fast to open images. Once the target image is open you need to create an outline of the target in the image. QPcolorsoft 501 doesn't care if the image is lined up squarely or not, which is nice, but if your card is a bit out of alignment you'll need to do some monkeying with the dimensions of your card outline to try and get the color patches to line up. QPcolorsoft 501 even has a provision for cards that are shot upside down.

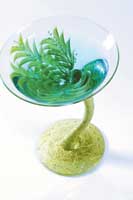
Here is the QPcolorsoft 501 conversion. Sure, the whites and neutrals are proper, but look how rich the colors are!

Once you have the card accurately outlined, it's simply a matter of clicking on "Create Profile." You then name your profile and save it to a folder of your choice. Once you create a profile the image on screen is converted by clicking "Convert Image." The color conversion, once the profile is applied, is certainly radical enough to a poorly balanced uncorrected image, but is it really more accurate than just using "Auto" in Photoshop Levels or clicking on a neutral gray patch?

My tungsten-balanced sample is a fairly good test. The image out of the camera is terribly blue with almost no red channel saturation. The QPcolorsoft 501 corrected image gets us a neutral image all right, but what is so amazing is the purity of the colors in the image. I took the same image and used Photoshop's white and gray balance tools to try and get a comparable result. Sure, I could turn the background white and remove the strong blue color balance, but I could not restore the natural color balance to the scene. If you look at the QPcolorsoft 501 corrected version you'll notice that the green of the painted leaves is back, the rich gold gilt painting on the stem of the glass is vibrant, and the overall image has a much more realistic look. Very impressive.

Five QPcard 201 targets come with the QPcolorkit 1 package, and QPcard sells replacement packs of five cards. Don't confuse these with cheap offset printed or photo paper targets--these are genuine pigmented ink targets and present accurate, repeatable color patches.

Batch Processing
Of course, if you had to do this type of thing for every image you'd be in big trouble, so QPcolorsoft 501's "Batch" utility is particularly nice, and extremely brisk. Unfortunately, QPcolorsoft 501 does not embed a color profile into the image, which will still retain the color profile used by your capture device. Regardless, there is no other package on the market right now that offers this level of true color correction at this price point. For most photographers the process of creating a calibration file is a pain and, frankly, a bit of overkill. But for serious shooters, it's not too much to simply create a half dozen or so "test" shots in different color conditions and create named profiles like "Daylight," "Tungsten," etc.

This requires you to religiously shoot with your camera locked to one color balance mode, but does give you the best way to create very repeatable color. I have created two profiles, one that matches the Balcar flash heads on my tabletop setup on one side of my studio, and another to match the newer Balcar Nexus heads on the other side of the studio. While I still tend to shoot in raw and use Phase One's excellent (but pricey!) Capture One software to create natural color, the QPcolorkit 1 package does a beautiful job when I'd rather shoot in JPEG mode.

While it requires a certain level of commitment from the photographer, a tool like QPcard's $150 QPcolorkit 1 package goes a long way to creating a closed-loop system--output color matching the real world. While it does not create a profile usable in any other software and does nothing for the confusing world of matching color monitors to color printers, it does an excellent job of creating really pure, realistic color from any digital camera. When you consider the five neat color targets and the CD with cross-platform software, I think you'll find this kit showing up in a fair number of serious photographers' bags.

For more information about the QPcolorkit 1, visit Argraph Digital Imaging's website at www.adi-digital.com.

X