Phase Ones Capture One DSLR
High Quality Raw Conversions For Canon DSLRs

Phase One's "Capture One DSLR"

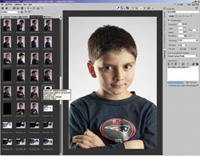
Here is the main window of Capture One. On the left you see my raw captures, on the right the ultra-large image preview. This giant preview is on screen in a fraction of a second. Shots like this with a clean gray background are a snap for Capture One to color balance.
Photos © 2002, Jay Abend, All Rights Reserved

One of the watershed products in the ongoing digital revolution is the Canon EOS-1Ds. Its 11 million pixel full frame CMOS sensor, rugged weatherproof body, and stunning image quality has been enough to convince an awful lot of photographers to part with the $8000 cost of admission.

As an EOS-1Ds user I can tell you that the camera is indeed quite wonderful, and I have found that shooting in Canon's raw format and creating TIFF files on my computer delivers the highest quality images with the most post-shoot control. While Canon has provided a very powerful conversion utility called "File Viewer Utility," a lot of photographers continue to complain about its slow speed, small previews, and general clunkiness.

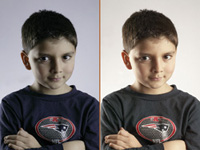
As stated in the article, Capture One does a super job with portraits. On the left the raw image converted using the "As Shot" settings in Canon's File Viewer Utility, while the image on the right is a Capture One conversion.

While inexpensive third-party conversion software programs like Breezebrowser and Yarc Plus offer a more intelligent workflow and such niceties as intelligent noise reduction, color profile creation, and contact sheet print options, they use the Canon-supplied conversion routines, and thus offer essentially the same image quality and preview times. While images converted with any of these programs can look absolutely awesome, I find that some tweaking in Photoshop is always necessary. Adobe's new raw Conversion plug-in is a reasonable $99 download, but preview image speeds compare to Canon's software, and many find that extensive use of the image manipulation tools in Adobe's software can add some noise. Wouldn't it be great, we EOS-1Ds and EOS-1D owners thought, if we could get our Canon files to look like captures from the heralded Phase One line of camera backs?

To my utter shock and surprise, days after I received my EOS-1Ds months ago I learned that Phase One was incredibly going to offer its proprietary software for Canon D-SLR cameras. (Phase One is now rolling out versions for Nikon and Kodak.) Excited beyond belief, I waited until Phase One had an active demo on their web site, and got busy.

The real thrill of using Capture One is the sharpening tools. Notice how remarkably crisp Jeremy's eyelashes are, yet there is a total absence of color aliasing, noise, or sharpening artifacts.

Try The Demo...Free
The free 30-day demo gives you access to the fully functional program, no demo limitations. Phase One hopes that you'll get excited enough about this software package to fork over the fairly stiff $599 just to get an access code to run the demo program past the 30 days. (A retail boxed version with a CD-ROM is $649.) While initially Phase One had chosen to institute a draconian install policy limiting registered owners to three total installs, at press time Phase One announced that it was doing away with this restrictive three install policy. Unlimited installs are now permitted (capitalism at work). Even better, the software is now available for both Windows and Mac OS X. What all pros and serious digital shooters want to know though, is Capture One worth the money? Let's take a look.

Interface Comments
I've used several Phase One products over the years, always on a Macintosh computer, so I figured that it would be a fairly familiar interface. As of early 2003 Capture One was only available as a PC install, so I used it on a super-fast 3GB Pentium 4 Compaq machine. After installing the software and opening this program, frankly, I was lost. Where were my images? How did I get to my folders of raw images? Well, like a lot of European-developed software, Phase One chooses to use a series of arrows and pictures to get you around the program. This allows them to use one version for most of the world, but it's a bit primitive for first-timers. After a while I figured out that clicking the left-facing arrow expanded the "My Computer" window so I could find my files. I learned that the little triangle was for sharpening, the little colored box was for soft proofing, and the two green boxes compared before and after images side by side.


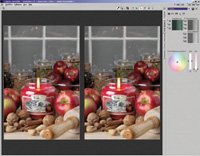
Capture One's intelligent gray balance tool creates neutral color balance very quickly.

While most of the controls on the Phase One software are similar to those found on the software that ships with Phase One camera backs, on the PC it just feels different. It works fine, however, as I found out over the next few weeks.

Since Phase One chooses not to use the Canon SDK (Software Development Kit) and use their own proprietary conversion routines, you don't get the standard Canon settings. Gone are the camera settings for white balance, sharpness, color matrix, and the like, replaced by Phase One's intelligent gray balance window, exposure compensation, color profiling, and of course the famous Phase One sharpening algorithms.

Speed Up
Your first brush with the software is both exhilarating and frustrating. The sheer speed with which Capture One throws those big preview images up on your screen is just breathtaking. After a typical shoot I have hundreds and hundreds of raw files. Browsing them in Canon's File Viewer Utility is speedy, but clicking on an image to get a slightly larger preview results in a 5-7 second delay. Multiply that by dozens and dozens of images, especially with a client at your elbow and you're painfully aware at how much time you're wasting. With Capture One there is no such delay. Click on a thumbnail and a nice large preview is there right now.


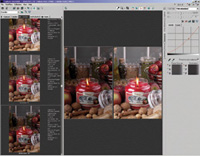
The totally customizable work space is great. Here I have a before/after conversion reflecting, in real time, the results of my image modifications.

Batch 'Em
Go through Capture One's menus and all image modes happen in real time. For those of us used to years of other raw conversion programs the effect is utterly addictive.

Gray balance, exposure compensation, contrast modifications, color profiling--all done, instantly. Now of course those modes, like the late and great Live Picture software, are only done to the preview. Converting an actual file is still a 7-30 second process, according to the speed of your machine. Processing and converting images one at a time is no fun, and certainly makes the workflow marginally better than other methods. However, the correct workflow is to work your images in Capture One, line up a mess of images, then hit the"develop" button,read your mail for a few minutes, then have a folder full of crisp clean TIFF files. It's just as easy to set all of your corrections to a test file, then instantly apply those settings to all of the files in your capture folder, resulting in an effortless batch process.

The workflow advantage to Phase One's software is certainly substantial, but for professional photographers it's the output that counts. Believe it or not, those raw files created by Canon cameras can actually be interpreted differently by different software engines. Canon's code produces brilliant results, as I have proven on dozens of assignments shot with both the EOS-1D and EOS-1Ds. The big question is this: Does the Phase One software produce better results? After all it ain't cheap!

Comparison Tests
To find out if Capture One could deliver the goods I took a number of raw files that I had shot on assignment and converted them both with Canon's software and Phase One's. Since the toughest color for any digital photographer to deal with is human flesh, I included some Caucasian portraits. Operating the software for the first time can be a bit confusing, due to the cryptic hieroglyphics. After five minutes you get fairly familiar with the controls, and if you have been using the Canon software you might feel a bit lost. Where is the color balance setting box? Where is the Color Matrix? How about the default sharpening box? What's going on here?

Phase One relies on exactly none of the Canon in-camera conventions for dealing with files. There is no way to preset your color balance, nor even the simplest setting for "Daylight," "Cloudy," or "Fluorescent." Phase One reveals their studio tethered camera history here, since in the studio you always shoot a gray card or known reference first, set up your white balance, then continue the shoot in perfect color balance. Smart, right? Well, here's the rub: If you are shooting a scene in the field with no gray areas, Capture One has a devil of a time applying a relative color balance. Sure there are numerous workarounds but the ability to quickly and easily get a neutral color balance is dependent upon finding a neutral gray area in your image.

Once I learned this, I immediately shot a whole bunch of test images using studio strobes, daylight, fluorescent, tungsten, etc. I used each frame to create a reference setting that I saved. Now when I open Capture One I have my own "custom" color spaces like "Daylight," "Daylight Warm," "Daylight Warmer," etc. It's a teeny bit of work that produces repeatable and excellent results. (Though Phase One certainly should have included such profiles in the package.)

Besides the neutral gray issue, the rest of the package is fast and easy. Exposure and contrast adjustment are simple, happen in real time and respect the ultimate color space that you have designated for your finished files. (Capture One can produce CMYK or RGB files in any number of color spaces on the fly.) The sharpening window is where the magic happens, however. While I always loved the sharp results produced by Phase One cameras like the H20 and Lightphase, in some cases I have found it to be a bit heavy handed. The EOS-1Ds files seem capable of handling a ton of unsharp masking in Photoshop, so I was eager to see how Phase One would treat the files.

As expected the results were nothing short of brilliant. Portraits displayed really stupefying crispness, especially in eyelashes and fine hair. Product shots showed remarkable levels of acutance and artifact suppression. Phase One has two settings in the preferences window--one for banding suppression and the other for noise reduction. Both work really well, and the noise suppressions combined with the Photoshop plug-in de-moiré filter produce startling files even at high ISOs.

Phase One knows what they have here. After a week or so of using this software you get addicted. The brilliant fast preview images, on-the-fly color profiling, toning and sharpening, and remarkably crisp and artifact-free images are all strong reasons to fork over the money for a licensed copy. Though I also use both Canon's software and Adobe's Camera RAW plug-in on a daily basis, all of my work for clients must go through Capture One. Now that Phase One is supporting both Macintosh OS X and Nikon NEF files, more and more pros will be checking it out. Certainly if you are a pro photographer with an EOS-1D or EOS-1Ds or a Nikon pro DSLR, Capture One is an indispensable tool that really wrings the maximum performance out of your camera.

For more information, visit Phase One's web site, www.phaseone.com.

X