Meet Your Accessory Flash: Modes, Buttons, And Lighting Control
Even though portable flash units have buttons and dials in different places, the basic functions of the various features are the same. In this section, I will go over them and explain when to use them. You will probably need to consult the manual that came with your flash to identify where the features I discuss reside on your unit. Whenever you travel away from home, it’s a good idea to have this manual with you because if you don’t use a function for a while, it’s easy to forget where it is and how to use it.
First off, let’s cover what it means for a flash to be “dedicated.” If you buy a flash made by the camera maker for the camera model you own it will work in coordination with the camera exposure system in all respects, often reading the settings from the lens, the ISO setting, and more. If you buy a flash from another maker for your camera make sure it is “dedicated” to your camera model. This guarantees that your camera and flash will work in concert and make the most use of the automatic exposure system of the camera.
You can buy a flash that is not fully automatic or dedicated to your camera, but you might have to make settings manually and you will not get the full benefits dedication affords. When you use these units you will see that the GN shifts upward when you raise the ISO. The same occurs with dedicated units, but the dedicated flash units make this, and all other calculations for you.
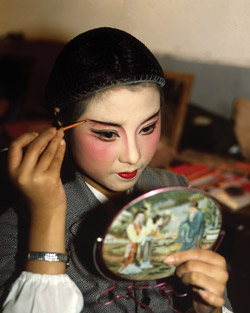
ETTL (or I-TTL): Fully Automatic Flash Mode: When this mode is selected you are turning exposure control over to the camera’s automated exposure system, much like choosing Program mode in ambient light. In fact, the easiest way to use an accessory flash is to set this mode, set the camera to Program (P) and the metering pattern to Matrix (or Evaluative or whatever the makers calls their intelligent metering pattern). For most flash situations, you should have good (or at least acceptable) exposures. This mode is ideal when you are shooting fast and you just don’t have time to think about the settings on the flash. Photographers making “candids” at weddings or covering events often use this setup. I used it in image (#1), taken backstage at the Chinese opera in Beijing.

All Photos © Jim Zuckerman
ETTL mode is power efficient. The exposure system will actually determine how much flash power it uses depending on the distance to the subject and other factors. In fact, each shot may use a different degree of power. This helps preserve battery life and can result in faster recycling times—the time it takes for the battery to provide enough power for the next flash shot. It does this when, for example, your subject is close to you or when you shoot in a relatively small room and the light bounces off white walls as in (#2). Less light is required to illuminate the subject. This extends the battery life and shortens the recycle time—this means you can shoot faster and for longer periods between battery swap or recharge.

Manual Mode: When the flash is set to manual and the power output is set to full power (sometimes indicated by 1⁄1), the flash produces as much light as it possibly can every time you fire the shutter. However, you also have the option to cut down the power, or output of light, in fractional amounts. For example, you can use 1⁄2 power, 1⁄4 power, etc.
This affects your use of flash in three important ways. First, the light output is reduced. You might use this when shooting with fill-flash and you want just a hint of light on the subject. Second, the recycle time is much faster because the flash doesn’t dump as much power and therefore the capacitor takes less time to recharge. Third, and most important for creative work, the flash duration is shortened.
The flash duration is the amount of time the flash is on when it fires. Most manufacturers don’t provide data on the specific flash durations at various reductions in power, but if we assume that at full power a typical flash has a flash duration of 1⁄1000th of a second (this is fairly accurate), then 1⁄2 power is 1⁄2000th, 1⁄4 power is 1⁄4000th of a second, etc.
When using Manual mode, the flash unit will not automatically determine the exposure on the subject. Therefore, you must have some way of arriving at the correct exposure. There are two ways to do that. First, you can use a hand-held light meter, such as the Sekonic L-758dr (#3). This meter is capable of reading the light in tenths of an f/stop, thus it’s extremely accurate. When using the meter, place it next to the subject and point the white dome at the camera, not toward the flash. (If the camera and flash happen to be in the same place, then obviously the meter is directed there. However, if the flash is used off-camera, it’s important to remember to point the white dome at the camera.) When the flash is triggered manually, the readout on the meter gives you the f/stop—shutter speed combination.

Second, you can take a picture of the subject and then assess the exposure on the LCD monitor on the back of the camera. If it is too light or too dark, you can adjust the exposure using the flash exposure compensation dial (see below). This will most likely take several shots before you arrive at the correct camera settings. If you are shooting a subject that is changing fast, you may lose the picture while you are fiddling with the exposure. However, if you are shooting a static subject and you have the time, or working in a studio setup, then this method works just fine.
Multi Mode: In this mode you can fire several flashes during a relatively long exposure for a stroboscopic effect. This works best when you are shooting a moving subject like a dancer, a kid riding a bike or swinging on a rope, a galloping horse, an athlete in motion, flowers blowing in the wind, and so on. You can select the number of flashes per second, the total number of flashes, and the power output. Photo (#4) was taken of my neighbor, Alyssa, doing a cartwheel, and I used six frames per second and the shutter was open for one full second.

This type of picture has to be done with the flash placed close to the subject. It should be no more than 5-6 feet away and you should use a large lens aperture. I suggest no smaller than f/5.6. The reason for this is because the flash has to fire several times in one second, and if too much light is required, the capacitor (the place where the flash charge is stored awaiting firing) will be depleted very quickly. By placing the flash close to the subject and opening the lens up, this helps keep the energy requirement low.
In addition, the background should be dark or muted. In a studio, the best material to use is black velvet because it absorbs light very well. Black background paper will reflect a certain amount of light and you probably won’t like the unwanted extraneous light. Alternatively, you can shoot outside at twilight or night. That’s what I did when I photographed Alyssa.
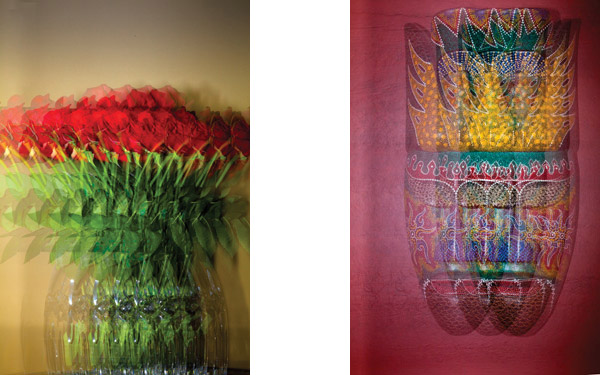
It’s also fun to use the stroboscopic effect indoors where the ambient light is relatively weak. I abstracted a vase of roses (#5), by moving the camera past the stationary subject. It doesn’t matter if the subject is moving or if the camera moves—the effect is the same. In (#6), I used a colorful mask to accomplish the same thing. Note in both of these photos the background isn’t black, but the only way this could work is if the ambient light in the room is low. I used normal daylight coming into the room through the windows, but the indoor lights were turned off.

Flash Exposure Compensation: This is an important control for both built-in and accessory flash units, especially when using the LCD playback to tweak flash exposures. It allows you to adjust the exposure plus or minus, and I constantly use it to refine my flash pictures. There are many reasons why flash pictures aren’t perfectly exposed (such as when you shoot light or dark subjects, inconsistencies with the flash output, shooting reflective surfaces, etc.), and this is the best way you have to adjust the exposure to suit your needs right on the spot.
Photos (#7 and #8) illustrate a typical situation where I used flash exposure compensation to correct a problem. The first shot was much too light—I’d say about 12⁄3 f/stops overexposed—so I made the correction using the flash exposure compensation and then checked the LCD screen again. The next picture was perfect. If the first adjustment isn’t perfect, it’s a simple matter to try again until the picture is exactly as you want it. It’s that simple.


You can make the adjustments in 1⁄3 f/stop increments. Both of these images are completely unedited—the exposures were exactly as you see them. This method of adjusting the light output from the flash to obtain a correct exposure can work with any subject you shoot with flash. How much do you over- or underexpose? That comes with experience, but even as a novice it’s not hard to come up with a perfect exposure by working with what you see on the camera’s monitor.
Zoom Feature: The light from your flash travels outward at a certain angle of coverage, just as your lens covers a certain angle of view. The problem is, sometimes the two do not agree, and that’s when you get an effect called “flash falloff,” a kind of vignette caused by the flash not covering the full angle of view of the lens.
The coverage “agreement” is made by using a feature known as the flash “zoom.” The width of this coverage can be adjusted according to the lens you’re using. For example, if you are using a 24mm wide angle on a camera with a full frame sensor, you would set the zoom setting to 24mm. If it is set at 50mm then the edges will be darker than the center. When using a medium telephoto lens, like a 105mm, you would choose this setting on the zoom feature. The purpose of doing this is to extend the reach of the flash. The zoom setting at the telephoto end focuses the light to a narrower angle; it takes the spill of light that would have been used at the periphery and directs it in toward the center, giving you greater reach with the flash.
If you have a less than full frame sensor camera, then the actual focal length must be calculated by multiplying the focal length by the correction factor: 1.5x for Nikon, 1.6x for Canon and 2x for Four/Thirds sensor cameras. For example, if you are shooting with a 16mm lens on a Nikon D90, 16mm x 1.5 equals 24mm. In this case, then, you would have to decide whether you wanted to use the 24mm or the 50mm zoom setting. If you used the 50mm zoom setting, the edges of your picture would be slightly darkened because the angle of the light would be perfect for a 50mm lens, while if you used a wider angle—in this case 38mm—the lens would include peripheral elements in the scene that weren’t being illuminated sufficiently.
On some flash units there is a plastic panel that pulls out from under the flash head and snaps into place in front of the flash head (#9). It is, in essence, a Fresnel lens. This is designed to spread the light at an angle that will cover what a 14mm lens “sees.” If you don’t use this panel, a wide angle shot will be illuminated in the center while the entire periphery of the composition will be dark.

Ready Light: Some flash units indicate you can take the next picture when the light is green while others use red. And sometimes the colors will change from green to red (or vice versa) to tell you that on one color you can shoot but not with a full charge, thus limiting the distance you can reach. When the other color lights up, you are then ready to shoot with full power. Get to know what these lights indicate on your flash. Shooting too quickly and not allowing the capacitor to charge up will result in pictures that are disappointingly dark.
Master/Slave: Many flash units have a switch or menu that allows the flash to wirelessly trigger one or more flash units. It works only if the remote flash units have the same built-in system capable of receiving the signal from the master. The triggering mechanism is an infrared beam, and therefore if anything blocks the ability of the master flash from seeing any of the slaves, the slave flash units won’t fire. When I photographed the rarely seen nocturnal pacas in Costa Rica, (#10), I had the master flash on-camera providing some fill light, and the second flash was held by an assistant off to the side with a clear view of the transmitting master. We will cover another type of triggering flash—a radio controlled unit, later. This has the advantage of not needing line of sight to trigger the secondary flash.

Test Button: Portable flash units have a test button (on the Canon 580 EX it’s called a pilot as you can see on the back of my well-used flash in #11) that allows you to fire the flash manually. This serves many functions. It lets you know the flash is firing and that the batteries are functional, and it can be used in conjunction with a hand-held light meter to establish the right f/stop—shutter speed combination. I have used the test button on numerous occasions to manually trigger the flash in a dark environment when I used it off-camera. If you don’t have a wireless method of firing an off-camera flash, you can do it using the test button. This can work in darkness by setting the camera on Bulb, a setting that keeps the shutter open until you press the shutter release again. You can walk around a subject and light it this way from numerous angles.

- Log in or register to post comments


