Master Class
Monte On Stage At New York’s PhotoPlus Show; Improvisation, Agility, And Going With What You Know Page 2
To illustrate the sharpness of the EOS 20D and the incredible ability the
camera has to place the point of focus just about anywhere you want it to be
in the composition, I moved the focus point to upper-left, used the automatic
focus built into the camera, and came in to just a portion of her face. I brought
her hand up to her face to give the picture balance and to show how her colored
shirtsleeve matched her eyes.
Within minutes after shooting these pictures many of them were sent over to
Canon's W6200 printer for 24x36" prints that were displayed while
I was still shooting. Prints came out of the printer in less than 10 minutes!
Everyone (including me) was amazed at the clarity and brilliance of the images
as they came right out of the camera--even before retouching! You can see
each strand of her hair more sharply than if you were there in person looking
at her! And just look at the detail in the iris of her eye!
Clay Blackmore, another of Canon's Explorers of Light, was often on the
stage with me. We get a big kick out of working together. Clay pushes my buttons
to make me stretch my imagination and go beyond what I normally do. This was
one of those instances. He carries an enormous amount of props with him for
portrait accessories. For this picture he gave my model one of his fans.

To complete the "look" I had two assistants hold up another piece
of fabric in the background and draped it to work with the composition. Yes,
of course I tipped the camera--just notice the angle of her earring! How
do you know how much to tip? I just do it out of "feel." It'll
come to you, too, after a while. You just have to be careful when you have an
earring like this or if your background has verticals that will "tell
all!"
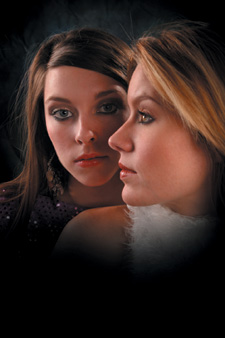
When I posed the two models together it felt completely natural for me to position
a profile over the 2/3 view of the second model. I began by figuring out how
to get one person just a little higher than the other. Lips to eyes usually
works well for a non-romantic picture. Lips to lips works for a more romantic
approach to this pose. In this instance I seated one of the models and stood
the other.
I turned the lower model's body directly into the camera, the body position
for a 2/3 view of a woman in the feminine pose. When I turned her face to the
2/3 camera position, there was space in which to bring the second model's
profile directly over her. The placement of their eyes is up to you. I had them
both looking downward, but at a slight distance so that it wouldn't appear
as if their eyes were accidentally closed.

Notice that for this portrait I brought the main light all the way around back
to light the profile. Using the track lighting, I simply switched what was the
hairlight to become the main light. That lit the right side of the lower model's
face. The shadowed side of both of their faces was lit by both a reflector (positioned
to block the profile light from flaring my lens) and the fill light.
With the two models in the same position it was a natural to turn both faces
toward the camera, keeping their faces at a 2/3
camera position and having them bring their eyes back toward the camera. Of
course I had to bring the main light back around to a 90Þ angle to the
camera to get back to my regular lighting position.
Does the same lighting pattern on almost all of my portraits bore you? I hope
not! It just simplifies everything for me and allows me to concentrate more
on my subjects, rather than have too many things to think about each time I
create a portrait.
A hairlight coming from behind spilled over onto the shadowed side of the upper
model; does it bother you? Again, I hope not! I saw it, left it, and loved it!
It's not my regular "thing," but like I always say, "If
you like the way it looks take the picture!"
Here's another variation of the two models together. The main light is
again in profile position. This time I positioned one profile over the full
face of the other. Lips are closer to the same level, but not exactly. With
the two of them looking in different directions I feel that the two of them
do not appear to be attached to the other. Instead, I feel that it is simply
a statement of two beautiful women.
I felt as if the bare white top and bare shoulder of the front model was a distraction
from their faces, so I again darkened most of the lower portion of the portrait
in Photoshop.
On the final day of the PhotoPlus Expo Clay pushed me still further when he
saw both models come out of the dressing room wearing headbands. I laid the
two of them on their backs, bodies going in opposite directions. The lights
were placed directly overhead.
The final touch was to place Clay's crepe paper flowers all around them.
The effect couldn't be seen from the audience's viewpoint out front
of our stage, but when Clay snapped the shutter and the image appeared on all
of the video monitors out front, there was an audible gasp and then an incredible
applause. It was a great way to finish off our shooting session.
But, knowing me, you can believe that it didn't end there...at least,
not for me! I just had to have one picture of me with Allison and Kate. Chip
Pecere, a New York photographer who is an invaluable assistant for everyone
who shoots for Canon at shows like this, took the picture.
- Log in or register to post comments

