- REVIEWS
Camera Reviews 
More Reviews Mobile Reviews Photography Reviews - GALLERIES
- VIDEOS
- BUYER'S GUIDES
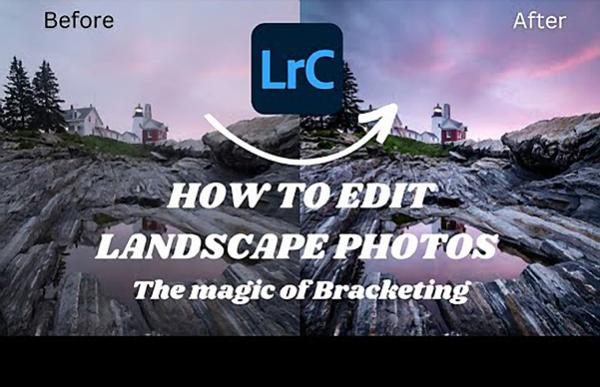
Landscape Photo Magic: Editing Bracketed Photos in Lightroom (VIDEO)
Landscape photography is full of challenges, one of the biggest being arriving at a proper exposure. That’s because many scenes have a wide range of tones, with a density range that’s beyond the capability of your camera.
This problem typically occurs when you confront both a dark foreground and a very bright sky. Or perhaps it’s the reverse, with a bright lake or sea full of reflections in the foreground, and dark trees in the distance.
In either case you can resort to graduated ND filters to balance out the tones, or perhaps strike a compromise by opening up the shadows and dropping the highlights during the editing process. But there’s an easy and effective technique that delivers precise results as you’ll in the tutorial below.

Photographer Tom Sloan specializes in landscape images and portraiture, and he’s an adept instructor as well. His solution to the foregoing is to make two shots of a scene, bracketing the exposure, and then use a simple method to edit and merge the images in Lightroom.
Sloan shot the sunrise scene for this lesson at beautiful Pemiquid Point on the coast of Maine. As you can see, there’s a bright sky and a very dark foreground. He solved the problem like this: He used exposure compensation while capturing two shots. One was optimized for the sky, and the other for the foreground.
Turning to Lightroom he combined the shots using the Photo Merge HDR option. He then made a few adjustments in Lightroom’s Basic panel, and cropped the photo to refine composition.

To complete the job he did a bit of masking on both the sky and the foreground. As you can see from the before/after images, the result is outstanding. Sloan walks you through the entire process in barely 11 minutes.
You can find more tips and tricks on Sloan’s instructional YouTube channel, so be sure to take a look.
And don’t miss our earlier tutorial from another expert, explaining how to use an underrated Lightroom tool that makes colors POP!


![]()
Get the Latest Photo Tips, News & Reviews from Shutterbug!
| Camera Reviews Other Reviews | Mobile Reviews Photography Reviews Columns | News | Features | How-To | Resources |
 © 2025 Shutterbug
AVTech Media Americas Inc., USA
All rights reserved