- REVIEWS
Camera Reviews 
More Reviews Mobile Reviews Photography Reviews - GALLERIES
- VIDEOS
- BUYER'S GUIDES
How to Get Started with Lightroom’s Tone Curve for Better Photos (VIDEO)

It’s not often we have access to an upcoming lecture, but that’s what you’ll find in the tutorial below, explaining how to get started using Lightroom’s powerful Tone Curve for more effective edits.
Imaging-editing expert Anthony Morganti is set to speak at the October 7 Lightroom Virtual Summit 2022. He’s just one of several presenters at the event, and his presentation will cover several topics in depth. And if you want to register for the event, there’s a link in the description beneath the video.
This 12-minute episode explains and demonstrates one basic aspect of Lightroom’s Tone Curve Panel; namely, the very useful Parametric Curve. And by joining in on the Lightroom Virtual Summit 2022, you’ll learn complete details of everything Tone Curves have to offer in complete detail, as well as other topics Morganti presents.

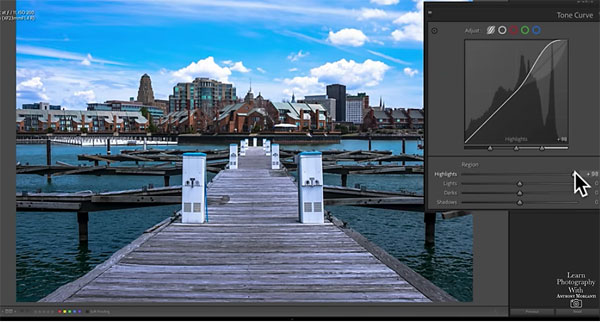
Morganti provides helpful keyboard shortcuts, include some that can be used in tandem to speed up the process. As he explains, the Parametric Curve is also known as the Region Curve. This tool is divided into three sections; the graphical representation, three sliders called Splits, and below those there are four additional sliders representing Regions.
Morganti’s tips begin with a demonstration of the graphical representation, and he explains what it does and how easy it is to use. You notice there’s a histogram in the background and that’s important to understand when adjusting highlights, midtones and shadows.
The remainder of the 12-minute episode discusses the ramifications of the seven sliders mentioned above. And by the time you’re done watching, Lightroom’s Parametric Curve may become one of your best friends.
You can find a wide a wide variety of editing explainers on Morganti’s YouTube channel, and we suggest that you refer to it often.
And for another helpful post-processing tutorial check out our recent post, with a simple technique for giving landscape photos a unique dreamy look.


![]()
Get the Latest Photo Tips, News & Reviews from Shutterbug!
| Camera Reviews Other Reviews | Mobile Reviews Photography Reviews Columns | News | Features | How-To | Resources |
 © 2025 Shutterbug
AVTech Media Americas Inc., USA
All rights reserved