Handmade Panoramas; Manually Stitching Can Be Fun!
In 1980, I was involved in
a project to create the world's largest photograph: a panorama
of the Grand Canyon. Our team of six (photographers and a TV crew) rode
mules into the Grand Canyon, where, in the sweltering August heat, we
set up a 35mm SLR camera loaded with slide film. The camera, equipped
with a 85mm lens, was carefully secured on a surveyor's level
that was, in turn, mounted on a tripod. |
|||
This past August, again in
the sweltering heat, I rode a mule into the Grand Canyon, this time with
my wife, son, and digital camera kit: a Canon EOS Rebel and a Canon EF-S
18-55mm zoom lens. One of my photography goals was to take a panorama,
although not on the scale of the 1980 project. This time I intended to
produce a panorama solo--something anyone can do these days in the
digital darkroom. You'll need a panorama program and/or an image-editing
program with layers and canvas size control, such as Photoshop Elements
or Photoshop CS (the program I use). |
|||
(#1) Here are my three original
digital images, which I shot specifically for the panorama. Each image
overlapped the other by about 30 percent. I set my camera to the raw mode
for maximum image quality. Overlapping pictures to be used in a panorama
is very important. So is keeping the camera level. |
|||
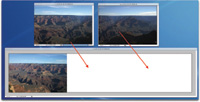
(#4) Manually stitching images together in Photoshop or other photo editing imaging programs with layers and a canvas size option is easy. First, open the picture you want on the left side of your panorama. Then, triple the canvas size to the right of your image. This screen shot shows one photo and the canvas dialog box in Photoshop. |
|||
(#5) Next, open the other images.
Then, using the Move tool, drag your other two images into position on
the newly expanded image. For easy alignment, slightly reduce the opacity
of your pictures so you can see through them. |
|||
Now it's your turn to have fun expanding your photographic horizons by creating panoramas. Rick Sammon recently completed "Photoshop for Outdoor and Travel Photographers," an interactive, tutorial CD produced by Software Cinema. For information, see www.ricksammon.com and www.software-cinema.com |


