- REVIEWS
Camera Reviews 
More Reviews Mobile Reviews Photography Reviews - GALLERIES
- VIDEOS
- BUYER'S GUIDES
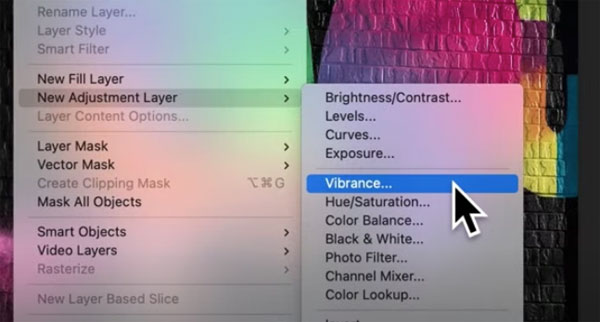
Fix Subdued Colors with Photoshop’s Vibrance Tool (VIDEO)

Three key elements of awe-inspiring images are great light, precise focus, and accurate color. The super-simple tutorial below concentrates on the latter of the three goals using a basic Photoshop tool that many photographers ignore.
This three-minute episode from the Adobe Photoshop YouTube channel introduces you to the Vibrance tool and explains how it differs from the more commonly used Saturation tool. You’ll also learn when adjusting Vibrance is the best choice.
In simple terms, Photoshop’s Saturation tool does exactly what the name implies; it significantly bumps up colors in a photo when you want an image that really “pops.” But what if your photo contains both strong and softer colors, like a portrait with a bright background? Or perhaps you’re editing a landscape image that has both vivid and subdued tones.
The magic of Photoshop’s Vibrance tool is that enable you to intensity colors without over-saturating skin tones in portrait photos. Likewise, you can achieve a perfect balance of strong and softer colors when editing landscape images.
This tutorial is a step-by-step guide with simple tips for photographers of all skill levels. The unnamed instructor begins with this important point: “The camera and your eyes see color somewhat differently. That means the colors in your images may appear less vibrant than they did in real life.”
The Vibrance and Saturation sliders appear in the same panel, one above the other. This makes it easy to experiment with both controls while watching how they impact your image and quickly make whatever enhancements you desire.
As you’ll see, when you drag the Saturation slider to the right, all of the colors in the photo become super intense. Great, if that’s what you want. But for a more realistic look the Vibrance slider can be the proper tool to use.
You can find more helpful image-editing tips on the Adobe Photoshop YouTube channel, so be sure to take a look.
We suggest you also check out the tutorial we posted from another processing expert, explaining the easy way to use Photoshop/ACR masking for photos with more impact.


![]()
Get the Latest Photo Tips, News & Reviews from Shutterbug!
| Camera Reviews Other Reviews | Mobile Reviews Photography Reviews Columns | News | Features | How-To | Resources |
 © 2025 Shutterbug
AVTech Media Americas Inc., USA
All rights reserved