Fine Printing
Recipes For Great Print Quality

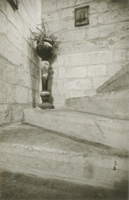
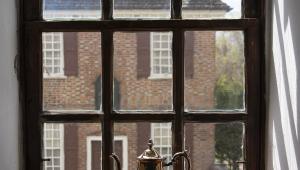
Sun shade. I think this is probably my finest "fine print" to date. I used my Alpa 12 S/WA and Rodenstock 35mm Apo-Grandagon, shooting on Ilford HP5 Plus. I took a shadow reading with my Pentax spot meter. This version is printed on Ilford Multigrade Warmtone and toned with selenium toner. The very same print appears as the frontispiece in our latest book, "Rangefinder" (Roger Hicks and Frances Schultz, Guild of Master Craftsman Publications, 2003, ISBN 1-86108-330-0). If you have a chance to see the book, you can see how different reproduction can be in different publications.
Photos © 2003, Frances E. Schultz, All Rights Reserved

Most printers strive to make fine prints. Some succeed while others fail. The road to success does not start in the darkroom; it starts before you ever press the shutter release.
A fine print can be of any subject. The single most important key to making a fine print, rather than just a record shot, is passion. You have to care about the subject. You can even make a fine print from someone else's negative--if the subject moves you. A technically excellent print still can fail as a fine print if it is devoid of passion.

Composition is important, but not in the way some people would have you think. Obey the rules or break the rules: it doesn't matter. What matters is finding the composition that best shows your interpretation of the subject.

Film And Exposure
Choose the right film. This is where the alchemy of photography begins to assert itself. I love Ilford XP2 Super and Ilford HP5. Some photographers prefer Kodak TMX, Agfa APX 100, or Maco Cube 400. It doesn't matter, as long as you use a film which gives you good results.

Exposure technique is crucial, because to get a good print, you need a good negative. The only way to get a good negative is to expose it correctly. Beware: the exposure meter in your camera may be optimized for transparency films, not negative films. You may have to re-rate your film to get the best exposure.

If I am relying on an in camera meter, or on an incident light meter, I will rate an ISO 400 film at anything up to a stop slower: 320, 250, or even 200. If I overdo it, well, it is far easier to print from an overexposed negative than to print from one that is even slightly underexposed. Ideally, use a spot meter to measure the shadow areas,never a gray card! There is not room here to cover the technique of spot metering. Suffice it to say that Ansel Adams reckoned that when he started using a spot meter, his exposures increased by an average of one stop.

Tripods are a good idea, but do not enslave yourself to them. If you can get better shots without a tripod, don't use one.

Vase, Xaghra Mill, Gozo. Many printers feel that you have to print on fiber paper to have a fine print. But, you can't tell in repro. This is printed on Ilford Multigrade Warmtone FB paper.

Film Developer
Once you get into the darkroom, film developer is the first critical choice, unless you use Ilford XP2 Super or another chromogenic (C-41 process) film. Some film developer combinations offer a "magic" tonality (as XP2 does!). Others don't. Good tonality is generally obvious as soon as you try a particular film-developer combination. If you have to spend a lot of time refining the development technique in an attempt to get better tonality, it is probably not worth the effort.

Paper And Paper Developer
The next critical choice is paper--and paper developer. Again, this is very much a personal choice and there are certain magical combinations. When I am working in 35mm it is Ilford XP2 Super, printed on Ilford Multigrade Warmtone, developed in either Ilford Multigrade developer or Tetenal Variospeed W. If I am working in medium format I
prefer Ilford HP5 on the same paper with the same developer. Always use high quality, fresh materials, of course. Stale paper and cheap developers will make it a lot harder to make good prints, let alone fine ones.

Choose the appropriate degree of enlargement. Some pictures cry out to be printed large--generally the ones with lots of fine detail. Others look better small. A contact print from a 4x5" negative can have a wonderful jewel-like quality.

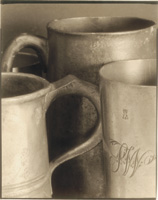
Tankards. Most of Roger Hicks' fine prints are contact prints on Printing Out Paper (POP). This is a 4x5" negative printed with a generous border. An enlargement just wouldn't have the same feeling.

Selective Bleaching
Many techniques can lift a print from the ordinary. Dodging and burning are the most obvious. Selective bleaching with Farmer's Reducer is another, particularly if you have a very small area you want to lighten without having a "halo." It is a rather harrowing technique at first, but the trick is to start out with a very dilute bleach and use multiple applications, rinsing between each.

Image Toning
Toning can often add a certain magical spark to a print. I love selenium toners and I'm not fussy about the brand. I have yet to find a selenium toner I don't like. They don't all give quite the same effect, though. For example, Maco's selenium tends to give a slightly blue tone to the highlights and a lovely purplish tone to the shadows (on Multigrade Warmtone paper).

It is important to know that a selenium toner will increase the maximum density slightly, provided you don't leave it in the toner for too long. After a few minutes, it begins to bleach the print. Strong selenium will radically change the image tone, while very weak selenium will increase the maximum density only slightly and improve the archival keeping of the print without much change to the image tone. Each paper is different, and each toner is different, so it is important to run
your own tests.

One of my passions is historical subjects and I will quite often tone them with a sepia toner. Although thiourea (thiocarbamide) toners are odorless and convenient, I prefer the tone I get from an old-fashioned sulfide (rotten egg smelling) toner which I mix myself. As usual this is personal preference, and you may very well prefer thiourea.

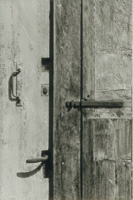
Both Roger Hicks and I shoot doors. There is probably some deep psychological meaning, but this is a subject which engages us both. I made this print from one of his negatives. It helped that he was using my favorite film (Ilford XP2 Super).

Look At Fine Prints...Live
Now comes the punch line. Printing a fine print on demand is almost impossible unless you are redoing a previous fine print from notes. Even a fine printer such as Ctein has been known to admit that he doesn't always know, until he has finished, whether it will be a fine print or merely a very, very good one. And Bob Carlos Clarke's technique is to keep printing until the next print is not as good as the one before.

Illustrating an article on fine printing is even more difficult, because photomechanical reproduction is a great leveler. There are a few very expensive books which are so beautifully printed that you can see and appreciate the illustrations as fine prints, but they are extremely rare. More usually, the tone and contrast of the very same print will vary from one publication to the next--and even from one copy to the next.

The best way to learn what fine prints look like is to go and look at as many original prints as you can. It is quite useful to see exhibitions of prints that you have only seen in reproduction. You may be shocked at how bad some of them are. In particular, many exhibition prints are made too large and lose their magic. Or you may find that prints which were dark and murky in reproduction "sing" when you see them as originals.

Once you are reasonably confident that you know what a fine print looks like, the best way to learn to make fine prints is to refine your shooting and printing technique. Don't try to run before you can walk. Just keep working until you are consistently producing really good prints. Some of them will be fine prints.

Reculver towers. This has appeared before in "Shutterbug" and well illustrates how you can use special techniques to make a fine print. It is printed on watercolor paper, coated with liquid emulsion. The brush strokes and rough deckle edges become part of the composition.

Farmer's Reducer

You can buy Farmer's Reducer in small packages, or if you have the raw chemicals you can mix it yourself. You need two solutions: 12.5 percent hypo and 10 percent potassium ferricyanide. The exact concentrations are not critical.

Add 5ml of the potassium ferricyanide solution to 100ml of hypo solution.

The bleach should be lemon-yellow. It goes off quite quickly, and when it does, it changes to a yellowy-green.

Test it on a scrap print. If it works too fast, dilute it. You should not see any immediate lightening on the first application.

Work on a damp print, and rinse frequently. Practice on scrap prints.

Sulfide Toner

Make a stock 20 percent solution by mixing 4 oz of sodium sulfide with 20 oz of water--or 100g in 500ml. The exact concentration is not critical.

For toning, use three parts of stock sulfide solution to 20 parts water.

When mixing sulfide toner, wear rubber gloves.

Do the mixing and the toning in a well ventilated place. I do it in the stable yard behind the house (we don't have horses!).

Don't store mixed sulfide toner near sensitized material: it can cause fogging.

X