- REVIEWS
Camera Reviews 
More Reviews Mobile Reviews Photography Reviews - GALLERIES
- VIDEOS
- BUYER'S GUIDES
Feathers: The Beauty Of Birds, Close-Up
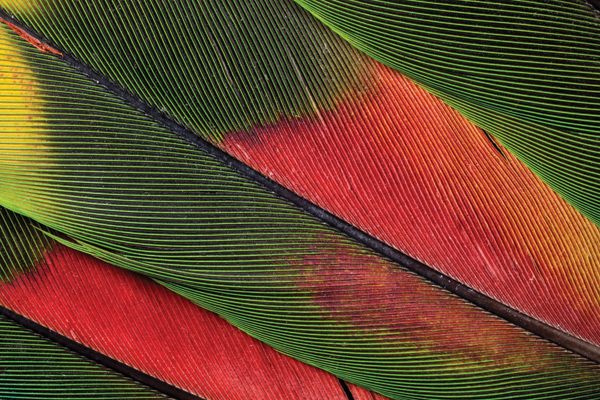
The beautiful designs and colors that can be found in the feathers of many species of birds offer wonderful photo opportunities. You can create frame-filling shots of unique patterns, and it’s also possible to make interesting arrangements of the feathers that become a unique art form unto itself.
Finding Feathers
Birds are always dropping their feathers, and I have found beautiful feathers on the ground in many parts of the world. Even in the subdivision in which I live in Tennessee, I’ve picked up tail and wing feathers from red tailed hawks, blue birds, woodpeckers and owls. Image (#1) is a macro shot of the unique reflective colors characteristic of some feathers from a red tailed hawk.

All Photos © Jim Zuckerman
Because feathers are used in so many types of costumes, you can buy them online as well as from large craft and hobby stores. When I started writing this issue, I realized I didn’t have enough feathers to illustrate the points I wanted to make so I went to eBay and found many people selling various species of feathers. From bird-breeding farms to craft outlets, you can find all kinds of colors, patterns and textures in feathers. In most cases they are just a few dollars for between 10 and 20 feathers. You can see the color and designs of what you are buying online. I only used naturally colored feathers for the pictures you see in this section. Some companies dye them garish colors to be used in various types of costumes, feathered boas, etc. but to me that is no longer a detail of nature.
Depth Of Field Issues
Some of the feathers you will find on the ground or purchase are surprisingly small. For example, the blue and black feathers of the Eurasian jay in (#2) are only an inch and a quarter long. In addition, every feather, whether long or short, has a slight curvature. These characteristics create a challenge with respect to obtaining complete depth of field. In my opinion, it is very important to photograph the feathers with as much depth of field as possible. What you are capturing has tremendous detail and to render most or all of the composition out of focus defeats the purpose. Blurred portions of the image deny us the ability to see and appreciate the true beauty of these remarkable subjects.

Therefore, there are three things you can do to achieve complete depth of field. First, use the smallest lens aperture on the lens. Second, you must use a tripod. There is absolutely no way you can expect a sharp picture with enough depth of field if you hand hold the camera. Depth of field aside, with significant magnification the feather will seem like it is in motion as you look at it through the viewfinder simply because it’s impossible to hold the camera still. And third, make the back of the camera—i.e. the plane of the digital sensor—as parallel as possible to the plane of the feather. This makes each point on the feather equidistant to the points on the sensor, and that helps keep everything in focus from edge to edge.
This is especially important when you lay several feathers on top of each other, as I did in the arrangement of pheasant features (#3). Remember that as you move in close to small subjects, depth of field becomes extremely critical. Even a height of 1 or 2 millimeters is enough to cause portions of the image to be soft. You need to do everything possible to make sure the subject is as sharp as possible, and paying attention to how parallel the camera is to the feather will help a great deal.

Something else I do when shooting feathers is to place a small amount of weight on them to flatten the arrangement as much as possible. Feathers are so light that it doesn’t take much to flatten them out. For example, when I place several feathers on a table I will lay a business card on the base of the stems and then I’ll put my cell phone on the card. This is sufficient pressure to help me get the depth of field I want. That’s what I did in (#4)—in addition to using f/32 and a tripod. I used a small twig to weigh down the features from a vulturine guinea fowl in (#5) that I shot against black velvet in Ethiopia.


Flash
Another approach to shooting feathers is with flash. If you don’t happen to have a tripod handy, the advantage of using flash is that the additional light enables you to use a small lens aperture. In addition, the brief burst of light eliminates the possibility of blurring the picture.
I use both on-camera flash as well as off-camera flash to shoot feathers. The latter creates more pronounced texture, which I like, but the on-camera flash look eliminates shadows. Compare (#6) and (#7), for example. The detail of a peacock makes a wonderful subject for a photograph. Image (#6) was taken with on-camera flash, although the flash unit I used was a ring flash. This provided a very soft and flattering type of light, especially because the camera and flash was used so close to the feather. Because I used a 50mm lens, the flash—which circles the lens—was only about 5” from the feather. In (#7), I took the ring flash off the lens and held it to the side such that the light skimmed the surface of the feather. I like both of these images, although they are quite different.

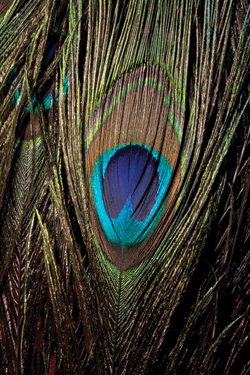
By changing the angle of the flash relative to the surface of the feather, you can change the way the light strikes its surface and thereby alter the look of the image. If you use an 80 or 90˚ angle to the lens axis, for example, it will produce more contrast and the texture will consequently be more pronounced. If you hold the off-camera flash at a 45˚ angle, you will create texture but to a lesser degree. In both (#8) and (#9), I used a 45˚ angle off the lens axis for the flash position—in this case the ring flash was used, although any portable or studio flash could be used. Admittedly, it’s a bit awkward to hold both the flash and the camera, and if you can enlist the help of a friend to hold the flash for you it’s easier. In all of the pictures in this section I held the flash myself so it’s quite doable.


![]()
Get the Latest Photo Tips, News & Reviews from Shutterbug!
| Camera Reviews Other Reviews | Mobile Reviews Photography Reviews Columns | News | Features | How-To | Resources |
 © 2025 Shutterbug
AVTech Media Americas Inc., USA
All rights reserved