Expand Your Horizons
Consider New Film Developer Combinations

For this shot of a factory worker, I went with Tri-X developed in Kodak Microdol-S developer. I handheld a Hasselblad since my flashes weren't allowed. The prints look really smooth, surprising since Tri-X usually has pronounced grain. Thanks to a fine grain developer like Microdol I could get away with this film and make my client happy.
Photos © 1999, Jay Abend, All Rights Reserved

One of the truly liberating aspects of shooting black and white film is the relatively low cost of setting up and maintaining your own darkroom. When moving to a new studio recently, I was forced to break down my existing darkroom and consider whether to build a new one. While the majority of my work for clients is shot on color transparency film, I do a bit of black and white. In addition, I shoot almost all of my personal work on black and white film. My local pro lab does a fine job with black and white, and for the couple dozen rolls a year that I shoot, why bother building a new darkroom?

To figure out whether I could live without a new darkroom or not, I looked through my files and tried to determine if my local lab could take care of business for me. After a thorough search, I called the plumber and booked him for the new darkroom sink install. Let's face it--black and white is one area of conventional photography where the photographer can still get his hand in there and sculpt the image. Although I have usually thought of dodging and burning as the limit of my creative input in the darkroom, I realized that by picking unique combinations of film and developer over the years, I have been creating a different black and white look for each assignment.

While I can get good results from a garden variety roll of black and white film and standard D:76 development, I have stumbled upon a few film developer combinations that produce markedly different images. Here is a brief list of my favorite combinations.

Black And White "Film Noir" Look. For the inky black shadows, moderate grain, and ethereal highlights of the classic "film noir" look, there is nothing like Kodak Tri-X developed in Microdol. While Kodak's old reliable has been surpassed by modern emulsions with finer grain, longer tonal range, and better latitude, Tri-X has a look that is hard to match.

While I have developed thousands of rolls in D:76, I have recently become a convert to Microdol, which has the potential to deliver a smoother negative with a wider tonal range. I like to expose the film for a push of about 1/2 of a stop for an effective EI of 600, then develop in Microdol at 75° rather than 68°. This produces a slightly thick negative with impenetrable shadows, but a gorgeous movie film type highlight quality. If you can deal with a rather difficult negative to print, the results are worth it. When my digital endeavors leave me cold, this is the combination that I come back to.

I scanned these negatives without making prints on a Minolta Dimâge Multi film scanner. In order to get a reasonable amount of shadow detail and sparkling highlights, I went with Ilford Delta 100 in Edwal FG-7 one-shot developer. The Provia film strip was added in Photoshop later.

Beautiful Portraits. When I'm looking to create a really stunning black and white portrait, I always turn to very slow film like Agfapan 25 or Ilford Pan-F. I prefer the Agfa stock, which sometimes is hard to get, because it has an amazingly smooth even contrast range that really suits headshots. The Ilford has a bit less shadow detail, but may appear a bit sharper. Either way, both films respond extraordinarily well to Agfa Rodinal. I like to mix the Rodinal at 1:25, develop at 68°, and go for extended development times with aggressive agitation. Developed in a good general purpose developer like Sprint Standard at 1:9 or D-76 at 1:1, they don't display any of the magic that Rodinal can give them. Be aware that lower dilutions like those recommended on the Rodinal bottle will produce impossibly flat negatives on slow film like this.

Be careful when using a heavily diluted developer like Rodinal. A very small mistake in mixing or a hotter temperature in the developer stage and you'll be faced with a negative with severely blocked highlights and rough pebble texture grain. Mixed and developed correctly, I've taken properly exposed headshots with Ilford Pan-F in a 35mm camera and made stunning 30x40' prints that looked as sharp as prints made from a 4x5" view camera. When shooting faster film, I use Rodinal diluted at 1:100, which produces a fine-grained image. However, this is not Rodinal's strong suit.

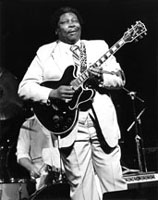
For this shot of BB King shot in the mid 1980s, I went with Ilford XP2 pushed to 800. Even pushed, the 8x10 prints looked very sharp and exhibited pretty fine grain.

Printing For Reproduction. When you're faced with shooting for reproduction, you've got to produce images that are of near-perfect contrast. Deliver-ing an overly harsh or terribly flat print to a service bureau or printer will invariably result in a printed piece that looks awful. Hard contrast is very difficult since it is nearly impossible to take a scan of a contrasty print and pump in any more shadow detail. On the other hand, a really flat print can be jazzed up in Photoshop, but the resulting noise in the image makes it look lousy. A print made expressly for exhibition will usually scan poorly since the deep shadows and solid blacks will block up.

For magazine and advertising reproduction I have standardized my studio and darkroom on Ilford Delta 100 developed in Sprint Standard developer. I like the Sprint developer. Because it is a liquid, you only need to mix what you need for that run of film and it lasts a long time in a half empty bottle. In addition, it is a nice combo with the Delta film, which can look a little blotchy in a really active developer like Rodinal. In a very even full-range developer like Sprint, the Delta becomes extremely even and smooth, with average grain and a good solid black. While not my first choice for really sparkling scenes, for studio product shots, corporate headshots, and general exteriors it just can't be beat. I'll expose the film a bit hot, develop normally, and make 8x10" prints on Kodak RC paper. Medium format negatives print very, very sharp with great blacks, tons of detail, and even, well-contained highlights.

Working In Low Light. While I have heard a lot of photographers complain about the C-41 processed black and white films like Ilford's XP2, I like it. Oddly enough, I like to underexpose it a bit and print with one extra stop of contrast dialed in on my enlarger head. While this tends to emphasize the grain a bit, it eliminates the number one problem of the C-41 films--inky blacks. While I don't do my own C-41, there are about 15 or 20 one-hour labs within a mile of my studio, so it is very easy.

If you want to use this stuff, you can simply have the lab make prints in their machine and you'll get black and white prints that look like a tinted D.W. Griffith film--a little green or maybe a little magenta. I prefer to have the one-hour labs soup only and give me back the film uncut. This way I can cut the film up into strips of five to fit into a slide page, rather than the strips of four the labs prefer.

For really good shadow detail in low light, nothing can touch a fine modern emulsion like Kodak T-Max in T-Max developer. Even in relatively flat light you can get a robust, punchy negative that will print on normal contrast paper with well-contained grain. I shoot this film mostly in medium format cameras and have my local lab soup it for me, since they do regular runs of T-Max chemicals. I have found the processing to be absolutely consistent, which makes it real easy to head into the darkroom and bang out perfect prints in a flash.

Perfect Scan Every Time. I have preached the joys of printing for digital scanning for some time, but now I usually prefer to scan the negative directly. While you can theoretically pull a lot more detail by skipping a generation--scanning the negative itself rather than a second generation print--in practice low-end to medium-end scanners do much better with reflective media prints. Since I have recently been using a Minolta Dimâge Scan Multi for medium format film scanning, I thought it might be interesting to see what kind of quality I could get if I scanned black and white 35mm negatives.

I had an assignment coming up for a major East Coast communications company, so I grabbed a few rolls of film and shot some tests. The assignment was to shoot a technician installing a fiber optic communications network and create a "filmstrip" effect by combining a series of black and white images within the frame work of a piece of film. Once I shot some tests and developed the negatives, I made contact prints by laying the negative pages flat on the glass of my Umax flat-bed scanner and made prints. I picked a few shots from each roll and loaded them in to the Minolta's filmstrip holder. To my great surprise, I got much better results from the film/developer combinations that didn't produce the least amount of grain. I got the best results from the negative that had the thinnest negative base. While the contrast and density of the images seemed the same, Ilford Delta 100 developed in Edwal film developer produced negatives with extremely clear film stock, which translated into a much sharper, clearer scan.

Once I shot the job on Delta 100, I developed all the rolls in Edwal FG-7 diluted at 1:3. To compensate for the inevitable contrast build-up of the Minolta scanner, I underdeveloped the film just a bit. The slight underdevelopment and thorough fixing also helped to create the very clear film base, which led to clear and crisp film scans.

If black and white has become humdrum for you as it had been for me, then maybe it's time to experiment a bit with your choice in film and chemicals. I'm not a big fan of gimmicky darkroom effects or instantly dated "look of the month" images, but a really persuasive black and white image always gets me going.

A good way to experiment is to stop by a well-equipped camera store and pick up a couple of rolls of every kind of black and white film that they normally stock. Nothing is better than a good excuse for a photo shoot, so try and take lots of pictures on different rolls of film under similar lighting circumstances. Once it's time to develop, try two or three different types of developers. Fine grain developers like Microdol and Ilfosol should offer a visible difference from active developers like D:76. The only way to see the difference is to make some decent prints on 11x14 or larger paper, since the higher magnification should really accentuate the differences in the grain structure, base fogging, and overall density level. While changing your film and developer regimen won't make a drastic difference in the quality of your images, it should get you excited about black and white again. In a world where color images are everywhere, I always need something to remind me how great a black and white print can be, and how a well-crafted black and white print can still be compelling.

X