- REVIEWS
Camera Reviews 
More Reviews Mobile Reviews Photography Reviews - GALLERIES
- VIDEOS
- BUYER'S GUIDES
Do It Yourself
Build Your Own Recessed Lensboards
For our project this month,
we will be making very inexpensive recessed lensboards for large format
cameras. As a commercially-made board of this type easily goes for over
$100 and our homegrown version costs about $10, I especially want to
point out its cost advantage as well as the simplicity of materials
and assembly. The project can be done easily in an afternoon by anyone
with a modicum of do-it-yourself skill and classifies as a Level 1 undertaking
as defined below. |
|||
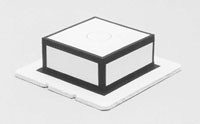
Foamcore is remarkably strong and durable if properly glued and taped. Although all-black foamcore makes for easier light-proofing of the finished lensboard, I made this one from the white and gray version to better show structural details. Measure the shutter mounting thread before boring its hole in case it differs from the now standard Copal No. 0, 1, and 3 sizes. You may need to glue thin sheets of model airplane plywood (available from a hobby shop) to the back and inside bottom of the well to make harder surfaces onto which to tighten the jam nut and shutter housing of a heavy lens. All edges must be cut straight and even (a sharp art knife and sturdy steel straightedge are a must), glued securely and covered completely with black photo tape. Coat all exposed foamcore with white glue to seal in loose particles. Light-proof the board with two thin coats of flat black paint on the inside and one on the outside, then topcoat the outside with Krylon or other protective spray. A Dremel MultiPro rotary tool and No. 561 bit ((800) 437-3635; www.dremel.com) is great for cutting the mounting hole, and while this step can be done with a knife, this miniature power tool system makes it and countless other do-it-yourself operations a snap. Whether cutting manually or with power, practice first on scrap to develop a steady, confident hand. |
|||
Foamcore is remarkably strong and durable if properly glued and taped. Although all-black foamcore makes for easier light-proofing of the finished lensboard, I made this one from the white and gray version to better show structural details. Measure the shutter mounting thread before boring its hole in case it differs from the now standard Copal No. 0, 1, and 3 sizes. You may need to glue thin sheets of model airplane plywood (available from a hobby shop) to the back and inside bottom of the well to make harder surfaces onto which to tighten the jam nut and shutter housing of a heavy lens. All edges must be cut straight and even (a sharp art knife and sturdy steel straightedge are a must), glued securely and covered completely with black photo tape. Coat all exposed foamcore with white glue to seal in loose particles. Light-proof the board with two thin coats of flat black paint on the inside and one on the outside, then topcoat the outside with Krylon or other protective spray. A Dremel MultiPro rotary tool and No. 561 bit ((800) 437-3635; www.dremel.com) is great for cutting the mounting hole, and while this step can be done with a knife, this miniature power tool system makes it and countless other do-it-yourself operations a snap. Whether cutting manually or with power, practice first on scrap to develop a steady, confident hand. |


![]()
Get the Latest Photo Tips, News & Reviews from Shutterbug!
| Camera Reviews Other Reviews | Mobile Reviews Photography Reviews Columns | News | Features | How-To | Resources |
 © 2025 Shutterbug
AVTech Media Americas Inc., USA
All rights reserved