Do It Yourself
Build An Underwater Camera Housing

Because of its fast and easy operation, and multiple autoexposure modes, a modern autofocus SLR is the camera of choice for our DIY underwater housing. The only requirements are that it pass the "bathtub test" and accept an electric remote release. Use a zoom or fixed focal length lens no shorter than 35mm.
Photos © 2001, Tom Fuller, All Rights Reserved

I've been thinking about this month's project for years, but its complexity kept me from presenting it until now. The features of current AF SLR cameras allow the design to be greatly simplified and made practical for the home workshop but, because a high degree of accuracy is required in construction and a drill press is needed, I'm declaring it a Level 4 project. For those who just joined us, Level 1 takes only everyday items and the ability to assemble, say, a plastic model kit. Level 2 requires basic hand tools and the skill to perhaps build a small birdhouse from scratch. Level 3 uses home improvement tools and the hands-on savvy to install a wall thermostat, with Levels 4 and 5 reserved for mechanically nimble readers who might enjoy putting in their own car sound system or overhauling their brakes.

Disclaimer: Please Read
The project is intended as a design starting point, rather than a housing for a specific camera, and as such can be adapted to fit your needs.

With an AF SLR, the only required control is the AF/shutter release button. Control exits are frequent leakers on underwater housings, but our simple push-to-focus, push-harder-to-release button solves the problem. A large flat washer holds a rubber gasket disk over a hole in the side, beneath which is mounted the remote release.

However, the many variables involved in materials, construction, and use prevent the author and/or Shutterbug from accepting any responsibility for water or other damage to your equipment should the project fail in any way. Please read the entire article carefully before beginning, and test the finished housing as described before taking it underwater with your camera inside. As these variables also make a maximum safe operating depth impossible to determine, consider it a shallow-water (20 ft or less) housing unless your tests prove otherwise.

Project Setup
The housing is basically a box made from common boards, covered on both sides with 3/16"-1/4" clear acrylic. Sealing is provided by gaskets made from sheets of 1/16" red rubber, used for a variety of plumbing tasks and found in well-stocked hardware stores. Hanger bolts, screwed into the edge of the frame, receive wing nuts and flat washers that hold each "port" tightly in place. A parts list is not provided because your housing is likely to differ in size and shape, but all items are inexpensive and easy to find. I highly recommend stainless steel or brass hardware, as even plated steel will soon rust.

Drill the holes for the #10 hanger bolts with a drill press, rather than a handheld power drill, so that they will run straight into the housing. The wing nuts and washers that hold the ports in place will not seat properly against the acrylic if the hanger bolts are not straight, and the housing may leak.

Tub Test
Before engaging in any tool play, use your bathtub to make sure the autofocus system of your camera functions underwater. Set up the test as shown in Diagram A, being careful that nothing tips, overflows, or otherwise goes awry and dunks the unprotected camera. The test container must have a flat clear side that will be parallel to the front of the lens. Use a lens no wider than 35mm (or a zoom set to 35mm), and load the camera with a 12-exposure roll of C-41 film. Be sure that the container is heavily weighted with bricks or other objects so that it does not capsize when the tub is filled.

The first test is done with the tub dry. Place a folded washcloth in the container so that the camera and lens rest evenly against the bottom. Set the camera to aperture-priority auto mode, open the aperture all the way, turn autofocus on and connect the remote release. Take a picture of the test target by existing light, not flash. (Program mode is likely to activate the built-in flash of many cameras.) Be sure not to jar the camera or container during exposure and blur the image.

The second test is done with the tub filled. Keeping everything as before, make another exposure of the target. Run the film to a minilab and examine the prints. Both should be in sharp focus and correctly exposed, although the target in the underwater shot will appear closer, as if taken with a 50mm lens. (This is caused by refraction differences between air and water.) If the underwater image made with a zoom lens is out of focus, add a +4 close-up lens and repeat the underwater test.
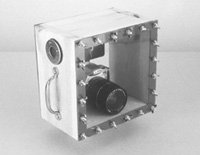
Sand the front and rear edges of the housing before varnishing. As both are gasket surfaces, they must be flat, smooth, and even to prevent leakage. Tape sheets of medium-grit sandpaper to a hard work surface and apply even hand pressure to all four sides.

The Housing
If your camera passes, measure it carefully and construct the housing as shown in Diagram B. Be sure it is deep enough so that the end of the lens does not extend beyond the front edge when focused at its closest distance. With the rubber eyecup removed, the viewfinder eyepiece must be very close to the rear edge but not protruding. Allow room on the side of the camera for attaching and removing the remote control plug, as well as space on top for the pop-up flash.

Build the housing from sound, unwarped wood. Carefully cut and fit the pieces so that the joints are without gaps, and glue them thoroughly keeping all edges even. Drill a 5/8" hole for the remote release and, being mindful of the earlier positioning considerations, a 5/16" hole for the camera fastening screw. These are the only holes that go all the way through--all others (handle screw holes, etc.) must not penetrate the housing as in Diagram C.
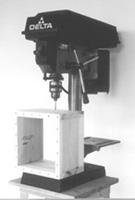
Because it is difficult to see the corners of the camera viewing screen through the eyepiece when wearing a mask, lock subject focus using the AF target zone in the center of the screen, then quickly move your eye to an external viewfinder (here a 35mm finder for Nikonos) for composition. As object size is skewed underwater, some trial-and-error shots will be needed for accurate "eyeballing" of the subject within the finder. This housing design can be modified as desired, with the finder mounted inside or out. Be sure the camera is turned on and that program (or one of its other automatic modes) has been selected before tightening the wing nuts evenly. A weight may have to be attached to the bottom for neutral buoyancy.

Acrylic Sheets
Without removing the protective paper from the acrylic, cut two sheets to fit the outside dimensions of the housing. Using one as a template, mark the hole positions for the evenly spaced #10 hanger bolts. Mark a hole in each corner, then space the others no more than 2" apart. However, before drilling a 1/4" hole at each mark, check to see that all are located such that the hanger bolts, when installed, will be in the center of the housing edge.

Using a drill press, drill the acrylic with a sharp bit. (A scrap of board beneath it minimizes the chance of cracking.) Align the sheets on their respective sides of the housing and trace the hole pattern onto the wood. Drill the proper size hole for the wood screw thread of the hanger bolts. The hardness of the wood will dictate the exact drill bit size for a tightly threaded fit, but it will definitely be smaller than the 1/4" acrylic clearance holes.

The Gaskets
Cut the gaskets from 1/16" rubber with a sharp art knife. Each must be a continuous square or rectangle, not made from individual strips, to seal properly. Using the acrylic again as a template, mark the holes on the rubber and punch each cleanly through with a paper punch. Make a spare set of gaskets while you're at it, and save a 4x4" piece of rubber for the AF/shutter release seal.

Marine Varnish
Give the housing several coats of marine varnish inside and out. Follow the label directions, as some manufacturers recommend a thinned base coat followed by full-strength top coats. Temperature and humidity affect drying time considerably, so be sure each coat is dry before applying the next. Cover the joints thoroughly, and use a cotton swab to saturate the inside surface of the camera mounting and remote release holes. Sand the housing edges gently between coats to maintain the smooth, flat gasket surface.

Leak Test
Before using your housing with the camera inside, try this simple-but-effective leak test. With everything dry--housing, hardware, and hands--stuff the housing with loosely crumpled toilet tissue. Place a flat washer and wing nut on the inside end of the camera fastening screw to hold the neoprene washer tightly in place, and attach both ports securely, applying a light coat of silicone grease to the acrylic/gasket joint. Take the housing down about 20 ft for at least 10 minutes, bring it back up, rinse with fresh water and let it dry completely. Back in a dry environment, remove the tissue and examine it inch by inch for water damage.

After Use
In regular use, rinse the housing with fresh water immediately after each dive and let it dry before opening. Examine the gaskets, camera fastening screw washer, and ports for cracks, wear, and/or deterioration, and replace as needed. Remove the gaskets at the end of the day to prevent moisture from softening the varnish beneath, and touchup deteriorated varnish spots promptly. Apply silicone grease sparingly to keep it from spreading onto the lens/viewfinder area of the ports. Remember, the performance and dependability of this do-it-yourself project is entirely up to you, so proceed with common sense. Enjoy!

X