The Digital Darkroom
Using Photoshop Styles
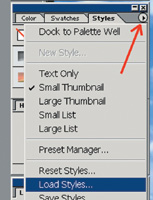
As some of you may already know, when you install Photoshop not all of the application is immediately loaded. There are many features and options that require further attention to become accessible. Photoshop "Styles" is one of those features. This article uses screen captures from Photoshop Version 7.0, but much of this information also applies to previous versions. Find the Styles Palette over on the right-hand side of the Photoshop window (#1). |
|||
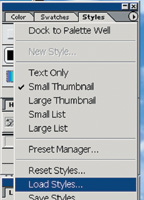
Click on the Styles tab to bring the Styles Palette to the front (#2). |
|||
Now, look in the upper right-hand corner for a little circle with an arrowhead in it. See the red arrow (#3). |
|||
Click on that little arrowhead and you will get a fly-out menu. Select the menu item Load Styles (#4). |
|||
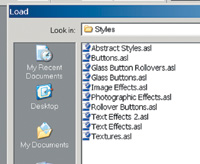
When you click on the Load
Styles menu item, you will get a window showing the 10 different Styles
that are already on your hard drive, but not yet loaded into the application
(#5). |
|||
Click on the first Style (Abstract
Styles.asl) and it will be loaded in. Return to the Load Styles menu item
and load the next Style, Buttons.asl. Continue loading until you have
loaded all the Styles. With all the Styles loaded into the application,
the Styles Palette will now look something like what's shown in
#6. |
|||
Here's how: |
|||
I have typed "PhotoShop Styles" onto my blank canvas (#8). I have used the font called Arial. I have also selected "Bold" and set the font size to 50 pt. All of these settings are in the tool bar at the top of the Photoshop window. |
|||
Next, I wanted to create several additional copies of the text so that I could apply a different Style to each of them. To do that, go to the Layers Palette in the lower right-hand corner of Photoshop and click on the highlighted Layer containing the text that you have just written and drag the Layer down into the little symbol that is just to the left of the trash can at the bottom of the Layers Palette (#9). |
|||
Now, go back to the blank page
and using the Move tool, drag the copy of the text layer that you just
created in the Layers Palette down below the original text that you typed
in. If you repeat this process several times, you'll wind up with
the same words repeated several times on your blank canvas (#10). There
are other ways to get multiple copies of the same words onto the blank
canvas, but this works for me. |
|||
Now, this is the fun part.
Go to the Layers Palette and click to highlight one of the Layers of text.
It will be to that highlighted Layer that we will now apply the first
Style. |
- Log in or register to post comments


