The Digital Darkroom
Retouching Eyeglass Glare With Photoshop Version 5.0

Photos © 1999, Darryl C. Nicholas, All Rights Reserved

Remember the old days when retouching eyeglass glare meant sending the image out to a retouching artist or, if you did it yourself, spending about an hour or more with wet dyes carefully blending colors and carefully adding dye in thin layers to gradually build-up the density? Well, those days are gone forever for this photographer. Now, I do all of my eyeglass retouching on the computer with Adobe's Photoshop V5.0. It takes a fraction of the time, and the quality is superior to anything that I was ever able to do with wet dyes. You do not need to be an artist to perform perfectly great retouching on a computer. If you're smart enough to learn how to operate a camera and take pictures, you can learn how to use a computer for digital imaging.

Here's how I handle a typical job.

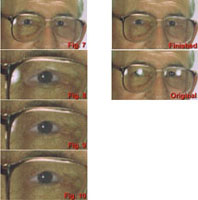
The secret to all retouching is to do the work on a large "work print." In the old days, major retouching was always done on a large, 16x20 or, in some cases, a 20x24, work print. Today, with computers, we do the same thing. Using the Navigator control in Photoshop V5.0 (PS-5), you first enlarge the image. I usually take the image up to just before you can start to see individual pixels on the screen. If you were working on an 8x10 size print, such magnification becomes the equivalent of a work print measuring 40 or 50" wide. At that magnification it becomes a lot easier to make the tiny, incremental changes that are used when performing the work. In Figure 1 you can see the man's left eye showing the glare that was produced by the twin umbrellas used to make the original exposure.

Next, I used the PS-5 Clone Tool (sometimes called the Rubber Stamp Tool). I select a brush size with a diameter that is a little less than the radius of the glare. Then, using standard Clone Tool techniques, I begin to nibble away at the edges of the glare. Notice in Figure 2 I have removed part of the glare that occurs on both sides of the eyeball. I have also removed one of the two catchlights, leaving the one catchlight that occurs at about the 3 o'clock position on the eyeball. In Figure 4 I have completed the task of removing all of the glare on both sides of the eyeball. And, in Figure 3 you'll notice that I have added in a lighter tone value where the white of the eye should be.

The white of the eye is pretty much obscured in the original image by the glare. In order to restore the white of the eyeball, I simply selected a very tiny brush and picked up some of the very light tone value that occurs in the area of the frame of the eyeglasses. I cloned this lighter tone value into the area where the white of the eye should normally be. Then, by reducing the opacity of the Clone Tool and frequently changing the selection sites used by the Clone Tool, I was able to blend the lighter tone value with the surrounding skin tones. Finally, I used a very tiny brush size, picked up some of the darker tones occurring in the pupil of the eye and used those darker tones to draw a bit of an outline where the upper and lower eyelid edges should be.

Again, I used a reduced opacity setting for the Clone Tool so that I could smoothly blend the outline that I was drawing with the surrounding skin tones. I also had to frequently change the selection site for the Clone Tool as I worked. The finished results of all of that work are shown in Figure 3. By then using the Navigation Tool and reducing the magnification back to normal, you can see the completed left eye in Figure 4.

I had worked on the man's left eye first because it required the least amount of drawing in order to complete the restoration. Most of the left eye work was simple Clone Tool work. Only a little drawing had to be done to draw in the areas where the white of the eyeball occurs. But, the man's right eye would require a lot more drawing since more of the actual eyeball has been obscured by the flash glare.

I try to avoid doing any more drawing than necessary. I like to "copy and clone" wherever possible. It is simply easier to be more accurate, and it is a lot faster. Since the human body has a certain amount of symmetry, it is frequently possible to take something from one side of the body and copy it over to the other side of the body. That is what I have done in this case. Notice in Figure 5 I have used the Lasso Tool to freehand-draw a loop around the man's retouched eyeball. Then, go to the Edit menu and pull down to Copy. This will copy the selected eyeball to the Clipboard. Next, go to the Edit menu and pull down to Paste. That will paste a copy of the selected eyeball back into the picture. But, the eyeball will be the left-hand version, and what we need is a right-hand version. A right-hand version can be obtained by simply flipping the pasted-in eyeball over. To perform this inversion, go to the pull down Edit menu, then to Trans-form, then to Flip Horizontal. The pasted-in, left eyeball will flip over and become a right eyeball. See Figure 6. All you have to do then is drag it into position. See Figure 7.

If you have a little problem in deciding when the eyeball is in the correct position, you can cause the pasted-in eyeball to become semitransparent. That will allow you to see through the pasted-in "patch" while you position it more carefully. The pasted-in patch of an eyeball is on a "layer."

Go to the Layers Pallet and at the top is an Opa-city setting. Normally the opacity will be set to 100 percent, but for this operation you can set it down to 30 or 40 percent. That will allow you to see through the layer well enough to know exactly where to position the pasted-in eyeball. When, you are satisfied with the position, return the opacity setting to its normal 100 percent. Then, in the Layers Pallet perform a Merge to merge the layers down. Once the eyeball patch has been merged into the surrounding area of the face, you will have an image that looks like Figure 8. The edges of the patch are obvious and need to be blended into the surrounding skin tones.

The blending is easy to do with the Clone Tool. In Figure 9 I have performed most of the blending. As with all use of the Clone Tool, you need to frequently change the selection site and brush size as you work. Finally, in Figure 10 I have completed the blending and the removal of the last little bit of glare from around the edges of the eyeglass frame. Notice in Figure 10 that the catchlight is at the 9 o'clock position on the pupil. It needs to be moved over to the 3 o'clock position so that it will correctly match with the other eye. Use the Clone Tool to move the catchlight. Now, compare the finished image with the original image.

Sometimes when you copy one side of a human and then flip it over to restore what might be missing on the other side, you might run into a bit of a perspective problem. There are ways to deal with such problems. Once the patched-in part is on a layer by itself, such as our eyeball back in Figure 6, you can do a lot of neat tricks with it. Under the Edit menu, you can go to Transform and then select one of several tools such as Skew, Perspective, or Distort in order to create just the right look to the patched-in part that needs to match the other side of the person. Once the patched-in part has the correct look, merge its layer into the main image and then cleanup the edges with the Clone Tool as I did in Figures 9 and 10.

If you'd like more help with digital imaging questions, write to me care of Shutterbug.

X