The Britek Dayphoto Lighting System

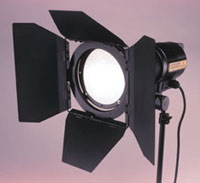
The Britek Dayphoto 5000 head is a substantial piece of gear. While the clamping system is awkward and unbalanced, the included heavy-duty barn doors and rugged construction make this the ultimate continuous light bargain.

In the quest for the perfect digital image I have learned an awful lot. Besides learning more than I ever hoped to know about ROM, RAM, Cache, and SCSI, I have learned way too much about continuous lighting. Continuous lighting, as the name suggests, is good old-fashioned light from light bulbs or the sun. Since light from the sun is hardly controllable, light bulbs of all sorts are the next best solution.

There was a time when continuous lighting was the norm even in the still photographer's studio. Large 1K, 2K, and 5K movie lights, often focusable Fresnel lights, were common items in the pro studio. When I first started out, I assisted a well-known food photographer in New York. He owned enough giant Kliegl lights to recreate Gone With the Wind, let alone shoot a plate full of pasta. While it seems funny today, he had plaster molds made of most foods, so they could withstand hours under the hot lights. Even though flash was the standard lighting source of the day, this guy knew how to do things with hot lights, and he was damn sure he wasn't going to change.

While a stubborn artist may have been charming 25 years ago, today an attitude like that will get you a quick trip to the exit of almost any Art Director's office. It's tough out there, and it's adapt or be eaten. While I've taken a lot of steps toward changing my own photographic technique to compete, the digital photography technology of today has required me to learn this entirely new way to light people and products.

Here is the ballast unit, which provides power for the head. There are two speeds--on and off. You'll need to wait about 15 minutes after turned on for the lights to stabilize, and 20 minutes after turning the unit off before it can be turned on again.

Since I use a scanning camera back that actually moves a thin wand of pixels across the film plane, I need a steady even form of lighting. I blew my entire budget on the camera, computer, software, and monitor, so I didn't have a lot of dough left over for a fancy lighting scheme. My first idea was that I would use the 250w lamps in my flash heads, since that seemed like a lot of light to me. I had used the modeling lights on a few jobs with some tungsten film and got a decent exposure of f/16 at 11/2 sec. Guess what--a scanning camera steps the CCD across the image, and my camera can shoot an 8500 pixel wide image. Even a reasonable 3500x3500 pixel image would require 3500 separate 1.5 sec exposures, for an unbearable hour and a half scan. Even with the lens wide open I was looking at some slow scans. Wide open I was looking at 13 minute scans, so I quickly torpedoed that idea.

While a 250w lamp is plenty for a modeling lamp, as a source of lighting it was woefully inadequate. My camera maker informed me that with a good light source I should expect 2-3 minute scans, rather than the painfully long scans I was getting. I figured that it was back to the drawing board.

A quick trip to my local pro photo shop started my lighting education. "You don't need bright tungsten lights," screamed my salesman. "You've got to get HMI lights." HMI? What in the world is HMI? He gave me a brochure from a California based movie supplier, and I did a little homework. HMI lights are based around a metal halide filament which must be excited by a ballast. The concept is similar to high intensity Carbon Arc or fluorescent lights. HMI lights had a few very interesting facts that made them perfect for the movie industry. First of all, they were very close to perfect daylight-balance, often ranging from 5200-5600K. This meant that heavy filtration was not needed, which would rob a lot of light and cause inconsistent results. Secondly, they ran very cool, reducing the heat on the set. This was a big plus for the "talent" as well as for the accountants who paid the electric bill. Last but not least, they punched out a boatload of light. "Don't be surprised," my photo shop pal warned me, "if a 575w HMI blows away a 2000w tungsten light."

Since I couldn't afford HMIs, I bought some 600, 1000, and 2000w tungsten lights. With 10,000w of tungsten, I figured that I was all set. Well, a scanning camera back is a demanding beast, and the best I could muster in most situations was an f/stop of f/11 and a total exposure that lasted almost eight minutes. Stopping the lens down to get some decent depth of field gave me unbearably long scans, and shorter scan times required horribly thin depth of field or software curves that created too much image noise. It started to dawn on me that maybe I should try HMI lighting.

Last year I got my first taste of HMI lighting when I reviewed the spectacular Briese line of lighting from Germany. While the 1200w Briese HMI blew me away, so did its price, nearly $7000. I looked at excellent systems from Profoto and Broncolor, but they too ran into the thousands of dollars. After I had the Briese gear in my studio, my tungsten lighting has been like a poor cousin. Not only is it hot, inefficient, and hot, (did I mention hot?) the wall voltage in my studio varies just a little bit during most scans. This required that I invest in three very large voltage stabilizers that would nail my power down to 110v with hardly any variance. A recent catalog of fine jewelry was extremely difficult since the brutally hot tungsten lighting had to be brought in very close to the jewelry. The hot movie lights actually overheated my camera and blew out a circuit board. Since I don't often do these kinds of macro shots with the digital camera, I hope this won't be an issue again, but the heat issue is a real one.

Recently I heard that a company called Britek was planning to bring out a very affordable HMI lighting system called Dayphoto. A quick flip through the pages of Shutterbug reminded me who Britek was. You know those little AC powered slave flashes that screw into a normal light socket? Well, Britek has made a living with those flashes, as well as a catalog full of reasonably priced lights and lighting accessories. An assistant reminded me that I actually owned some Britek lights, their small AC powered 200 ws studio lights, which we sometimes took out on location as emergency back-up units. After years of travel they all still worked like new. (In fact a few assistants shot their portfolios with those flash units.) While I had my doubts about a solidly pro-oriented piece of equipment from Britek, I arranged to get a few evaluation units.

When the lights arrived, I have to say that I was pleasantly surprised. While there were the telltale signs that this was equipment designed and manufactured in Taiwan rather than Stuttgart, like misspelled words on the warning labels ("Lighting Systen" and "USA Authrized") and a poorly designed clamping system, this was clearly a substantial piece of equipment. Britek sent along a 200w and a 500w unit. Since I am used to HMI lights based around the European standard Osram bulbs, which are 575 and 1200w, wattage ratings of 200 and 500 were news to me. A quick peek under the hood confused me even more. The 500w unit was loaded with an Osram 400w HMI bulb, the 250 with a Japanese 200w bulb. Curious. Britek claims that the unit's light output in lumens correspond to 250 and 500w units, but they sure looked like 400 and 200w bulbs to me.

Wattage clarifications aside, both units really looked well put together. Each lamphead has an integral reflector, clear heat absorbing front glass, and a standard cine style clamp accessory system. The large unit had the same 81/2" diameter accessory mounting system as one of my other units, so Chimera light boxes fit on beautifully. The heads are molded of sturdy black polycarbonate with a somewhat awkward steel mounting clamp. Heavy cables and rock solid locking electrical connectors inspire confidence. The whole effect is of a thoroughly professional unit, in spite of the tacky yellow labeling.

The ballast units are actually quite neat looking. A molded yellow central section and charcoal colored end caps give the units a vaguely European look, and the molded carrying handle is practically indestructible. There are indicator lamps for main power and lamp start as well as a main power switch. There is a definite procedure to start up an HMI, and without the right procedure you can ruin the bulb. While my early production units had no Owners Manuals, I had been around the block with HMI lighting before, so I soldiered on.

With the head cable screwed into the ballast, the next step was to power up. I turned the switch on the lamphead to the "on" position, then fired up the main power. True to form the bulb sputtered to life, then began its 15 minute process of "warming up." Once the bulb is fully warmed, it should yield perfectly stabilized lighting for the life of the bulb, which in this case is around 500 hours. I hung a medium Chimera softbox on the 500w unit and used the 250w unit direct. After a few test scans I realized that this was a magnetic ballast unit, not an electronic ballast one. Electronic ballast units allow the lamp to be dimmed, usually allow hot restrike capability, and are completely flicker-free. The less expensive magnetic ballast units won't allow a hot restart (if you shut the unit off you must wait the 15 minutes for it to cool before restarting the ballast), won't allow any light attenuation, and most importantly flickers at the rate of the incoming power. This means that the output of the light is cycling at 60 beats per sec. While this has no bearing on still photography with film, for movies, video, and digital scanning cameras this can be a factor. I found that "line times" of 1/80 of a sec or slower did create a noticeable flicker in the images, but everything greater than that looked great. I would have liked to have seen an electronic ballast version for comparison sake, since sometimes you just need a fast scan, which is practically impossible with a magnetic ballast HMI.

Once I had an exposure dialed in, I shot a few digital images, and I have to say that these lights performed beautifully. While the color temperature of the 2500 is spot on, the 5000 needed a bit of filtration. I added a very thin red filter on the 5000, which brought the color temp back to 5600K. After 10 or 12 exposures I realized that something was different in the studio--it was a lot cooler. The HMIs ran about as cool as a high output fluorescent. Even after several hours the props in my tabletop setup were cool to the touch. Better even than the cool running was the phenomenal efficiency. Just like the expensive Briese lighting, the affordable Briteks annihilated tungsten lighting as far as exposure times. While a daylight filtered 1000w tungsten lamp required an overall exposure of 1/4 of a sec at f/16 with my scanning back, the Britek Dayphoto 5000 required only 1/60 of a sec. Yes, that's four f/stops. Since the rule of thumb is that HMIs produce 4-8 times as much light as halogen or tungsten lighting, the Britek was right in the ballpark.

Since the HMI light output is already very close to daylight, there are very little hardware or software corrections necessary. This creates very clean scans with remarkably little dark noise. True to form, the Britek Dayphoto lights were absolutely perfectly regulated. Even 149MB scans of gray seamless paper revealed absolutely no dark stripes or banding. A most impressive performance, and one that requires $1000 regulators on my 2000w tungstens.

Even when used for traditional photography these HMI lights shine. While hot lights require heavy blue filtration or tungsten-balanced film to balance with daylight, HMI lights are almost exactly daylight-balanced. Photographers who like to blend daylight with studio lighting might consider this is a dream system. (Though I wouldn't mind adding an 81B filter for daylight-balanced transparency film.)

While there are certainly better engineered and constructed HMI lighting systems out there, they are many thousands of dollars more than the Britek Dayphoto system. With a direct price of only $795 for the 500w ballast, lamphead, HMI bulb, light stand, softbox, filter frame, and heavy-duty barn doors, you can't touch this value. The 2500 is only $588.95, and includes the same kit. Britek also will be offering a 200w unit which should compare favorably to 600w tungsten lighting at only $449.95. Britek says that they are working on a super high output 1200w unit as well, and electronic ballast units may be on the horizon, also. (At slightly higher prices of course.) While I have serious reservations about the flicker of these lights for scanning camera usage, the other benefits and the great price makes them really attractive.

Whether you shoot film, video, or digital, HMI lights have a lot of benefits. Having seen the beautiful light quality of expensive units like Briese, Profoto, Broncolor, and K5600, I have longed for HMI lights of my own. The Britek Dayphoto lighting system is an answer to a lot of digital photographer's prayers. For the studio photographer, this gear looks heavy-duty and rugged enough, and you sure can't beat the price.

For more information contact Britek, 12704 Marquardt Ave., Santa Fe Springs, CA 90670; (800) 925-6258; (562) 404-0593; (562) 404-0852.

X