- REVIEWS
Camera Reviews 
More Reviews Mobile Reviews Photography Reviews - GALLERIES
- VIDEOS
- BUYER'S GUIDES
The BEST Lightroom Tool That Almost NOBODY Uses (VIDEO)
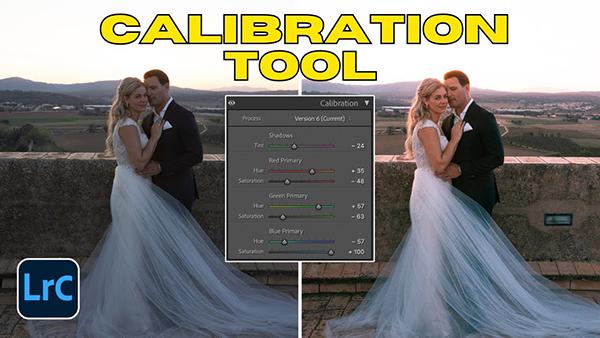
Lightroom is so jam-packed with features that it's easy to overlook a few powerful capabilities when devising your personal workflow. In the quick tutorial below you'll learn why one accomplished pro says, "The Calibration panel is "the best tool for editing photos quickly and beautifully," and today he demonstrates how easy it is to use.
Instructor Roy van der Wens is considered one of the most notable wedding photographer in the Netherlands, with a unique style he developed by shooting fashion. He says some photographers shy away from the Calibration panel because "it scares them off," but insists you can transform any photo into a profession edit by following the straightforward advice he provides in this seven-minute lesson.
It won't take you long to realize that Roy's self-taught workflow is as unique as his imagery—with the goal of making image-editing as fast as possible without sacrificing the quality of his results. And Lightroom's Calibration tools are at the heart of his process. He provides a trio of examples to demonstrate the necessary settings so you can get started today.
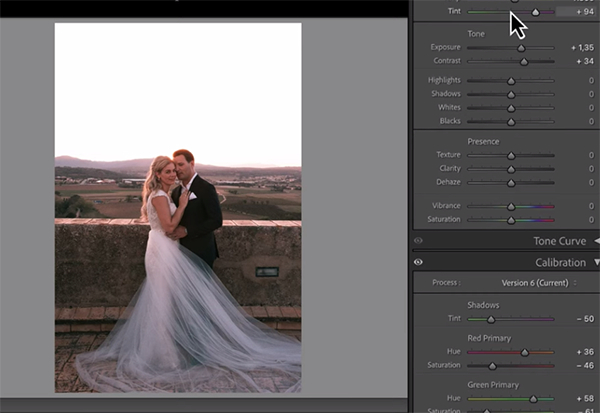
The Calibration hack he explains gets the job done "almost instantly" without touching any of Lightroom's more popular tools. As you'll see, Roy's original photos are intentionally somewhat dark, especially when shooting outdoors, for several reasons that he explains. And that's why he always employs the Calibration panel, while ignoring common tools involving White Balance, color grading, the Color Mixer, and the Tone Curve.
The beautify of Roy's unique approach is that it works wonders with just about any photo you shoot—even nature and landscape images. He jumps right into Lightroom's Calibration panel and shows how the magic occurs by simply moving four or five sliders depending upon the specific image at hand.
He notes that this approach "works at the pixel level" which is why it has more impact on a photo than the tools you may be employing in the workflow you developed. Along the way he illustrates how to modify the look and mood of a photo depending upon the effect you want to create.

If the images you're working on came from the same shoot under similar conditions, there an easy way to retain the setting you used on the first photo you processed and copy them over to the others to save time. And any necessary tweaks to perfect images in the sequence can be quickly accomplished.
The photos you see in this demonstration were shot for wedding clients, but don't hesitate to try Roy's quick trick on whatever types of images you capture on your next outing. Then pay a visit to Roy's popular YouTube channel where you'll find more helpful shooting and editing tips.
We also recommend taking a look at the tutorial we posted recently in which an acclaimed landscape photographer demonstrates his four-step Lightroom workflow that delivers perfect results every time.


![]()
Get the Latest Photo Tips, News & Reviews from Shutterbug!
| Camera Reviews Other Reviews | Mobile Reviews Photography Reviews Columns | News | Features | How-To | Resources |
 © 2025 Shutterbug
AVTech Media Americas Inc., USA
All rights reserved