Automated Color Correction
Getting Idiot Proof Color Every Time

Then setting the new values. I like R-252, G-250, and B-250. That's a slightly warm white that won't blow out. For black I also like a warm tone and I always set the following: R-12, G-6, B-4. This allows the blacks to print without clogging up too much. I like to leave gray at R-127, G-127, B-127. This assures that my mid tones aren't too warm, which will result in ruddy skin tones.
Photos © 2002, Jay Abend, All Rights Reserved

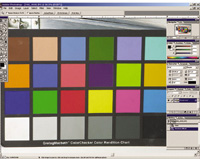
Here is a very easy and effective way to dial in accurate color on every outing. To do so you will need some basic tools. First of all, you'll need a camera that allows you to set White Balance manually. No, you don't need a "Set WB" control, just a means to dial in the basics: Daylight, Tungsten, Fluorescent, etc. Second, you'll need a color chart with black, white, and gray. I have alternately used the famed Macbeth Color Chart, as well as the small and inexpensive Kodak Step Wedge charts. I also have a small chart that I made myself that I always keep in my camera bag. It's three small paint chips from Benjamin Moore's paint sample charts. I chose the purest white, a neutral gray, and the darkest flat black. (Never use computer paper for setting white since it is often "blued" with bleach to look whiter.)

Here is how we create our calibration file. Since I use Adobe Photoshop 6 exclusively that's what I am using to illustrate the process. Once the file is open you'll need to access the "Levels" or "Curves" dialog box. Both share the same set of white, neutral, and black settings. From the factory most image editors ship with 255-255-255 for white and 0-0-0 for black. That's too wide a range for most output devices. You can reprogram them by double clicking on the white point tool.

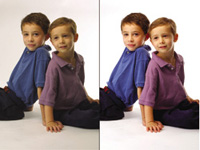
Here is the concept: For every distinct lighting condition in which you work you will create a "calibration image" first, using your color chart. You'll use your image-editing tools to set your black, white, and gray points, create a color adjustment file, then use that file to correct all the images you have shot. Sound complicated? If you're just out on the town banging off images it is in fact way too time consuming and complicated. However, if you plan to shoot a series of portraits or a set of images under identical lighting conditions you can use this technique for near perfect color.

Once the uncorrected image is open we simply apply the setting and the image adjusts automatically. To apply the correction to all the images in a folder we simply click "Automate-Batch Process," choose the folder and the action, and Photoshop will auto correct all of the images. As you can see from these two images the original image (left) is flat, slightly off-color and displays a pale and muted skin tone. The corrected image (right) looks vibrant and realistic. I applied the same saved setting to all of the images I shot and color is consistently good. Of course slight variations in exposure and lighting will require some fine "hand tweaking" on each individual image, but this idiot-proof batch process technique is an excellent way to get a large batch of images into order very quickly.

How Digicams "See" Color
First, some background. Modern digicams utilize a default mode of color balancing images. Unlike a film camera, where it is assumed that the color lab is applying an auto color balance method, digicams try to get it right in the camera. Most schemes involve automatically trying to balance the overall scene to the standard 18 percent gray that most photo printers use. Some try to find the brightest point in the image and make it "white," while others look at the shadows. Regardless, it is a very imperfect method. What makes more sense is to shoot an image with a clean white, neutral gray, and solid black. Once you know that these colors are exactly what they should be, you can balance the image back to a very natural color sense.

As you can see from this image, the corrected chart (bottom) displays a clean white, neutral gray, and solid black. That's what we want--a relatively balanced scene with maximum dynamic range.

Here's a step by step guide to creating automatic perfect color.

X