can you make a article about counter strike 1.6 cheats ?
10 Handy Digital Tips Page 2
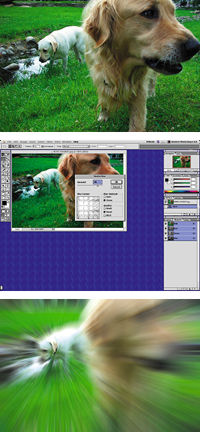 6. Zoom Explosion
 One fun photographic special effect is the zoom explosion, produced by zooming a zoom lens throughout its range during a one- or two-second exposure. The problems with this technique are (1) some cameras (including most point-and-shoots) won't let you zoom the lens during an exposure; and (2) the zoom effect thus produced is always centered.
Photoshop's Zoom filter lets you add this effect to any photo, and also lets you position the effect anywhere in the image. To do it, under the the Filter menu, drag down to Blur and select Radial Blur. In the window that appears, choose Zoom under Blur Method, start with an Amount of 80, and click in the Blur Center window where you want the effect's center to appear. Then just click OK, and watch the result.
This effect works best with subjects that contain strong color contrast, or good light/dark contrast—it's not very effective with low-contrast images. As with other digital effects, if you don't like a result, just Undo it, and try something different. Photos by Renee Chodor
 7. Package Prints
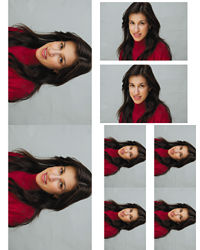
 Photoshop (along with other image-editing and printer-driver software) offers a neat feature that lets you print the same image in various sizes on a single sheet of paper. Just open the image you wish to package-print, drag down to Automate in the File menu and select Picture Package to bring up the Picture Package window. Check the box next to Use Foremost Document to print the opened image (or click the Choose button to navigate to another image you wish to package-print). Select the desired layout
from the Layout offerings—we chose the "(2)4x5(2)2.5x3.5(4)2x2.5" package for the print shown here. The active layout is shown graphically at the bottom right of the Picture Package window. Choose the resolution (200 pixels per inch works well for inkjet printing) and mode (generally RGB color or grayscale), then click OK, and the computer will compile the package document right before your eyes. When it's finished, print it, and save it if you'll want to print it again sometime.
 8. Selective Effects
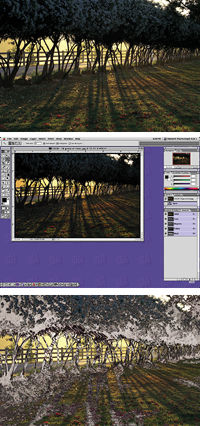
 Applying a filter to just a portion of an image is often more effective than applying it to the entire image. Just select the portions of the image to which you wish to apply the filter, then apply it. Here, we used Photoshop's Magic Wand tool to select the shadow areas of the image, then applied the Find Edges filter to those areas. (Find Edges is under the Stylize submenu in the Filters menu.)
 9. Background Control
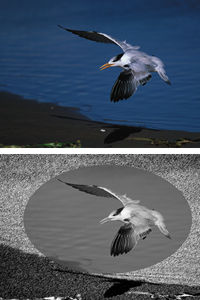
 One way to deal with a messy background is to play it down. Here, we converted the RGB color image to grayscale, selected the bird using the Circular Marquee tool, inversed the selection to select the background (drag down to Inverse under the Select menu), then applied the Graphic Pen filter to the background by dragging down to Sketch in the Filter menu and selecting Graphic Pen. The resulting image shows the bird in its environment, and has an interesting graphic effect to boot. You can adjust the the harshness/softness of the selection's edge by dragging down to Feather in the Select menu, and choosing a larger radius for a softer edge, or a smaller radius for a harder edge.
 10. Rhindeer
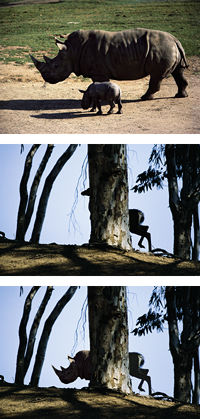
 One of the basic digital image-editing procedures is photo-compositing—combining two or more images to create a new one. This image began when executive editor Mike Stensvold was out looking for birds to photograph, and suddenly encountered a deer. A brief hesitation before realizing, "Hey—I should photograph that!" gave the deer time to bolt the scene, resulting in a deer-behind-the-tree shot. When editor Ron Leach saw it, he immediately remembered a photo of a rhino he'd taken some years ago, and directed art designer Nathan Hernandez to replace the deer's head with the rhino's to create this "rhindeer." Here's how: First, open both images in Photoshop. Then, drag the rhino shot onto the deer shot, using the Move tool. Next, use the Eraser tool to erase the unwanted areas from one image—in this case, everything but the rhino's head. Drag down to Free Transform under the Edit menu, then move the rhino head into the desired position, and use the "handles" in the corners to re-size the head appropriately. Now, under the Image menu, drag down to Adjust and select either Levels or Brightness/Contrast, and adjust until the two images match. Flatten the image (under the Layer menu, drag down to Flatten Image), and you're done. Photos by Ron Leach
Oh, yes—in case you were wondering, the image of the dogs in the Zoom Explosion demo and the portrait of the woman in the Package Printing demo were shot with digital cameras; the other images were shot on film and scanned for this article. All photos by Mike Stensvold unless otherwise credited.
- Log in or register to post comments


