The “Poison Dart Frog” Challenge; The Ring Flash (And A Little Bit O’ Photoshop) Solution
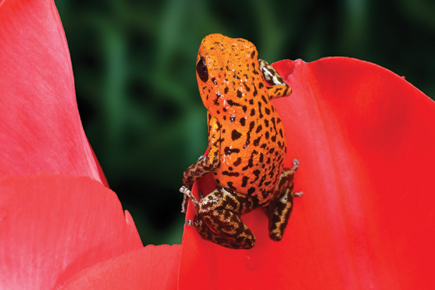
I recently had the opportunity to photograph poison dart frogs, and I was excited to do so because these unique creatures have brilliant colors and are endlessly fascinating. While they make for amazing pictures, they also present significant technical challenges. I had to do some thoughtful planning before I attempted to shoot them. I started out by buying several tropical plants and flowers at a nursery to use as props, then sat down to consider the technical issues.
Dendrobates Auratus From Panama |
|
 |
|
|
First, dart frogs are very small-- much smaller, in fact, than you would
think. One of the frogs I photographed in particular was the size of a dime;
others were not more than an inch and a quarter long. This meant that depth
of field would be extremely critical. Since macro photography is all about seeing
and appreciating the intricate and fascinating details in tiny subjects, middle-of-the-road
lens apertures like f/8 and f/11 wouldn't do. I needed to use the smallest
lens aperture possible, which is f/32 on my 50mm macro.
This meant, of course, that available light photography was out of the question.
A small lens aperture would force the shutter speed to be too slow for wildlife
photography. I had to use flash, therefore, and the flash had to be placed close
enough to the frogs so the light output was sufficient to give me a good exposure
at f/32 with a low ISO for maximum picture quality and a minimum of digital
noise.
Second, the frogs are shiny. Whether they are wet or dry, their skin readily
reflects any bright light source. This presents an insurmountable problem because
when a reflective surface is flat we can angle the camera to avoid the reflection.
However, when the surface of the subject is contoured, it reflects light in
many directions and it's not feasible to avoid it.
Dendrobates Tinctorius From Surinam |
|
 |
|
|
Third, frogs are constantly jumping away from the camera lens. They instinctively
want to find protective foliage, and it's hard to get them to sit still
for more than a few seconds. Some subjects will settle down after a while, but
most are very active and uncooperative. This means that one or two strobes in
fixed positions are not necessarily the best setup because it will probably
be necessary to follow the tiny subjects as they move from one flower or leaf
to another. With a fixed lighting setup, when a frog jumps a few inches toward
one of the flashes, that changes the flash-to-subject distance, which in turn
changes the exposure.
Finally, a flash placed on the hot shoe of a camera would be too high to properly
illuminate the tiny frogs. The light would pass right over them. Even if the
light spread was such that the top part of the amphibians were lit well, the
undersides would be unacceptably dark.
Enter The Ring Flash
I felt that the solution to all of these issues (except the problem of reflectivity)
was to use a ring flash. Therefore, I bought Canon's MR-14EX ring flash.
I had never owned a ring flash until recently because the original ring flash
units consisted of a single light that produced a flat, dimensionless image.
I always felt that the light was just too flat. Canon's MR-14EX ring flash,
however, has two small, controllable flash units inside the ring that can be
operated independently of each other. I can turn one of the lights off and use
only one off-axis light source, or both can be used where I define the lighting
ratio between the two light sources. In addition, the ring light can be rotated
around the lens so the two lights can be positioned on either side, left and
right, or top and bottom--or anywhere in between. The ring itself attaches
to a macro lens with a small flange which screws into the lens like a filter.
Ratios And Total Output
Lighting ratios are typically used in studio work where photographers compare
the light output of the main light with the fill light, and it's measured
with a handheld flash meter. Understanding ratios can be confusing because there
are two ways to make
the calculation. For example, if the exposure for the main light is f/8 and
the exposure for the fill light is f/5.6 (this would be determined by a handheld
flash meter), the ratio is understood to be 2:1. This means that the main light
provides double the amount of light that the fill does. However, that doesn't
take into account the combined light output that occurs when the picture is
taken with both lights. If we say that the main light puts out two units of
light and the fill light contributes one unit (this makes sense in a 2:1 ratio),
the combined output is three units. So, the ratio of the total light on the
scene to the fill is really 3:1, e.g., three units of light compared to one
unit of light. A 4:1 ratio is a two f/stop difference in light output, such
as f/8 from the main light and f/4 from the fill. However, if we calculate the
total flash output the 4:1 ratio becomes 5:1.
Dendrobates Pumilio From Panama |
|
 |
|
|
Whatever number we assign to the ratio, Canon's ring flash allows you
to change the lighting ratio between the left and the right lights (or the top
and bottom lights, depending on how you rotate the ring around the lens). This
gives us the ability to have dimension and depth in macro photographs plus the
mobility to follow a subject that just can't sit still.
I want to point out that if you have a 100mm or 180mm macro lens, this increases
the working distance between the camera and the subject. As the camera moves
farther away from the subject, the ring flash will act as a single light source
rather than a ring of light that surrounds the subject. This is especially noteworthy
because the lighting ratio become ineffectual when the ring flash acts as a
single source of light. This is why I photographed the frogs with a 50mm macro
and not one of the others. When the ring is right on top of the subject, the
lighting ratio helps make the images look beautifully lit.
- Log in or register to post comments


