Exposure = Emotion: Your Story—Your Photograph!
Which comes first in the photographic process, light or exposure? Without one, we don’t have the other, and we need both to make a photograph pull at the heartstrings. I’m going to suggest to you that when thinking exposure, think about the emotion you want the photograph to impart. I’m going to further suggest you lean the technology in your camera to free up the process so you are reacting to the photograph just like you’re reacting to the scene. Let’s apply technique to this reasoning.
The Element In Light That We Seek
The human eye can “see” approximately 14 stops of light at a glance. Your basic D-SLR can only capture 5 stops in one exposure. This huge gap is a big part of our problem in making the exposure that expresses what we’re seeing. Luckily, our D-SLRs have a feature that helps us learn to see as the camera sees. That’s the whole trick in this equation—realizing that the amazing system we have of seeing, our eyes and brain, are not replicated in our cameras.
Highlight Warnings, “blinkies” as I affectionately call them, can help us learn light in many ways. You can see the highlight warning, or blinkies, in many D-SLRs by toggling through the Display options. This will show you where the highlight areas reside, and where you are overexposed, right on the Review image after you make the picture. Lacking that, you can also use the on-screen Histogram to see what the exposure information might be. If the right side of the Histogram is crowded with data, or “clipped” at the top, then you have overexposed the scene.
When the warning “blinks” it tells us that the area blinking has no information, what some call paper white. The next thing this does is visually tell us where the mind’s eye will “go” when it first sees the photograph. That’s because the mind’s eye goes to light and bright areas first. The question is—how do we use this information in our photography?
If there are no “blinkies” on our LCD, or the Histogram is not bunched up on the right side, we don’t have to do a thing to “fix” the exposure. If we see that we are overexposed then we have to ask ourselves 2 questions: does the overexposed area pull the eye from the subject and, is that area important to our storytelling? How you answer these questions for your photograph determines what you need to do next.
Match Reality With Perception
We have 3 basic options for dealing with areas of a photograph outside the range of our camera that we want to have detail in—underexposure, using a neutral density split graduated filter, or HDR. There is no right or wrong answer, just the one that communicates the emotions you want to express.
Underexposure is a very simple and effective tool. Underexposure adjusts the 5-stop scale up, sacrificing the shadows to capture the highlights. Shadows will go darker or to black while those highlights which were gone now have detail. You can see this for yourself. Take a photo and if you have overexposed highlights, dial in -1 Exp Compensation, take another photo and look at the LCD. You will probably see no blinking highlights, but if you compare the 2 photos your shadows will be much darker.
The split grad filter is a great tool for “compacting” the exposure. I recommend the .9 or 3-stop soft edge split grad for digital photography. Look at the filter and you see half is dark and half is clear. Place the dark portion over that part of your photograph that is overexposed (like bright sky and a darker ground) and it holds back the exposure in the overexposed area. In doing this, it compacts the exposure, making it possible to take a photograph with a range of 7-stops in one click.
HDR (High Dynamic Range) is a technique invented back in the late 1800s to compact light of a big range into a small range. We’re talking just light now, not wacked out colors and edges. HDR in its simplest form is merely a number of photographs of the same scene, each single photograph having an exposure targeting one specific exposure range in the scene, later combined in the computer to make one photograph with all the exposures encompassing a wide exposure range.
These tools used separately or together can record reality, so what we see equals what we capture, or they can communicate what we feel. It’s totally up to us. This brings me to a concept I think is very important when it comes to exposure. What the world needs are not more technically perfect photographs, but those with more passion!
The Gift Of Underexposure
Underexposure instantly increases the color saturation of our images. Underexposure pushes the blacks to black, which the mind’s eye uses as an anchor to register the other colors in the photograph. Finally that extra black on the edges of elements tricks the eye into thinking the elements are sharp. And, if there are highlights on the edge of disappearing, this little underexposure might protect them.
There is no right or wrong answer to exposure because it is your photograph after all. There is, however, a difference in showing reality or our perception of reality—that’s part of the storytelling in photography. Overexpose a storm coming over a mountain and we communicate the storm is blowing out. Underexpose that same photo and we can communicate a big storm is coming. It’s your story, your photograph and it’s your exposure. The photography will become successful when you use exposure not for technical merits, but to communicate emotion.
1. The clouds way off to the east left a slit for the sunrise to peek through. I wanted the mellow quality and color of that slit of light and the color in the snow blowing around the top of Mt. Whitney to combine so I underexposed 1.5-stops. Understand this is not what I was seeing but what I was feeling—the quality and quantity of light was harder than expressed in this photo.

All Photos © Moose Peterson
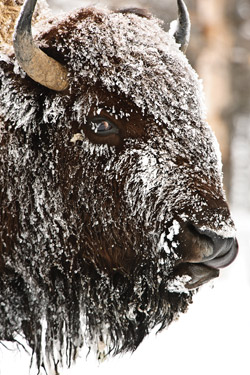
2. Dark subjects covered in white are an exposure nightmare in any kind of light. This Bison was photographed on an overcast day where there was no direct light. What light there was also bounced off the white snow on the ground, filling in any possible shadows, this made exposure a slam-dunk at zero. The camera nailed it because there was no lighting challenge.
3. The New Mexico desert is a great place for a sunset! This one is reflecting off one of the ponds at Bosque del Apache. Water reflections are routinely underexposed 1-stop, which is why they often look better than the real McCoy. In this case, a split grad filter was used along with an additional -1.5-stops to pull down the shadows in the water and punch up the color in the sky. This is not what the folks standing next to me were seeing, but it’s what the sunset sure felt like.

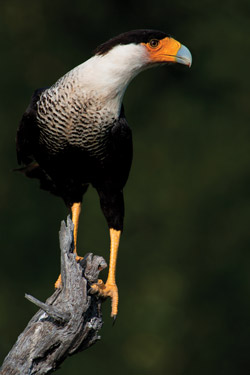
4. There it is, the exposure nightmare of white on black. This Crested Caracara is perched in the fading sunlight and making life a challenge. Ask yourself, “What is the subject?” It’s that stare, the combination of eye, brow and colorful beak. I wanted the white hackles, the under eye detail and I didn’t care about the black body because most know the neck is attached to the body without me showing all that detail. Dial in the underexposure 1-stop and shoot away!
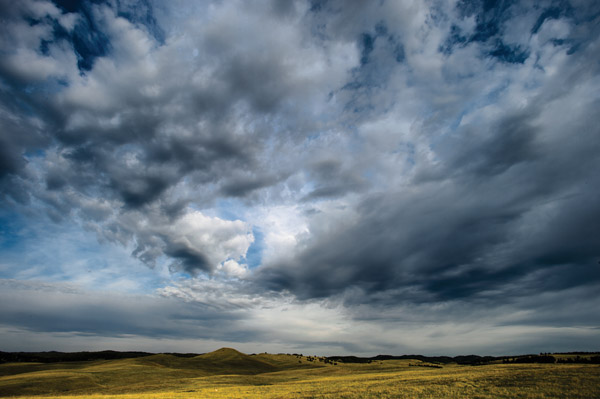
5. There is a storm is on the horizon. How do I say that in a photograph? When you have mixed lighting like this in a photo, I think it’s pretty simple. Underexpose a full stop to 2-stops and go! What does that accomplish? It pushes the black blacker and by association the whites become brighter. In this case the whiter parts of the clouds and that beam of light on the landscape suggest a storm is coming, and that’s the whole idea!
6. The first rays of day light up this Short-billed Dowitcher as it forages in the surf. Being down on its level has lots of advantages. When it comes to exposure, the sand acts like a natural reflector, filling in the little bit of shadow under its belly. This makes exposure a snap as the range of light is well within 3-stops. Zero exposure comp nailed it, exactly what the camera suggested.

7. You might look at this and think it would be hard to expose. The beams of light coming down on the Alaskan Range are dramatic and that’s the subject—those beams. Look carefully—they are not white, what does that tell you? I underexposed by at least 1-stop. And just to make sure that the drama came through the exposure, a .9 soft edge split grad was used to darken the top of the frame even more. The drama was presented to us, but exposure is what’s presenting it to you.

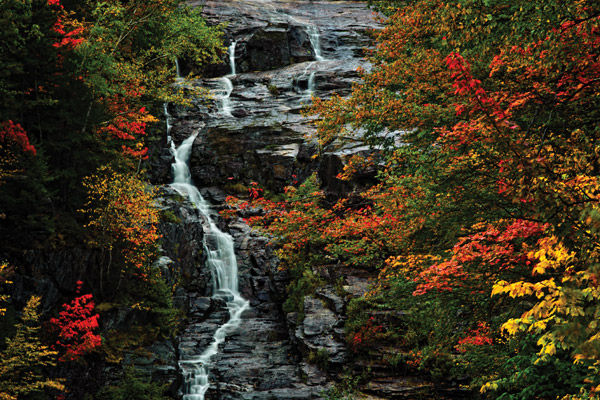
8. It’s pouring rain, can you tell? The skies are dark, gray and spitting on us, but the photography was killer! High in the White Mountains of New Hampshire, the overcast light and wetness saturates the color as well as the -1 exp comp. Why -1? The light was flat, so I wanted the shadows to go black, which then makes the colors pop more and gives the rocks more character.
9. Hot air balloons floating over Monument Valley—the photography simply doesn’t get any better! As you see, there were some clouds floating about and that was a blessing. If the balloons were in direct sun, the exposure range would have been much greater, the shadows deeper and the exposure more of a challenge. With the diffused light of the scattered clouds, underexposure of -1/3 pumped up the colors and the shadows in the cracks in the background and made the sky a tad bluer. The combination of light and exposure makes it all happen.

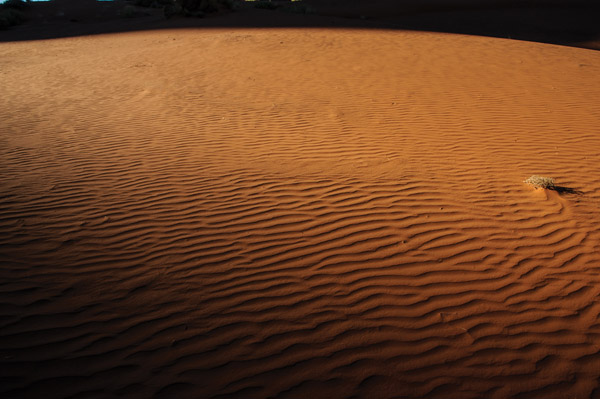
10. The drifting sands of Monument Valley are simply stunning. Though this is not what we saw when standing there. What you’re seeing comes from -2-stops of exp comp. That minus exposure pushes the shadows way down. First is the background, which becomes a black curtain. Then the ripples in the sand as the light scatters across it bring out the texture, pattern and detail, saying it’s a sand dune blowing in the wind. Without that underexposure it would have been just red sand, and while gorgeous, not near the same effect.
11. The winter storm has just broken up as the sun peeks over the valley rim to light up El Capitan, Yosemite Valley. The foreground is being lit by the light bouncing off of the clouds overhead, making the photograph happen. Otherwise there would have been no photo since that would have all been in shade. Wanting the eye to go to the face of El Cap first, that part of the scene was allowed to burn up, go paper white. The exposure then was for the vast majority of the photo and set to -1 exp comp.

12. Those beams of light attract photographers to them like a moth to a flame, and rightly so! While photographers love them, camera sensors do not, as the exposure range is well beyond their 5-stop capability. This is a simple 3 image HDR to bring out the beams and not let the shadows go completely black. Why not let the shadows go completely black? In this case the light and airiness of the photo would be lost with heavy shadows. It was a glorious morning in the Fern Grotto, so I wanted the photograph to communicate that presence.

13. A gorgeous fall evening in the woods of Maine, how do you say that in a photograph? I knew I could get that killer starburst out of the sun by closing the lens all the way down. I also knew the exposure range shooting into the sun would overwhelm a single click. This is a 5 image HDR, permitting you to see all the fall color. The trunks are in shadow—why is that? I didn’t think you needed to see the information in those trunks to know that they were tree trunks. It is also in part because I really don’t like the curved trunk on the left, and putting it in shadow made it disappear, the best option of any. It’s all about the exposure and what you want to communicate because it is your story, your photograph!

Exposure And Light
Exposure is based on the quality and quantity of light. The story we want to tell, the drama and passion we want to communicate is based on how we expose for the light. So, light rules the day.
Light is when and where you find it—always run toward it and not away from it. With that said, here are my basic rules about light: Some of the best photography is in the worst weather; wildlife and rocks don’t read, so they don’t know to avoid high noon; and, most importantly, it’s your story so tell it the way you want to!
- Log in or register to post comments


