ArcSoft’s Panorama Maker 4 Pro; Shooting And Assembling Made Easy Page 2
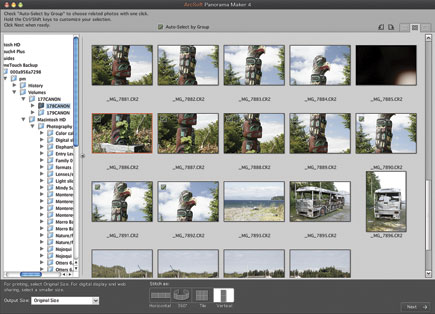
As I mentioned, the user interface is very intuitive and unbelievably easy to navigate. I’m computer challenged but even I can’t get lost in Panorama Maker Pro. The supplied browser works independently of Photoshop Bridge or other browsers, reads raw, TIFF, and JPEG files, and makes the selection and loading of images a very simple matter.
 |
|
|
Panorama Maker 4 Pro also allows you to manually adjust the contrast, brightness, cropping, straightening, blending stitching paths, and stitching points of your image without taking it into Photoshop or some other editing software. Even when your exposure varies a bit from image to image, Panorama Maker Pro recognizes those variances and balances the frame automatically. I have never had an image that didn’t match for density with any version of Panorama Maker. This is not always the case with other software I have tried. I don’t know how they do it but it’s pretty cool. New to shooting panoramas? As a bonus, ArcSoft has included a thorough tutorial within the software and a printable check list for location shooting.
 |
|
|
OK, the bottom line—is it worth the extra bucks? I’m sure you’ve guessed by now that my answer is a definite yes.
Tips On Shooting And Assembling Panoramas With Panorama Maker 4 Pro
1. The judicious use of a leveling device really helps with the stitching process. I use a bubble level in the camera’s hot shoe and also on the tripod. This redundancy assures that the camera doesn’t creep up or down as I capture subsequent frames.
2. Try to not pan both left and right on the same subject. This will cause the subject to look like it’s bowing outward due to a double vanishing point. Instead, stand at one end of the subject and pan in one direction only. This results in a more pleasing perspective.
3. Using longer focal length lenses will help to improve your success rate. With wide angle lenses you’ll need more overlap, at least 50 percent.
4. Turn off the auto white balance, autoexposure, and autofocus. Set the exposure manually for the average light in the scene and let the software balance any discrepancies. Panorama Maker is uncanny in its ability to match the image density from frame to frame.
5. Be sure that all other settings, e.g., file size, resolution, file format, etc., remain the same for the whole sequence to ensure seamless stitching.
6. I like to place a marker, usually a blank shot with my hand covering the lens, at the start and end of each sequence. As I try to shoot multiple sets of each subject this simplifies the editing process later.
7. Panorama Maker uses the EXIF time data to identify groups of images so shoot quickly when you can. If for some reason you can’t, intervening traffic for example, don’t worry, you can always select the shots manually.
8. Don’t use a polarizer filter if you are panning horizontally. The sky will be uneven and will probably result in banding in your finished panorama. I will often use a polarizer when shooting vertical panoramas however.
9. Don’t limit your options to horizontal compositions. Look down—you can find interesting macro panoramas right at your feet, and look for vertical possibilities as well.
For more information, contact ArcSoft at: www.arcsoft.com.
- Log in or register to post comments
