- REVIEWS
Camera Reviews 
More Reviews Mobile Reviews Photography Reviews - GALLERIES
- VIDEOS
- BUYER'S GUIDES
Wear Your Photography
From Camera To T Shirt With An Ink Jet Printer
Most photo hobbyists are
justifiably proud of their best images, and look for any excuse or opportunity
to show them off. Mounted enlargements and slide shows have been the
traditional means of exhibiting a photographer's work, but both
involve "trapping" an audience in one way or another. Whether
it's luring viewers to a gallery or seminar, mingling with your
peers at a camera club meeting, or just terrorizing your friends and
relatives, you have to bring the bodies to your pictures. |
|||
Your first choices of potential
images will probably be your favorite fine art or nature photos. But this
inexpensive art form lends itself to a much wider variety of subject matter.
Photographs of yourself engaged in a favorite activity (photography, working
on the Model A, riding your horse, etc.) can attract other folks who share
the same interests, resulting in many new friendships. Teen-age boys would
love to have a shirt with a picture of their cool new tricked-out car.
Teen-agers would also like wearing a shirt showing them with their latest
flame, but be prepared for a fairly rapid turnover in shirts! Family pets
are popular, and what new parents wouldn't like to showcase their
new income tax deduction? If you own your own business, why not create
a shirt to advertise it? The possibilities are practically endless. |
|||
The printer is the other major piece of hardware needed. While other types of printers such as thermal transfer can, with appropriate media, do T-shirt transfers, most readers will probably have, or be contemplating buying, an ink jet printer; therefore what follows is ink jet specific, although the actual transfer process is pretty much the same. The printer used and illustrated is an Epson Stylus Photo 1200 (which comes with Photoshop LE as a bonus). Its ability to handle paper up to 13x44" is irrelevant here, as iron-on transfer paper only comes in 8.5x11" size. Whether Epson or another brand, check the transfer paper package for compatible models. Although the spec sheet included with Epson's Cool Peel transfer paper includes a sizable list of supposedly incompatible Epson printers, their tech support personnel assured me that in fact the paper will work with all models; it's just that with the listed models it may be necessary to use different paper and ink laydown settings in order to obtain optimum results (e.g. you'll have to experiment). Newly added models may not be listed, so check your instruction manual or call the manufacturer. |
|||
Standard Epson inks were used; if you use a different brand of ink than that supplied with your printer (regardless of make), you'll need to run color calibration tests to correlate your monitor's colors with what actually comes out of the printer. You should do this anyway if you're at all particular about color accuracy. You also need to ascertain that the color balance obtained with the transfer material is the same as with your usual photo quality papers; if not, you'll need to add or subtract color to eliminate any offending color caste. A popular Photoshop plug-in for this purpose is Test Strip 2.0 from Vivid Details (supplied with the featured Epson 1200). The calibration procedure is designed to be user-friendly to any photographer familiar with photographic color printing. |
|||
With a computer, printer,
and transfer paper at hand, the next step is to get your chosen image(s)
into the computer. Prints can be scanned on a flat-bed scanner; slides
and negs can too, or a dedicated slide/neg scanner can be used, such as
are available from Canon, Nikon, Minolta, Polaroid, and others. If you
don't have a scanner, a service bureau can do the scans for you.
You can have them scanned to your preferred storage media, such as a Zip
disk or Kodak Photo CD; Photo CDs are also available from many photofinishers.
Since the shirt fabric limits the reproducible resolution and tonal range,
practically any inexpensive flat-bed scanner will prove adequate. |
|||
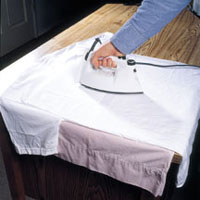
Until you're confident
of your various printer settings, it's a good idea to practice applying
your first few transfers to T-shirts that are one step away from the rag
bag. It also lets you get the hang of the ironing technique required. |
|||
Incidentally, if you're
a single guy and don't own an iron, any $10 discount cheapie will
do the job. Heavy is good, and you don't need steam; if you can't
find a non-steam model, just use it dry. Beware of yard sale irons; the
usual reason they're there is that the heat control is shot. |
|||
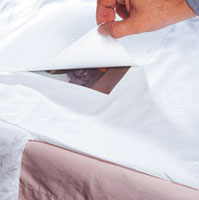
After completion of the ironing
step, let the transfer cool for one to two minutes (Epson; some brands
require immediate backing removal), but no longer; if allowed to cool
too long, removal of the backing paper will be difficult or impossible.
Lift any corner and peel the backing off with a steady motion. That's
it--your T-shirt is ready to wear! Epson America Inc. Vivid Details (Test Strip) |


- Log in or register to post comments


![]()
Get the Latest Photo Tips, News & Reviews from Shutterbug!
| Camera Reviews Other Reviews | Mobile Reviews Photography Reviews Columns | News | Features | How-To | Resources |
 © 2025 Shutterbug
AVTech Media Americas Inc., USA
All rights reserved