- REVIEWS
Camera Reviews 
More Reviews Mobile Reviews Photography Reviews - GALLERIES
- VIDEOS
- BUYER'S GUIDES
Shooting Stars: Night Sky Tips & Techniques

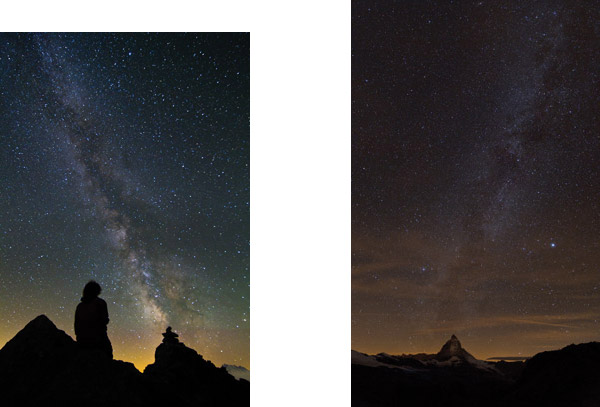
© Gilles Monney
My shutter clicks, and a million tiny stars appear on my camera’s monitor. For me, being able to photograph the sky like this is a magical experience. Until recently, it was nearly impossible to capture these awe-inspiring points of light. Night photography was limited to star trails and long exposures under moonlight. The new generations of pro and semi-pro D-SLR cameras, with their ability to cope with noise at previously unthinkable ISOs, coupled with wide, fast lenses, have made it possible to photograph the night sky as we actually see it.
Photos © Gilles Monney
The Basics
At the very least, you’ll need to get away from the light pollution that leaks upward from cities and towns and dims the stars. I do a lot of my night photography on canoe trips into the Canadian wilderness, but pockets of darkness can be found closer to home, too. My friends, photographers Masahiro Miyasaka and Gilles Monney, both take superb star field photographs in and around the more populous Japanese and Swiss Alps (respectively). Because I’m literally shooting in the dark, it can take a lot of trial and error to make an image I’m happy with, but nearly any daytime landscape photographer already has the tools for the job.

© Masahiro Miyasaka
Once you’re out in the night, all you need is a camera with high ISO capabilities, a wide, fast lens, a tripod and a cable release. You’ll also want to have enough clothes to keep you warm and, if you’re staying out for the night, a sleeping bag and tent. An extra battery is essential, particularly in cold weather, and a flashlight comes in handy for setting up and for light painting.

© Masahiro Miyasaka
Because the earth spins far more quickly than we generally notice, you’ll need to make relatively short exposures if you want to freeze the stars. A rule of thumb for finding your maximum exposure time is to divide your focal length into 600. This means that my 20mm lens allows me a full 30 second exposure without any visible streaking of the stars. Although there are faster lenses, I get good results with my 20mm at f/2.8. The wide angle allows me to incorporate the foreground elements I want, and to also be able to include as much of the sky as possible.
© Masahiro Miyasaka
Three Techniques
At its simplest, making images of star fields simply requires the stars, but foreground elements often make or break the picture. Gilles strips star fields down to their barest elements. By using the jagged peaks of the Swiss Alps silhouetted against the stars, his compositions are simple and breathtaking. At between 16mm and 24mm, his lens is wide enough for both the mountains and the Milky Way. Shooting at ISOs of 3200 and, occasionally 6400, allows for exposures of between 20 to 30 seconds at f/2.8.
Adding another light to the mix can change the photograph entirely. Not living anywhere near any mountains, nor having anything quite so spectacular to set against the backdrop of the universe, I use moonlight to light paint the landscape. When the moon is rising, but not yet up, the edge of the horizon glows blue. A distant town will occasionally give the same effect, but the luminance will verge toward orange.

© Skye Hohmann
Including objects in the foreground of a photograph means that I have to break the rules somewhat. Smaller apertures help keep the foreground and the distant stars in focus. A rising moon can backlight the foreground; a risen moon out of frame will light the scene like daylight, pushing the stars into the background of the image. Using a high enough ISO (over 800) will still freeze the stars, keeping the night look. This is a more flexible option if your camera doesn’t deal well with higher ISOs, as a slight blurring in the stars is still acceptable, if the foreground object is the clear focal point.
One of the most difficult aspects of night photography can be focusing. Manually focusing at or near infinity (and then checking the results on playback) can be easiest—in the dark autofocus will search futilely for something to lock onto. Foreground objects will of course need you to focus at far less than infinity, and lighting them up with your flashlight will help with this.

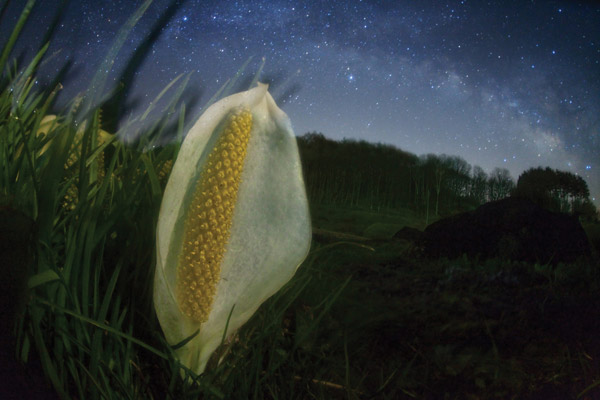
© Masahiro Miyasaka
Masahiro Miyasaka takes both manual focusing and light painting to a higher level. Simpler compositions allow him to use a flashlight in the same way I use the moon, to highlight portions of his work. More complicated compositions require using lenses with manual aperture rings, as his technique is to initially focus on infinity, setting the aperture at f/2.8. After exposing the stars for 30 seconds or more, he moves first the aperture ring to f/22 and then, immediately, the focus to macro. Covering the lens with a black cloth or cardboard while adjusting the f/stop and focus will eliminate ugly vibrations. Finally, shining a LED light on an angle to the foreground subject (often a flower) before finishing the exposure makes for unique and beautiful images. High ISOs are, again, essential for this. His technique is a tricky one to master, but well worth the effort.
White Balance And Post Processing
I think of the night as blue. Auto and daylight white balance can give a reddish brown tinge to the sky, or a yellow tint to the stars. Shooting in Raw allows me to play around with this when I get home.
There are a number of web-based software and applications that can help with moon rise and set times—my favorite of these is the Photographer’s Ephemeris (www.photoephemeris.com), which also shows you which angle the moon and sun will rise and set from.
Photography can open us up to things: to another way of seeing, or even to the world itself. Making these images allows me to truly experience the night, and the feeling is primal. There’s nothing like being out in the darkness, alone with the universe and a camera.
- Log in or register to post comments


![]()
Get the Latest Photo Tips, News & Reviews from Shutterbug!
| Camera Reviews Other Reviews | Mobile Reviews Photography Reviews Columns | News | Features | How-To | Resources |
 © 2025 Shutterbug
AVTech Media Americas Inc., USA
All rights reserved