Practical Accessories For The Field Photographer; A Pro’s Recommended List Of Gear For The Road
Photographers, by nature, love accessories. But sooner or later we all have
to face the fact that we can only carry so much equipment. When I go out I go
through a mental check list and include the basic equipment that I've
outlined in this article. Please keep in mind this is my personal list; vary
yours to suit the terrain, subject, and distance covered.
Looking To The Right
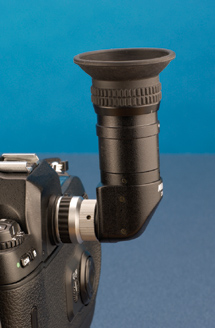
One accessory that I cannot do without is the right angle finder. This accessory
is much different than a waist-level finder in that it simply screws into the
eyepiece of your camera's viewfinder, shows 100 percent of the image,
and does not disturb the metering system of the host camera body. This in turn
now allows you to place the camera directly on the ground yet allows you to
view the scene without stretching or getting into sometimes awkward or impossible
positions. Most have built-in diopter adjustment, a rubber cup to keep extra
light out, and weigh mere ounces. Nikon calls its right angle finder the DR-4;
Canon refers to its as the Angle Finder C.
|
|
|
Getting Close Without A Prime Macro
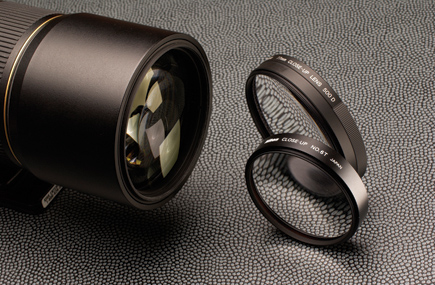
These add-on lens accessories are simply called a "close-up" lens
by both Nikon and Canon. While it will not take the place of a true macro lens
in the field, it will allow you to use your longer 80-200mm or even a 300mm
lens and focus as close as 20"!
Simply attach these magnifiers to the front of your prime lens. Both Nikon and
Canon state that "they will not degrade the high performance of your prime
lens." Note that they do correct for chromatic aberrations and in two
element sets, they are the best you can buy. Regrettably Nikon's attachment
lenses are available only in 52-62mm thread size. Canon has their series run
through 52, 58, 72, and 77mm diameters.
|
|
|
Fill When You Need It
Small and portable (read handheld) flash units that have systems dedicated to
the host camera are very popular and lend themselves to hundreds of situations.
For different effects you can dial in compensation, scale up or down power,
and even use the built-in infrared focusing light to assure razor-sharp images
even in the bleakest of lighting conditions. Working off the camera's
TTL metering system makes for right on the money exposures. You can even take
these flashes off the camera via an accessory cord, which allows you to put
the light exactly where you want it. Make sure you look for a flash that has
a zoom head and provision for a wireless slave. One special flash I recommend
is a twin-bulb macro unit, which is the ultimate in close-up flash control.
|
|
|
Supporting It All
If nothing else, a sturdy and lightweight tripod is very important to the success
of a day's outing. Looking around, the choice presently centers on either
aluminum or carbon fiber and in my kit I have three that I use constantly in
my work. The first is a Bogen #3021, which is made from aluminum, has a center
column that I can adjust to within inches of my intended subject, remove, or
even shorten within minutes. The others are carbon-fiber models that I use for
long trekking days or for long heavy lenses where a sturdy platform is mandatory.
The Gitzo #1325 (weighs only 41/2 lbs) is a medium-weight rig that I find suitable
for lenses up to 400mm with great results; I use the heavier Gitzo #1548 (checks
in at 63/4 lbs) for lenses from 500-600mm and beyond with tele-converters.
Finally, height is another consideration, especially if your photography is
done on uneven terrain. If you like to photograph wildflowers, don't buy
a tripod with a long center column that will interfere when you lower the head
down toward the ground. In addition, for best results when working with any
tripod use a cable release and don't forget your head. Along with that
tripod, a good head will certainly make for a fine day in the field.
For more on tripods and heads see Jack Neubart's article in this issue.
|
|
|
Beanbag Steadier
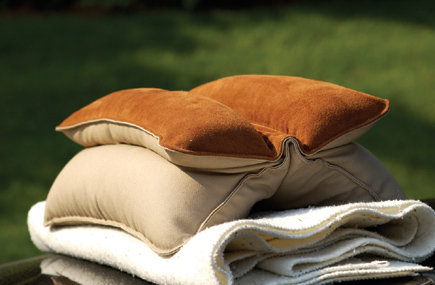
Now here is something you might never have thought of--it's called
a beanbag and can substitute for a tripod in more than one location. Placing
the beanbag on the hood of the car lowers your profile and in some instances
makes it easier to capture images of wildlife. Believe it or not, I found mine
in a sporting goods store under the name "Bulls Bag." Filled with
crushed walnut shells (available at pet stores) it measures about 15"
long and weighs a few pounds. Placing a long lens like a 500 or 600mm within
the top flaps eats up just about all of its length, giving one stability never
possible even with a gimbal mount.
|
|
|
