- REVIEWS
Camera Reviews 
More Reviews Mobile Reviews Photography Reviews - GALLERIES
- VIDEOS
- BUYER'S GUIDES
Polarizers Cause Problems When Using Wide Lenses: Here's a Quick Fix (VIDEO)

Most landscape photographers always carry a polarizing filter to solve a bunch a problems. These affordable tools let you darken pale blues skies, reduce reflections on water and other non-metallic objects, and even boost saturation if need be. But as you'll see in this tutorial from the PHLOG Photography YouTube channel, these benefits often come at a cost.
So ponder this question: Have ever noticed a dark blob in the sky after capturing a landscape photo with a polarizing filter—especially when shooting with wide-angle lens? This is the common problem you'll learn how to quickly resolve by using one simple mask when editing the image in Lightroom.
Instructor Christian Mohrle is an accomplished German pro who explains the dilemma like this. "A polarizing filter affects different areas of the sky differently, so we end up with darker and lighter parts in the scene." This problem is exacerbated when using wide-angle lenses because of the expansive view they provide
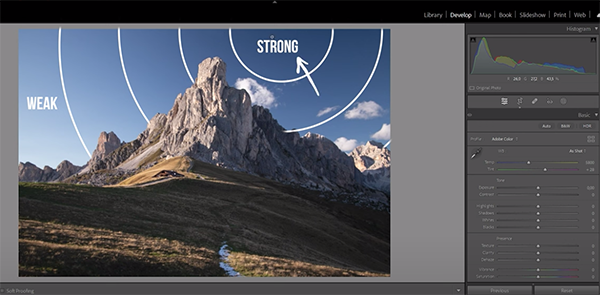
As you can see, Mohrle's dramatic, unedited landscape image has what he refers to as a "dark blob" in the upper right of the frame that imparts a distracting an unnatural look to the photo. We encourage you to download this sample photo with the link beneath the video so you can follow along and make the changes yourself as they're explained.
Mohrle begins with a few basic global adjustments to the overall scene so it appears as good as possible for the selective enhancements that follow. He first changes the profile from Adobe Color to Adobe Standard which immediately lessens contrast. Next he brings down highlights, increases the shadows to introduce more detail, and increases Whites while cutting the Blacks.
With the exposure is significantly improved, Mohrle turns his attention to other preliminary enhancements like boosting Texture, reducing Clarity and Dehaze, and pumping up Vibrance.
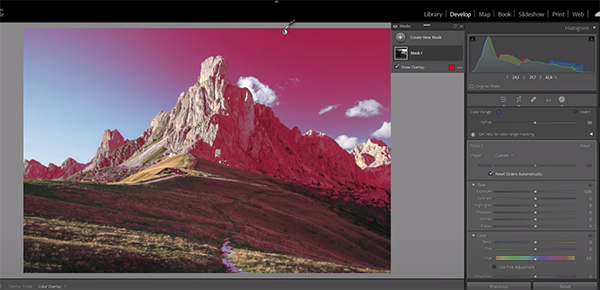
With the Basics out of the ways it's time for the meat of the tutorial; namely fixing that black blob caused by the polarizing filter. All it takes is simple masking, color grading, and a final bit of subtle sharpening.
As mentioned earlier, a polarizing filter doesn't apply effects evenly, hence in this image the sky is somewhat bright on the left side of the frame and progressively darker and darker as you look to the right—at which point the offending blob is quite apparent.
Pay close attention as Mohrle illustrates the simple fix that corrects the offending portion of the shot, while leaving other areas in the shot untouched. He begins in Lightroom's Masking panel, selects Color Range Mask, and walks you through every step of the straightforward rehabilitation technique. Examine his before/after images and you'll be impressed.
You can find more helpful tips on Mohrle' instructional YouTube channel and in an earlier tutorial we posted explaining the best way to install and organize plugins for a streamlined Lightroom workflow that saves you tons of time and delivers great results.


![]()
Get the Latest Photo Tips, News & Reviews from Shutterbug!
| Camera Reviews Other Reviews | Mobile Reviews Photography Reviews Columns | News | Features | How-To | Resources |
 © 2025 Shutterbug
AVTech Media Americas Inc., USA
All rights reserved