- REVIEWS
Camera Reviews 
More Reviews Mobile Reviews Photography Reviews - GALLERIES
- VIDEOS
- BUYER'S GUIDES
INTERSECT MASKS: One of Lightroom's Most Powerful & Overlooked Tools (VIDEO)

Lightroom is jam-packed with transformative features, and some don't get the attention they deserve. According to instructor Brian Matiash, one good example is the oft-ignored Intersect Masking capabilities.
Matiash is a post-processing expert whose instructional YouTube channel has a simple motto: "Making pictures better" with straightforward image-editing tools that anyone can master. He kicks of this episode by explaining how to enhance images with Intersect Masking—a lesser-known technique he says, "could be Lightroom's most powerful tool."
In barely 15 minutes you'll learn three ways to use this easy-to-master feature to enhance outdoor imagery, and they all work exactly the same whether you use Lightroom Desktop or Lightroom Classic to edit your images.
Matiash begins with this: "Lightroom's more familiar Adaptive masking analyzes photos and makes selections tailored to the image at hand." For example, the Adaptive Sky mask uses AI to identify the sky and create an appropriate selection that's typically quite precise. But here's the deal, the Intersect tool lets you to make Adaptive masks significantly more powerful.
In basic terms, Intersect Masking enables you to make a selection within a selection. By doing so you'll be able to refine selections with even greater detail and precision. Matiash uses a trio of interesting photographs to illustrate three different ways to harness the power of Lightroom's Intersect tools. The specific approach you'll take depends upon the attributes of the photo you're working on.
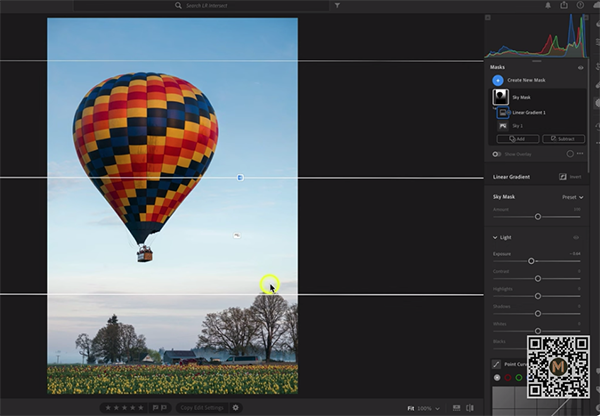
The first example is an image of a colorful hot air balloon against a featureless pale blue sky. For this particular shot Matiash demonstrates how to use a Linear Gradient to enhance that portion of the photo. He first applies a conventional Adaptive mask, and that does an OK job, but there are a few noticeable problems due to the fact that the sky is darkened evenly, and that's rarely a realistic effect.
Matiash says this is where Intersect masking, with its ability to make selections within selections, really shines. By employing a Linear Gradient the sky appears far more natural, with darker tones at the top of the sky that gradually become lighter toward the horizon.
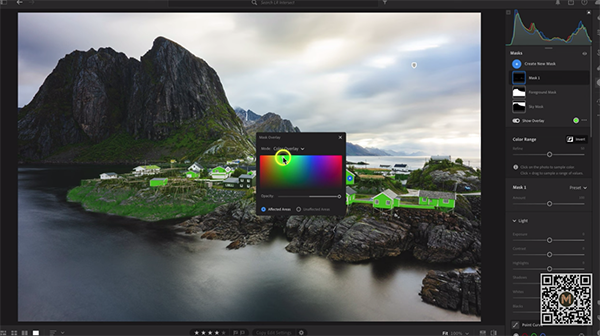
There are a couple more Intersect methods that are more effective for the other two sample images—one using a Color Range mask and the other employing Luminance Range. In all three instances the images are quickly and significantly enhanced.
There's much more to learn on the Brian Matiash YouTube channel, so be sure to pay a visit when you have time to explore.
And don't miss the tutorial we posted recently from another image-editing expert who explains a straightforward Lightroom technique for giving sensuous portrait photos stunning and realistic tones.


![]()
Get the Latest Photo Tips, News & Reviews from Shutterbug!
| Camera Reviews Other Reviews | Mobile Reviews Photography Reviews Columns | News | Features | How-To | Resources |
 © 2025 Shutterbug
AVTech Media Americas Inc., USA
All rights reserved