- REVIEWS
Camera Reviews 
More Reviews Mobile Reviews Photography Reviews - GALLERIES
- VIDEOS
- BUYER'S GUIDES
File And Find ’em—Part I; Keywording Strategies
One of the greatest challenges in working with large numbers of images is determining how to catalog your photographs in a way that not only makes sense to you, but also to anyone else who may be searching for specific content.
If you maintain all your own images you have more freedom in how to go about tagging these photos for future reference. On the money-making side, if you submit to stock agencies it’s critical to tag your images in such a way that potential clients will find them sooner than they find similar images that may be available. If stock photo buyers are under tight deadlines, they may never bother browsing through the hundreds of choices that may be returned to them. They are more likely to choose from the batches of images they see first. Even if you’re not selling your images, if they’re worth keeping, they’re worth finding again in the future. The best way to do this is through consistent use of keywords.
Metadata Tags
All digital images have metadata associated with them. You might be more familiar with the term EXIF, which stands for Exchangeable Image File Format. It’s exchangeable because it’s a standard format that can be read by almost any program that works with digital images. Here’s where you’ll find the information on your exposure settings, time and date of capture, and other useful data. While interesting, the real value of metadata comes in the additional information that can be added to a file, including copyright, contact information, and keywords. This information travels with the file. If you post it online, your copyright and any assigned keywords are in the file. When you backup your images, the information stays with the file, making it easier to find in the future.
Keywording is supported by every DAM (Digital Asset Manager) application in one form or another. If you use Adobe Bridge, Adobe Lightroom, Photoshop Organizer, or Apple Aperture, you can add keywords and other metadata to your images when you import them. (From experience, I know that images tagged on import are more likely to have more accurate and relevant tags than those images I put off tagging until later.) Most programs make it easy to add keywords during import. Here’s one, Adobe Lightroom, that I’ll use to illustrate the ease with which it can all work.
Import And Copyright
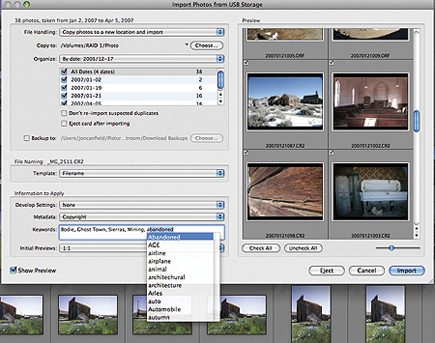
To add keywords during import from a memory card, select File>Import (or click the Import button in the Library module) and you’ll see a dialog similar to the one shown.
 |
 |
In this dialog you’ll find two very helpful items. The first is what template to apply. Because every single image you shoot should at a minimum include your copyright, it’s best to setup a template that will be assigned automatically on import. So, choose Create New Preset and enter your information (to enter the copyright symbol hold the Alt key and type 0169 on the numeric pad for Windows, or type Option + G on the Mac).
Similars
If all the images you’re importing have the same subject, you can add keywords now, saving yourself time down the road. You’ll see a Keywords field in the Import dialog. As you enter keywords here, anything that matches will be displayed, which helps avoid misspellings. Separate each keyword with a comma, and when you’ve finished, click the Import button.
 |
Keyword Later
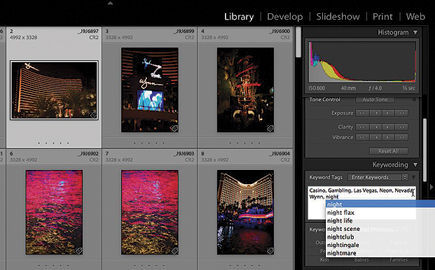
Of course, you can also add keywords at any time to one or more images that are already in your collection. In Lightroom, this is done from the Library module. On the left side, you’ll see a Keywording section. Select all the images you want to apply the keywords to, and enter them here. As you can see, if the keyword already exists, you’ll see a list of matching entries you can select from.
 |
Keywording Tips
1. Regardless of what words you use, make their use consistent. If you start using house, use house on all appropriate images, don’t tag some with house and some with home.
2. If your application supports hierarchical keywords, identify keyword groups for your images. For example, if I shoot images of tulips, I automatically get flowers included with my keywords because tulips are a subset of flowers. Same with roses or iris. So, when I search for flowers, I can either use the keyword flowers to find everything, or I can filter it down to a smaller group by using the flower name.
3. If you’re stuck trying to come up with keywords, go online and look at similar images for ideas. Of course, if you go with The Controlled Vocabulary, finding the right keyword is seldom a problem.
4. Whether you use keywords or not, put your copyright information into every single image you import.
ID Ideas
One problem that arises is in knowing which specific keywords to use. For example, the photo shown is from Nyhavn Harbor in Copenhagen, Denmark. Logical keywords would include Nyhavn Harbor, Copenhagen, Denmark, boats, tourism. But, let’s assume that the potential buyer doesn’t use boats in his search and can’t recall the name of the area. If he searches for ships, Denmark, he will see a number of images before finding this one and this image will be lumped with every other image tagged with Denmark, regardless of the subject matter.
Luckily, there’s a great tool to help standardize keyword selection. The Controlled Vocabulary is a project started by David Riecks and available at www.controlledvocabulary.com. The full catalog contains about 11,000 terms organized by hierarchical structure, making it easy to select the best possible set of keywords for your images.
 |
|
|
The catalog is available in various formats to support popular DAMs. You’ll also find plenty of information on metalogging and IPTC standards to help you learn what standards are used by stock agencies and other image buyers.


![]()
Get the Latest Photo Tips, News & Reviews from Shutterbug!
| Camera Reviews Other Reviews | Mobile Reviews Photography Reviews Columns | News | Features | How-To | Resources |
 © 2025 Shutterbug
AVTech Media Americas Inc., USA
All rights reserved