- REVIEWS
Camera Reviews 
More Reviews Mobile Reviews Photography Reviews - GALLERIES
- VIDEOS
- BUYER'S GUIDES
Experiments With Flash: Creative And Fun Techniques
With the immediate feedback of the LCD monitor of a digital camera, you can now assess the exposure, composition, the background, and everything else that goes into making pictures successful—or unsuccessful. With the next shot, you can change any of these factors until the photos are exactly what you wanted in the first place.
“Dragging” The Shutter
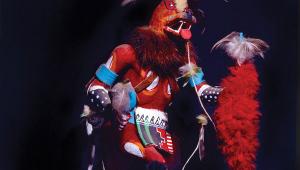
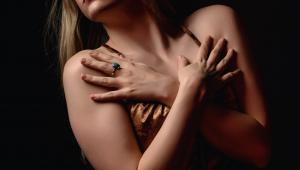
This is my favorite technique with flash. In essence, you are creating a double exposure as you can see in (#1) where the abstracted lights are superimposed over the costumed models. Similarly, I photographed a Maasai dance in Kenya (#2) and portions of the image are frozen from the flash while other areas are blurred. I did this by setting the camera to shutter priority. I typically choose a slow shutter speed ranging from about 1⁄15th of a second to one full second, depending on how fast the subject is moving and what kind of picture I want. For the Maasai dancers, I used 0.6 seconds, and for the Carnival models in Venice I selected 1⁄2 second.

All Photos © Jim Zuckerman
It’s interesting to note the difference between these two pictures. In the night shot of Venice, the models were stationary and I moved the camera in a horizontal direction. In the African shot, the camera remained still but the performers were moving.
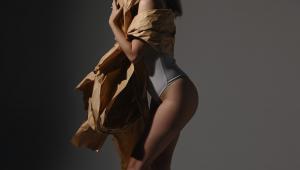
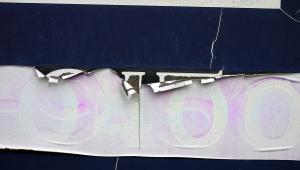
Normally, the shutter opens fully, the flash fires, and the shutter closes. On most portable flash units, you have the choice of precisely when the flash fires during the relatively long exposure. For example, if the flash fires at the beginning of the time the shutter is open, this is called first curtain sync. If the flash fires at the end of the time the shutter is open, this is second curtain sync. The difference between these two options shows up in the placement of the subject with respect to the streaks of light in the picture. For example, in (#3) I moved the camera from left to right and then, just before the shutter closed, the flash fired. This was second curtain sync, and as a result the streaks of light seem like they are trailing the model. Second curtain sync is usually preferred when shooting moving subjects at twilight or night such as a motorcycle or car where the lights trail the vehicle.

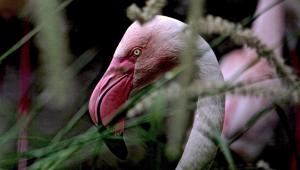
Sometimes I like to move the camera during a longer exposure, such as (#4). I used front curtain sync for this shot in Venice, but the shutter was open for 2.5 seconds. Without the long exposure, the background would have been very dark. Had I used a tripod, of course, the entire picture would be sharp. I wanted something “different” so I hand held the shot. I like the fact that while the background is abstract it is still defined so we can recognize what it is. How the picture turns out depends on how much you move the camera during the exposure.

A variation on this theme is to change focal lengths during the long exposure. In other words, if you zoom a lens in conjunction with a flash, the results can be quite dynamic. The action shot of two Carnival dancers in Rio de Janeiro, Brazil (#5), shows you what I’m talking about. During the 1⁄2 second exposure, the flash fired and I zoomed from 70mm to 200mm (it doesn’t matter if you zoom from wide to telephoto or telephoto to wide). In this particular case, the abstracted background worked to my advantage because the spectator boxes were in the distance and they weren’t very attractive. The zoom blur took care of that.

Shooting indoors at a performance of Turkish folk dancers (#6), I didn’t want photos with only the on-camera flash look, and to take pictures without any flash at all meant either a foolishly high ISO or images that were completely blurred with no definition in the performers. The solution, then, was to combine both. I reduced the exposure on the flash by minus 2⁄3 stops, and the shutter speed I chose (based on test shots and then studying the LCD monitor) was 1⁄6th of a second.

To demonstrate how this technique can be applied to so many different situations, I photographed the summer solstice celebration near Vilnius, Lithuania with a one second exposure and flash, (#7). Notice how only the center of the scene shows any evidence of flash. This happened because I used a 14mm lens without any attempt to expand flash coverage with a diffuser. In this way, I only illuminated the logs surrounding the fire, allowing the rest of the picture to retain the red glow from the firelight.

Multiple “Pops”
When you are shooting in a dark environment, you can fire the flash using the test button multiple times while the shutter is open for a variety of effects. Shooting at night makes this possible, and you can also use a black background in a studio. No image is recorded until the flash fires, assuming there is no ambient light. To do this set the shutter to Bulb, or a very long shutter speed.
This application can be seen in the photo of a megalithic head from the 1st century B.C. I photographed in Turkey, (#8). With the camera on a tripod, I was able to fire my flash off-camera twice, once with a red filter held over the flash head and once with no filter. This gave the ancient statue an interesting highlight against the pre-dawn sky. The flash was set to ETTL and the camera was set to Manual. I had to do some test flashes to determine the correct lens aperture.

- Log in or register to post comments


![]()
Get the Latest Photo Tips, News & Reviews from Shutterbug!
| Camera Reviews Other Reviews | Mobile Reviews Photography Reviews Columns | News | Features | How-To | Resources |
 © 2025 Shutterbug
AVTech Media Americas Inc., USA
All rights reserved