- REVIEWS
Camera Reviews 
More Reviews Mobile Reviews Photography Reviews - GALLERIES
- VIDEOS
- BUYER'S GUIDES
Do It Yourself
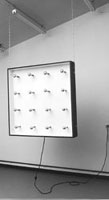
Build A 1600W Studio Broadlight
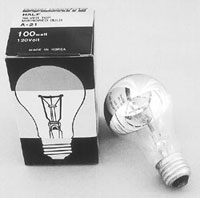
Our do-it-yourself project this month is a studio broadlight particularly suitable for portraiture. Unlike point source lights diffused with fabric coverings, this mammoth fixture uses 16 100w bulbs, arranged in a grid within a wooden box, to flood a very large area with soft illumination. While this is a Level 3 project (see the April 2000 issue for an explanation of my DIY project complexity scale) the parts and materials can easily top $100, so consider your lighting needs carefully before starting. And, although a smaller version can be built at a somewhat lower cost, the softening effect comes mostly from the large light box size. The design is quite simple, but the first step should be finding an electrical supplier who carries (or can order) the requisite "silver-top" bulbs shown in the accompanying photos. These are ordinary 100w tungsten bulbs with an internal mirrored dome that reflects light from the filament backward, toward the lamp base, so that our white plywood panel can collect it and bounce it forward. Although 1600w is a good amount of light even by studio standards, the large distribution area significantly reduces the heat endured by your subject. |
|||
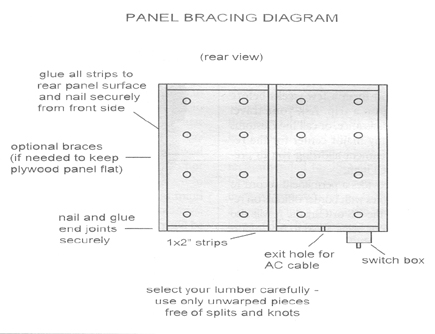
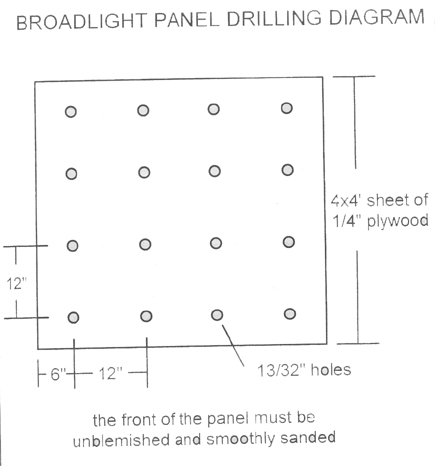
Because the color quality of the lamps is less than 3200°K, I recommend using tungsten-balanced color film and a pale correction filter, or black and white film without filtration. Also, as the type of white paint used in the light box can change color output, take a color temperature meter reading (or experimentally expose a roll or two of film) to determine the exact filter needed. Of course, daylight film can be exposed with the broadlight, but the deep blue conversion filter required for normal color rendition cuts the effective light output to less than 800w. The diagrams and photos shown will guide you through assembly. As the choice of paint used to finish the interior also affects light intensity, I recommend a base coat of good quality bare wood primer/sealer, followed by at least two coats of bright, semimatte white latex paint. Avoid glossy enamel, as its high reflectance can throw hot spots onto the subject. Heat yellows the paint over time, so a new top coat will have to be applied periodically. Tungsten lamps also darken with age, but these should last around a thousand hours before their output drops to an unacceptable level. Be sure to change all 16 lamps as a set. In addition to altering the dimensions of the light box, you can change the number and wattage of lamps, but keep power consumption in mind to keep from blowing a typical 15amp fuse. (Divide the total lamp wattage by 120 to find the power consumption--the 16 100w lamps use just over 13amps.) Two or more banks of separately switched lamps can be wired for convenient lighting ratio control, if desired. Use 16 gauge or larger wire for the AC cord and internal hook-up, install a power switch rated at 15amps or more, and never leave the broadlight on longer than necessary. If this is your first electrical project, have the finished work checked by an electrician or an experienced do-it-yourselfer for possible shock and/or fire hazards. |
|||
|
|||
|
|||
|

- Log in or register to post comments


![]()
Get the Latest Photo Tips, News & Reviews from Shutterbug!
| Camera Reviews Other Reviews | Mobile Reviews Photography Reviews Columns | News | Features | How-To | Resources |
 © 2025 Shutterbug
AVTech Media Americas Inc., USA
All rights reserved