- REVIEWS
Camera Reviews 
More Reviews Mobile Reviews Photography Reviews - GALLERIES
- VIDEOS
- BUYER'S GUIDES
Are Your Soft Photos Due to a Faulty Lens or Bad Filter? (VIDEO)
There's nothing more aggravating than capturing what you thought was a great shot, only to discover upon close evaluation that the image isn't critically sharp. There are a variety of reasons that this may occur, and we've discussed many of these in the past, but the video below explores a couple other causes worthy of consideration.
Soft images are typically the result of poor technique, incorrect camera settings, or the failure to use a tripod when shooting in low light when long shutter speeds are the norm. But what about the possibility that your lens is out of alignment or the culprit is a bad filter?
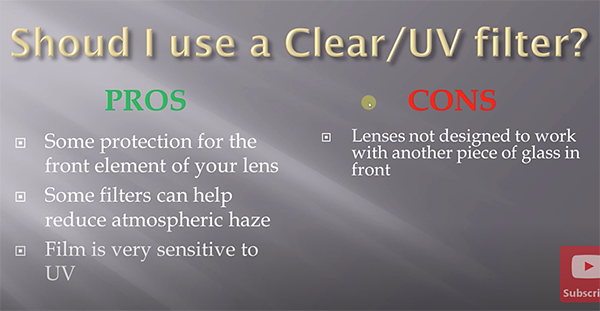
After all, many photographers always use a UV or Skylight filter to protect the front element of their lenses from moisture, scratches, dirt, and other forms of damage. But this practice can be counterproductive if you try to save money by purchasing cheap filters—especially if you if you invest big bucks on premium glass.

On rare occasions unsharp images may be the result of a malfunctioning camera, but we'll leave that discussion for another time. Today we'll help you diagnose whether to blame your lens or the filter on the front. Let's hope it's the latter because in that case the solution is both obvious and affordable.
Pablo Garcia is an experienced landscape photographer with a background in engineering that he draws upon to identify gear problems that may affect the quality of his images. He recently returned from Bosque del Apache National Wildlife Refuge in new Mexico, and despite his premium camera and lens, he was disappointed that many of his images were unsharp.
As an experienced bird photographer there was no question about the techniques and camera settings he used and he was confident that "I did everything perfectly." Thus, he was determined to devise a testing procedure to determine exactly what went wrong. He has another big trip coming up soon, so he needed to quickly figure things out in case he had to send his camera and/or lens in for servicing ASAP.
Garcia's methodology was both thoughtfully controlled and repeatable so he could have faith in the findings, and it's one you can employ if you confront a similar problem. As you'll see, he wanted to remove all sources of vibration, so he mounted his camera and lens on a sturdy tripod and disabled image stabilization.
He also relied upon a wireless remote to activate focus and trip the shutter, using ISO 200 at 1/200, and an aperture setting of f/8. Garcia employed a Spyder LensCal target and conducted tests at two different camera-to-subject distances to cover all the bases.
So take a close look, examine his results, and learn what Garcia discovered. It's a very interesting experiment, and you can find more videos like this one by visiting his instructional YouTube channel.
We also suggest watching a tutorial we posted recently from another pro who demonstrates how to master Lightroom's Lens Blur tools to create eye-catching nature and wildlife photographs with maximum impact.


![]()
Get the Latest Photo Tips, News & Reviews from Shutterbug!
| Camera Reviews Other Reviews | Mobile Reviews Photography Reviews Columns | News | Features | How-To | Resources |
 © 2025 Shutterbug
AVTech Media Americas Inc., USA
All rights reserved