- REVIEWS
Camera Reviews 
More Reviews Mobile Reviews Photography Reviews - GALLERIES
- VIDEOS
- BUYER'S GUIDES
3 Easy Ways to Use Water as a Gorgeous Artistic Effect in Your Photos

Although Florida doesn’t have the majestic mountains typically captured in reflective landscape images, its lakes provide a perfect venue for beautiful water art images. Technical info: Nikon D7200, 12-24mm lens, Manfrotto 055CXPRO3 tripod, Acratech ball head; f/4, 1/250 second, ISO 100. Photos ©Jeff Howe
The practice of incorporating water reflections into your photography can create amazing effects and beautiful images. Water reflections can completely alter an ordinary image and create something deeper, more abstract, and artistic.
These reflections are all around us if we slow down and train our eyes to observe and seek out these wonderful opportunities. As a photographer, we are tasked with seeing beyond the obvious, to see things differently, rather than seeing only one part of a larger whole. I like to refer to this type of photography as water art.
It is an art because you must delve deep into your imagination to see the hidden possibilities and beauty in a particular scene. On the other hand, it’s also a science because you need to know and understand some basic techniques in order to capture the perfect image. Here are three ways to incorporate water into your images as an artistic effect.
1. Reflect Skyscapes
One of the most common types of water art involves spectacular skyscapes reflected on water where the symmetry provides for a stunning image. Although the primary focus of these images is the reflection, the focus could be something completely different—a silhouette, a common water feature such as a dock or a boat—while the reflection itself merely provides a subtle, colorful backdrop.
The hours of dawn and dusk are typically the best times of the day because the light is at its best. At dawn in particular the water is more likely to be calm, thereby maximizing the water’s reflective potential, and the colors, clouds, and lighting tend to be more dramatic. Additional suggestions in order to maximize your results include:
• Using a tripod to ensure a tack-sharp image.
• Thinking about the angle of the light and how it may affect the reflection based on the image you’re hoping to capture.
• Experimenting with your focal point and f/stop, which will in part depend on the distance between the subject and the reflection. I would suggest starting with a relatively high f/stop such as f/11 so that the subject and reflection appear to be closer to each other than in reality, thereby enhancing the reflection.
• Using a polarizing filter to control the amount of shine from the water’s surface.
• Using a graduated neutral density filter to prevent overexposing the sky.
2. Use Puddles
On a much less grand scale, wonderful opportunities for water art await you in the form of puddles. The next time you experience an intense rainstorm, check out puddles along the sides of roads, in parking lots, ditches, etc., and look for those unique opportunities. The exciting element associated with puddles is that not only does the photographic potential of the puddle change over the course of the day based on lighting, etc., but they will also increase or decrease over time based on the weather.
That said, plan on visiting the same puddle or series of puddles over several days to explore their full potential. Also, unlike large bodies of water, puddles provide you with the unique ability to alter the reflective qualities. For example, drop a small rock in the puddle and observe how it affects your image. If you’re looking for that painterly or abstract effect in your images, this is a great option and no two images will be the same. Additionally, check out puddles on a windy day as this will create a different effect.
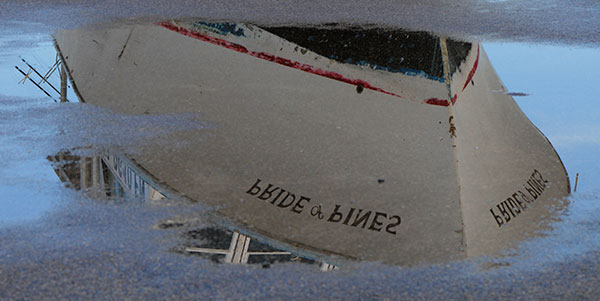
In a photo outing at a local boatyard, I was fortunate that it had rained the night before because the rain created a plethora of image possibilities. Technical info: Nikon D300, 105mm macro lens, Manfrotto 055CXPRO3 tripod, Acratech ball head; f/9, 1/80 second, ISO 200.
Florida, where I reside, is riddled with naturally formed springs, man-made lakes, retention ponds, and a network of canals. Some estimates suggest that there are over 8,000 lakes greater than one acre in size and thousands of miles of canals; all of which play a vital role in flood control, water conveyance, drainage, irrigation, stormwater treatment, water supply, navigation, water quality improvements, and recreation. Hence, even during drought conditions, I have plenty of other small bodies of water to explore throughout any given year.
3. Focus on Droplets
There is no requirement in water art that states that the reflective surface has to be flat. Droplets are a great example of this.
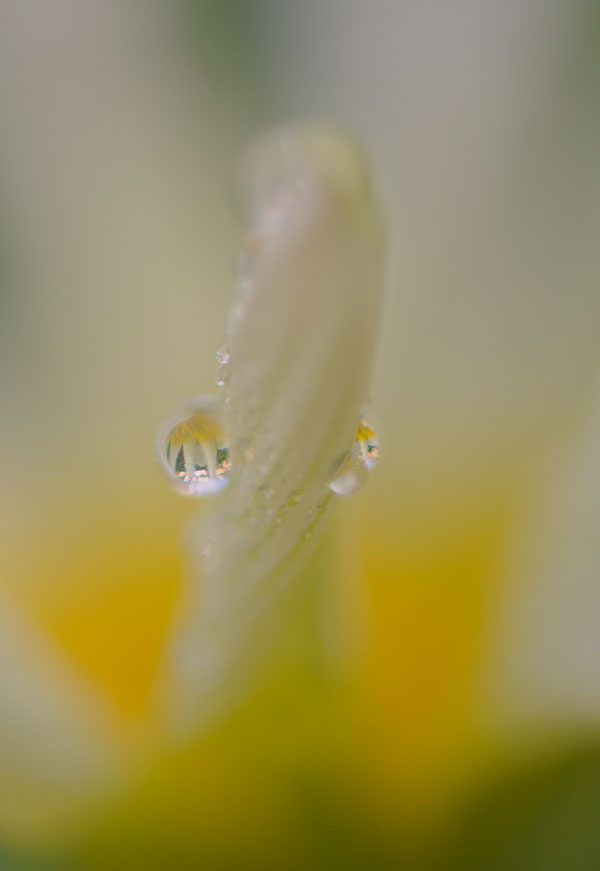
Arriving at a local nursery after the morning irrigation system had cycled off, this blossom caught my eye with both reflective droplets. Fortunately, it was early in the morning and wind was not a factor. Technical info: Nikon D300, 105mm macro lens, Manfrotto 055CXPRO3 tripod, Acratech ball head; f/4.8, 1/160 second, ISO 200.
Whether created artificially through the use of a sprinkler or spray hose, or naturally after a rain shower or morning dew, these beautifully crafted droplets provide us with a curved window as they reflect and refract light in marvelous ways. As photographers, it’s up to us as to how we choose to use these elements in fulfilling our artistic vision. There are a few fundamental techniques that will assist you in achieving better results when photographing droplets.
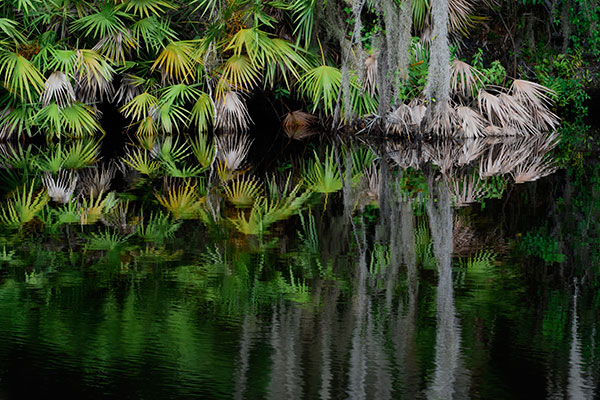
While walking along a canal, this image reminded me of what Old Florida must have looked like in the past. Technical info: Nikon D7200, 70-200mm lens, Manfrotto 055CXPRO3 tripod, Acratech ball head; f/18, 1/30 second, ISO 640.
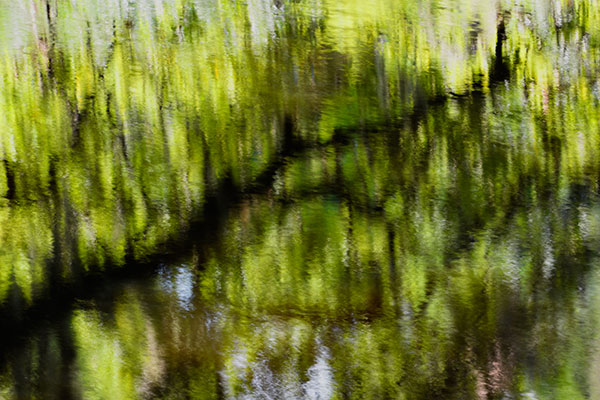
On a windy day, I took numerous images of this foliage reflected in a puddle. I experimented with different shutter stops to produce the painterly effect. Technical info: Nikon D7200, 70-200mm lens, Manfrotto 055CXPRO3 tripod, Acratech ball head; f/16, 1/40 second, ISO 100.
Use aperture priority to control the depth of field so that the drop, adjacent drops, plant, and reflective image are in focus. Although I always attempt to maximize the depth of field with an aperture setting as high as f/22 or f/32, I may need to open my aperture in order to blur a distracting background. Regardless of the f/stop setting, secure your camera on a sturdy tripod. Another thing to take into account is the distance and position of the droplet in reference to the object behind it.

Along the bank of a man-made wetland, I observed this drop of dew early in the morning. I positioned my camera in order to backlight the plant, and I closed down the aperture to create the starburst. Technical info: Nikon D300, 105mm lens, Manfrotto 055CXPRO3 tripod, Acratech ball head; f/40, 1/6 second, ISO 200.
To maximize the “fixed focal lens” of the droplet you may need to move the object forward or backward until clarity of focus is attained. Best results will be obtained when the object is three to five inches behind the droplet.
Also, since the shape of a droplet is not perfectly spherical, slight adjustments in regard to the camera’s position can have drastic effects on the final image. A couple of other items to keep in mind as it relates to photographing droplets include:
• Droplets will present your subject upside down and in reverse.
• Droplet integrity (e.g., size, cohesion) will be easier to maintain on more humid days.
• Don’t attempt on a windy day.
• You can create your own droplets using a syringe and a small amount of sugar added as it will attach better, or use glycerin.
Water art can be described as abstract, but when utilizing water as a reflective surface, the type of images you create are totally up to you. Like so many other avenues in photography, experiment, experiment, and then experiment some more.
To see more of Jeff Howe’s water art, visit http://jeffreyhowe.zenfolio.com.


![]()
Get the Latest Photo Tips, News & Reviews from Shutterbug!
| Camera Reviews Other Reviews | Mobile Reviews Photography Reviews Columns | News | Features | How-To | Resources |
 © 2025 Shutterbug
AVTech Media Americas Inc., USA
All rights reserved