- REVIEWS
Camera Reviews 
More Reviews Mobile Reviews Photography Reviews - GALLERIES
- VIDEOS
- BUYER'S GUIDES
Get The Noise Out; A Survey Of Strategies For Digital Imagers Page 2
Controlling Noise With Color Noise Reduction
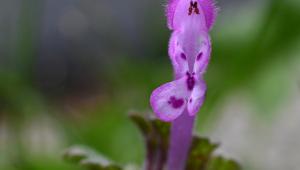
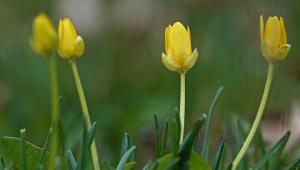
If you have green or magenta speckles in your image, particularly in dark areas,
or you see these speckles around highlights in the image, you are a victim of
color noise. The problem is particularly bad at higher ISO settings and with
longer exposures. Color noise shows up even more with high-resolution compact
cameras that pack more photosites into a smaller area, resulting in sensors
that are more sensitive to light than their digital SLR counterparts that use
larger sensors. The method of correcting color noise is very similar to the
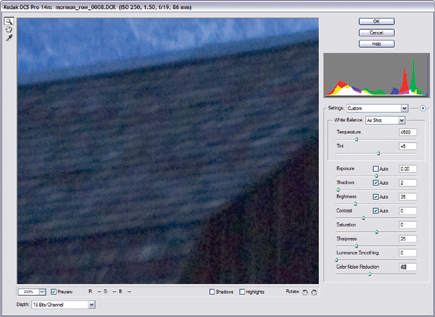
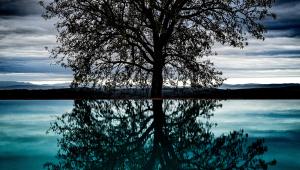
one used previously for luminance noise. Start off by zooming in as much as
needed to see detail in the problem area of your image (#6).
 |
|
|
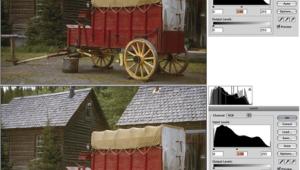
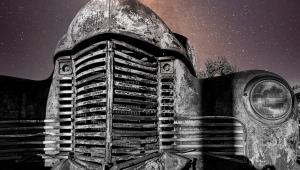
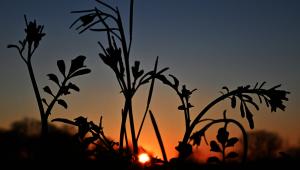
After zooming in on the problem area, the color noise problems are obvious in this image. All of the green and magenta splotches are signs of noise. Color Noise Reduction doesn't have the same problem with affecting the sharpness of the converted image that Luminance Smoothing does, but you'll still want to keep your adjustments to the minimum acceptable here. (If you're using Photoshop, this slider is on the Camera Raw Details tab.) I suggest starting at the control's default setting of 25 and going from there. Again, watching the preview area as you make adjustments, watch for the splotches of color to begin to blend away as shown in #7.
 |
|
|
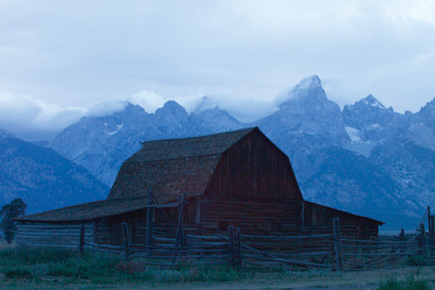
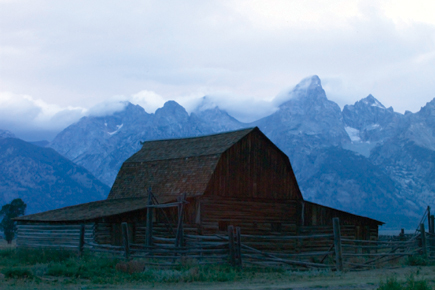
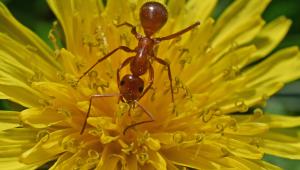
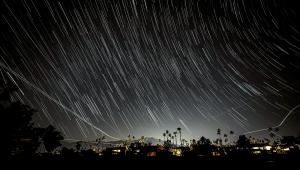
As you can see in the before and after (#8 and #9) images on the following page, the green and magenta problem areas are much less visible in the shadows of the image.
 |
|
|
 |
|
|
When To Look Into Other Tools
To be honest, the noise reduction tools in Adobe Camera Raw don't offer
the level of control that will take care of every noise problem you encounter.
Some other tools available that can work minor miracles on your noise-plagued
images are available.
There are a couple of drawbacks that you should consider. First, they are an
extra expense. Second, these programs don't work on the raw images, so
you'll need to do all your conversions first and then run the image, either
a TIFF (recommended) or JPEG, through the noise reduction process. Finally,
using them adds an extra step in the workflow. With these caveats in mind, I
recommend any of the following for those really tough noise problems. Each of
the applications listed here works on both Macintosh OS X and Windows XP systems.
Noise Ninja (www.picturecode.com)--This
includes both stand-alone and Photoshop and Photoshop Elements plug-in versions.
The program includes numerous profiles for specific cameras and includes information
on how to create your own profiles. Noise Ninja does the best job of luminance
noise reduction of any program I've tried. I recommend getting the pro
version which supports 16-bit images and batch processing options. The Pro version
costs about $80, and it includes the plug-in and the stand-alone version.
nik Dfine (www.nikmultimedia.com)--This
is a Photoshop and Photoshop Elements plug-in. Dfine has the most intuitive
interface of the noise reduction programs listed here and does a particularly
good job with color noise reduction. If you use any of the other nik products,
such as Sharpener Pro or Color Efex, Dfine will be easy to understand and use.
It runs at around $100.
Neat Image (www.neatimage.com)--This
is the other strong contender for noise reduction. Neat Image and Noise Ninja
compete for best results on many images. Neat Image also has a stand-alone and
plug-in version of the program. The stand-alone version supports batch processing
and 16-bit files. The Windows Pro bundle, which includes both versions costs
under $80; and the Mac version is under $40.
My Recommendation
If you frequently find yourself making adjustments to raw images in Camera Raw
but aren't happy with the results, take a look at one of these programs.
All three work on Macintosh or Windows systems, and all work with Photoshop
Elements and Photoshop. I recommend Noise Ninja. It does the best overall job
and is significantly faster than the other options. All of them have free trial
versions available (go to their respective websites), so try them out and see
which suits your needs best.
--Jon Canfield
Jon Canfield is a writer and photographer living in the Pacific Northwest. He has contributed many articles on digital photography to several magazines and is an instructor with BetterPhoto.com. "RAW 101: Better Images with Photoshop Elements and Photoshop" is Jon's second book. His first, co-authored with Tim Grey is "Photo Finish: The Digital Photographer's Guide to Printing, Showing, and Selling Images." To contact Jon, send e-mail to jon@joncanfield.com, or visit his website at: www.joncanfield.com.
|
| |||||||||
- Log in or register to post comments


![]()
Get the Latest Photo Tips, News & Reviews from Shutterbug!
| Camera Reviews Other Reviews | Mobile Reviews Photography Reviews Columns | News | Features | How-To | Resources |
 © 2024 Shutterbug
AVTech Media Americas Inc., USA
All rights reserved