- REVIEWS
Camera Reviews 
More Reviews Mobile Reviews Photography Reviews - GALLERIES
- VIDEOS
- BUYER'S GUIDES
Take Control Of Your Print Quality; A Color Managed Screen-To-Print Workflow With Adobe’s Photoshop Elements 3.0 & 4.0
This article is for those of you who color correct and adjust your image files
to attain what looks like an ideal photograph on screen, but whose prints don't
match that perfect screen image. Of all the challenges and disappointments digital
photographers express to me in e-mails I receive almost daily, matching screen
to print is the most common. It is also the most difficult for me to answer
with an easy and simple solution, as there are quite a number of detailed steps
involved. As a foundation for our discussion I'll delve into color management
and how it works.
The Problem
Printing disappointment is normally not something that can be blamed on inkjet
photo printers, at least those made recently, including many of the inexpensive
models. The fault is also not usually found in the way you might edit the image
file or operate the printer. If anything, it could be blamed on marketing forces
and how printer manufacturers set their defaults to aid snapshooters, casual
users who just want a print of any kind reproduced as easily as possible. The
manufacturers of inkjet photo printers are very aware their products may be
used indifferently and carelessly. To this end, the printer driver has been
given the task of analyzing the file information sent to it and then making
automatic adjustments to correct for any deficiencies. It is a built-in defense,
if you will, against the "garbage in, garbage out" syndrome.
The problem this creates is that the printer driver's auto-correction
cannot "see" what the image should look like, or identify and recognize
the subject content. It can only recognize that the file information does not
conform to predetermined standards and generic, stereotypical image quality
values. This is not all bad--if the image content is of a typical, "normal"
scene, the automatic adjustment applied can be advantageous. But if the subject
content is unusual, like a high-key wedding portrait or a cityscape at night,
the software is often misled into applying an erroneous correction and the driver
reproduces a poor print quality, at least relative to what the image looks like
on screen.
 |
The Context
In the early days of personal computers, obtaining a color match between what
is seen on screen and what is reproduced by a color photo inkjet printer was
just one of many problems with digital color reproduction. Although a standard
method of recording and storing digital color information was established pretty
early on, computer color reproduction devices like monitors, scanners, digital
cameras, and printers were "independent," that is, each device reproduced
somewhat different-appearing color from the same RGB file information. Until
fairly recently, when many of the key players came together to form the International
Color Consortium (ICC) and agreed on a standard color palette, there was not
a universal, objective benchmark for what color should look like. Once the ICC
standard was established, then software application developers could make their
image-editing programs support the management of color.
That capability was first introduced to individual computer users with Adobe's
Photoshop Version 5.0. Control of how color is reproduced is now supported by
a number of applications, including products from Adobe and Corel. To find a
solution that can be generalized to almost all of these products I'll
work with Adobe's Photoshop Elements, a popular and powerful software
program.
 |
Profiles--What They Are And How They Work
The problem is to have different devices conform to a standard so that they
will "agree" on reproduction from the same RGB image file information.
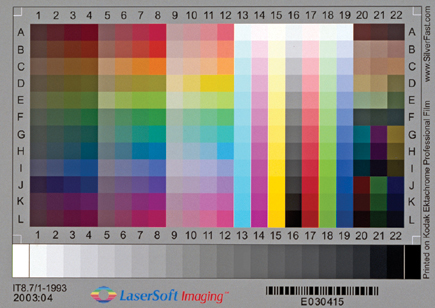
The solution rests with the establishment of a standard ICC color palette represented
by uniform targets like an IT8 film or print reference. This defines what color
should look like. Using the test target, each color reproduction device can
be measured and calibrated (characterized) to produce data which defines how
the device's color reproduction differs from the ICC standard palette.
The result of this measurement and analysis is then written in a text file called
a profile with either the
suffix .ICC or .ICM. This profile is then associated with the device, and that
file is stored in a Color/Profile folder in a computer's operating system.
In addition to device profiles there are also working space profiles, like sRGB
and Adobe RGB (1998). These define the color space used by an application to
generate and display image files. If an image file is created by the application
the working space profile (Adobe RGB) can and should be embedded in the file.
This embedded profile tells any computer imaging application that supports color
management the color space to use to open the file. This is how consistency
of color reproduction is achieved between color reproduction devices like scanners,
cameras, displays, and printers, and also between computers using any and all
operating systems, including Apple, Microsoft, UNIX, and Linux.
A Profile-To-Profile Color Managed Workflow, Step By Step
The one crucial prerequisite for all this to work is that your computer system's
monitor/display is calibrated and profiled, and the monitor profile is the default
the system uses to control displayed color.
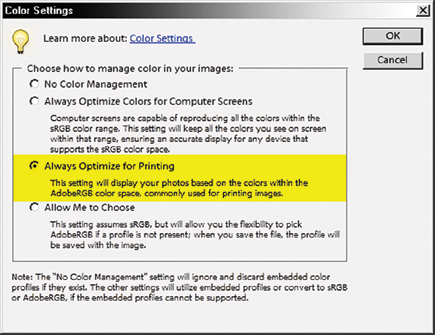
Second, the application's (in this case Adobe's Photoshop Elements
Versions 3.0 or 4.0) Color Settings must be configured to use the Adobe RGB
(1998) working space by selecting "Always Optimize for Printing."
What follows are workflows for Windows and Mac operating systems.
Windows Instructions
1. Once you have launched Elements go to the menu bar and click
on Edit, and from the drop-down menu selections click on Color Settings. When
the Color Settings dialog opens click on the radio button "Always Optimize
for Printing." If you are also using Elements to color correct and adjust
photo image files that you expect to print, you should also use this option
setting to manage color.
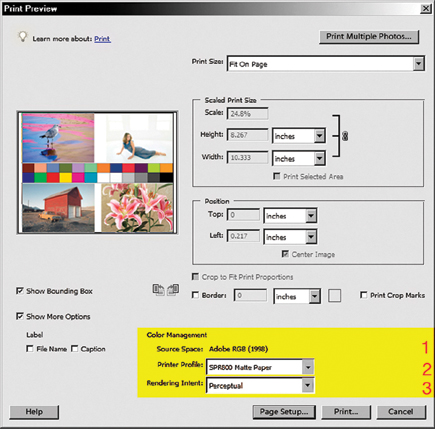 |
2. To make a print of a photo image open in Elements, click Print from the application file menu to open Print Preview. Then, after selecting your print output size and selecting orientation in Page Setup, you must click on "Show More Options" to check and select the Color Management options. (1) Be sure that the Source Space is Adobe RGB (1998). (2) Click on the arrow to the right of the Printer Profile box to open the drop-down menu selection and select the profile that corresponds with your printer and the paper you will be printing on. (The printer is usually identified by an abbreviation. But if you are confused which profile file name is associated with your printer and each paper it uses, then use Windows Search to open the Color folder in the operating system. Right click with your mouse on each profile file to pop up a Properties dialog that provides an identification description of each profile.) (3) The usual preferred Rendering Intent selection for photographic image printing is Perceptual. Some users prefer Relative Colorimetric, which you may also try to compare the print results. With these settings complete, click on Print.
 |


![]()
Get the Latest Photo Tips, News & Reviews from Shutterbug!
| Camera Reviews Other Reviews | Mobile Reviews Photography Reviews Columns | News | Features | How-To | Resources |
 © 2025 Shutterbug
AVTech Media Americas Inc., USA
All rights reserved