I understand that Jon was trying to keep it simple, but in that case he shouldn't be dogmatic about its distribution always being 1/3 nearer and 2/3 farther away than the distance focused upon. That is true at only one focus distance. When focusing close, at 1:1 it is 1/2 nearer and 1/2 farther. As focus moves farther away, the far depth increases more than the near depth.
- REVIEWS
Camera Reviews 
More Reviews Mobile Reviews Photography Reviews - GALLERIES
- VIDEOS
- BUYER'S GUIDES
Photo Basics: 7 Facts About Depth-of-Field That Help Photographers Take Better Pictures

Depth-of-field is like the weather—we can’t control it but we can take advantage of its powerful effects. That is, if we understand its behavior. Here are 7 facts about DoF to coach photographers through the laws of physics and optical phenomena.
Depth-of-field is predictable, and you can leverage it to improve your images. All you need is a bit of background and some practice.
1. Simplified Definition
When a lens is focused on a subject, some objects in front of and some objects in back of the subject are also in focus. The band of sharpness between the nearest sharp object and the most distant sharp object is called the Depth-of-field. In other words, DoF is that slice of real estate that’s in focus at the same time the main subject is in focus.
2. Inconsistent But Predictable Behavior
Depth-of-field on average, mid-distance subjects extends about 1/3 in front and 2/3 in back of the subject that is in sharpest focus. DoF front-limit-to-back-limit range varies with subject distance, and approximates nearly 1:1 (at close-up distances) to 1:infinity (at farther distances).
3. Subject Distance Matters
Depth-of-field decreases as you move in closer to the subject you focus on. Conversely, DoF increases as you move farther away. This doesn’t matter much when you’re focusing on a herd of nanny goats or the sunset over Lake Michigan, but when you’re shooting macro images at very short distances, this phenomena becomes extremely critical. Likewise, when shooting portraits it’s a matter of tremendous importance. More on that later.
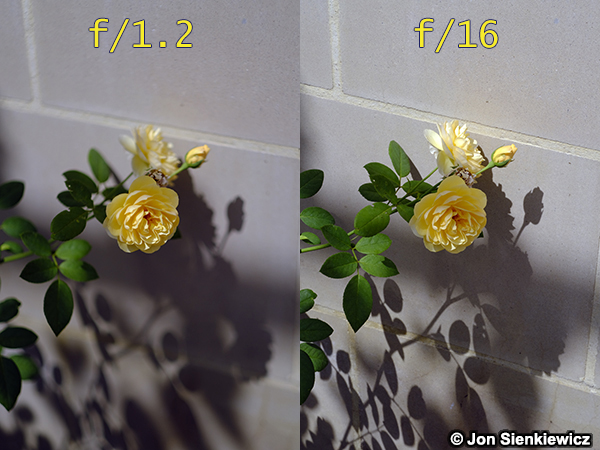
4. Influence of Aperture
Depth-of-field increases as you reduce the aperture. Shooting at a small f/stop, f/8 for example, produces greater DoF than shooting at f/4—provided that everything else is the same. By the same token, shooting at a large aperture, like f/2, produces less DoF than f/4 under identical conditions.
Portrait photographers often exploit this fact of physics by shooting at a large aperture to limit the DoF and thereby isolate the subject from the background (and sometimes foreground). This makes the subject appear to pop off the page.
This carefully applied feature can make the main subject appear sharper because our eye compares it to the background.

The out-of-focus areas are commonly called bokeh, a word appropriated from Japanese language that translates literally as “lack of focus.” In the Western world we use the term endearingly, and apply lavish adjectives when describing a condition that is really, simply, not sharp. But I’ll climb on that soapbox another day. (For the record, the first syllable is bo as in bowtie and the second is keh; the eh sound is like the e in edible. I’m so tired of hearing YouTube experts mispronounce it.)
If stopping down a little is good (i.e., using a small aperture), then stopping the lens down all the way to the smallest possible aperture is even better, no? No. If you select an f/stop that’s too small, a weird and disruptive effect called diffraction erodes the sharpness. Scientifically, this is caused by interference created when lightwaves are crammed through a tiny opening.
Logic suggests that there should be a perfect compromise of aperture, DoF and other optical phenomena. There is, and the technical word for it is “sweet spot.” More of a range than a spot, truth be told, every zoom lens, for example, has a combination of focal length and f/stop that produces the best results.
Sadly, for telephoto zoom users, often the worst combination is one that is used often—zoomed to the longest focal length and stopped down to the smallest aperture. If you’re not happy with your 75-200mm zoom, do some shooting at the 135mm setting at f/5.6 and compare.
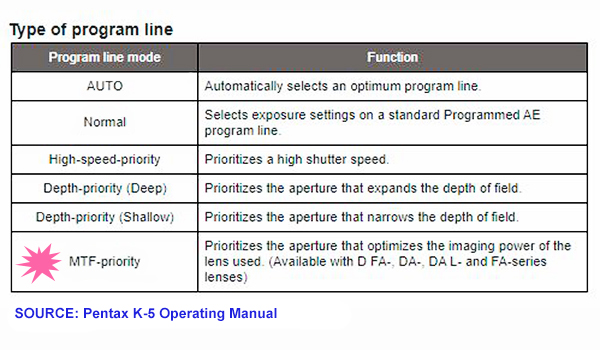 Whereas many cameras offer Program Exposure modes that favor fast subject action, DoF and/or other considerations, to my knowledge Pentax (Ricoh) is the only camera company that features an MTF Program Slope, that is, the exposure is governed by algorithms that try to use the best aperture for the attached lens. MTF stands for Modulation Transfer Function and is usually presented as a graph that compares the tested lens to a theoretically perfect sample. MTF is not as popular as it could be because the charts are challenging to decipher, on par with casual reading of Sumerian cuneiform in the dark without your glasses.

Use a large aperture and lens in the 80-105mm range for headshots. ©Jon Sienkiewicz
5. Focal Length Matters – A Lot
Depth-of-field is greater with wideangle lenses. The opposite is true as well: DoF is comparatively less with telephoto lenses. If you use a wideangle-to-telephoto zoom, then your lens has a bifurcated personality.
Once again, portrait photographers leverage the shallow DoF of mid-tele lenses, made even shallower by a larger aperture, to make the main subject jump out of the background. A telephoto that’s too long causes unflattering compression of facial features, however, so the recommended focal length for head shots is between 80mm and 105mm. (For you purists out there, yes, I am aware that it’s the subject distance that creates the apparent distortion, but cut me some slack because this is an admittedly oversimplified explanation in the interest of brevity.)

6. Disappearing Depth-of-Field
Okay, it doesn’t really disappear, but DoF can become so shallow that it seems to. For instance, Depth-of-field at f/1.4 on a 85mm lens is paper thin, particularly at closer distances. For some images, this is a desirable feature. If you’re shooting a tiny spider on her web, not so much.
The countermeasure for shallow DoF is to use a smaller aperture. (It’s the only variable we can change in this spider-shooting scenario, since subject distance and focal length cannot be adjusted.) The downside of using a smaller aperture is that correct exposure then requires a slower shutter speed—an option that sometimes opens the door to the overall unsharpness caused by camera shake.
The countermeasure for a too-slow shutter speed is a higher ISO setting. That option, too, has baggage—higher ISO can mean more noise in the image. More noise is objectionable, but sometimes it can be mitigated in post processing with software like DxO PhotoLab 4.
As you can see, good image quality requires understanding the relationships between the variables that are in play. Depth-of-field is a crucial element to master.

Example of Hyperfocal Distance setting. Aperture is set at f/8 and ∞ symbol that's engraved on the focusing ring is aligned with 8 on right side. If distance to subject is 18 feet (as shown) everything from 9 feet away to infinity will be in focus. ©Jon Sienkiewicz
7. Learn to Love Hyperfocal
Setting a lens on its hyperfocal distance allows you to benefit from every ounce of DoF without refocusing between shots. And it’s easy to do, it just has a difficult-sounding name. First, your lens must have the focus distance scale and aperture scale marked on the barrel. Set the f/stop, for example let’s use f/8. Then rotate the focusing ring until the infinity symbol is opposite the 8 engraved on the right side of aperture scale. Your lens is now set at its hyperfocal distance for the f/8 aperture.
The Depth-of-field extends to infinity. The starting point of the DoF (in this example) can be read by looking at the number that is opposite the 8 that’s engraved on the left side of the aperture scale. Interestingly, the middle hash mark that indicates point-of-focus will be opposite a distance value that is exactly one-half the distance opposite the left-side f/8. It’s not a coincidence—this is how it works.
Remember that f/8 is just an example here—the same procedure works for all apertures. Some will be harder to set than others, because it’s impossible to engrave all of the distance values on the smallish lens barrel. But you can usually guess the missing data accurately enough for sharp images. If the lens barrel is unmarked you can refer to the DoF tables that might be available from the manufacturer of your lens.
Hyperfocal distance is Nature’s gift to street photographers. Using the hyperfocal distance and a medium wide or wideangle lens produces acceptably shape images faster than any autofocus system ever can. This phenomena also explains so-called “focus free” point-and-shoot cameras, single-use cameras, and the like.
 Conclusion
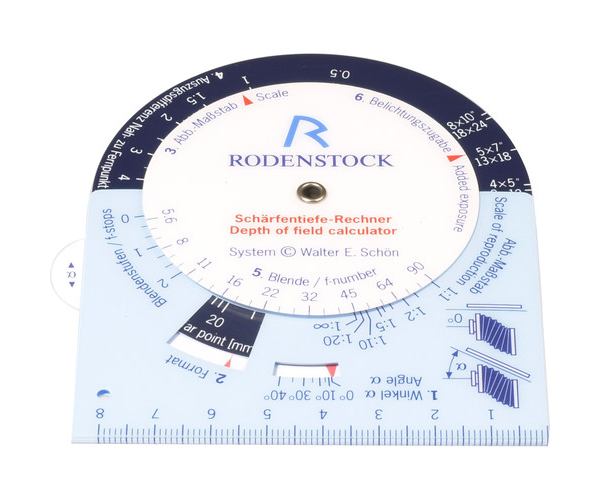
If you know all of the variables (subject distance, aperture, lens focal length, phase of the moon, etc.) you can precisely calculate the depth-of-field for a given shooting situation. Rodenstock makes a paper calculator that facilitates the math. But you can (usually) use the engraving on the lens barrel to calculate the approximate range and make good decisions accordingly.
—Jon Sienkiewicz
(As an Amazon Associate, Shutterbug earns from qualifying purchases linked in this story.)
- Log in or register to post comments

Thank you for your input! You
Submitted by Jon Sienkiewicz on March 5, 2021 - 4:35pm
Thank you for your input! You are, of course, correct. DoF front-back range varies from nearly 1:1 (at close distances) to 1:infinity (at farther distances).
horrible article
Submitted by birderphotoguy on March 2, 2021 - 6:21pm
I'm sorry to have to say this, but this article if full of mis-information. The 1/3 rule is NOT "an immutable law that is consistent and measurable" but rather an urban myth, contradicted later in his article. There is NO basis for this law. None. For close-up photograph with a VERY narrow depth of field, there is roughly the same distance behind and before the image that is in focus (that's 1/2-1/2, NOT 1/3-2/3). Conversely (as the author discussed), at the hyperfocal distance, EVERYTHING behind the image is in focus. As he states, "The Depth-of-field extends to infinity". This doesn't match up with his "immutable rule" that there is twice as much in focus behind as in front. It means that 1/2 of infinity, which is also infinity, should be in focus in front of this point (absurd, I know, but that's the logical conclusion). The article would be better if it just didn't spout off absurdities that everyone has stated for years but which aren't true.
Thank you for your input! Did
Submitted by Jon Sienkiewicz on March 5, 2021 - 4:36pm
Thank you for your input! Did you find anything at all useful in the article, or is it all horrible?
response to "did I find anything useful"
Submitted by birderphotoguy on March 6, 2021 - 5:53am
Once I read that something that is not true and has no basis in fact, AND is contradicted later in the article, is an "immutable rule", your credibility was shot and I knew I couldn't trust anything else you said. Thus, I didn't bother to read much else - how could I believe it?


PHOTO OF THE DAY

Today’s photo is Desert Dessert! by Hans B. Epp
eNEWSLETTER SIGNUP
![]()
Get the Latest Photo Tips, News & Reviews from Shutterbug!
| Camera Reviews Other Reviews | Mobile Reviews Photography Reviews Columns | News | Features | How-To | Resources |
 © 2024 Shutterbug
AVTech Media Americas Inc., USA
All rights reserved