Good tips. Thank you. I hope to be able to get out again soon. I would just disagree with you about shutter speed. I want some motion blur in the water but I want it to still look like water with some texture, not like it’s made out of shaving cream, which is what you get with a two to five second exposure. Around a tenth of a second gives results that suit me. But it’s a matter of personal tase, isn’t it.
- REVIEWS
Camera Reviews 
More Reviews Mobile Reviews Photography Reviews - GALLERIES
- VIDEOS
- BUYER'S GUIDES
Everything You Need to Know When Photographing Waterfalls: 6 Tips
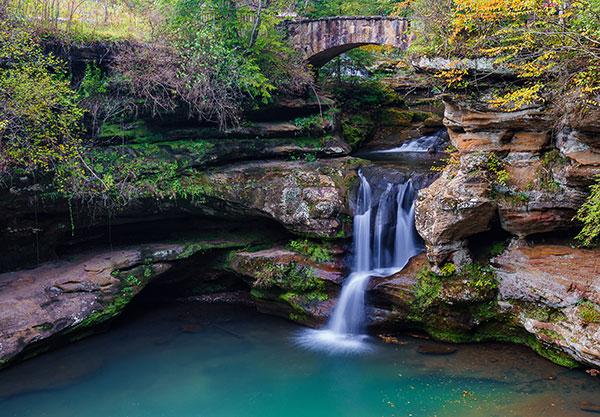
All photos © Joel Lewis
(Editor's Note: Joel Lewis is a nature photographer and a member of Datacolor's Friends with Vision.)
#1 Get to Your Location Early
Waterfall locations are often very popular. This is especially true for those more easily accessible along a trail. Often, it is best to plan to get to your shooting location as close to sunrise as possible. This gives you the best chance of getting a nice image without a crowd of people. There may still be people there early, as well as other photographers, but arriving early will increase your chances of having the area to yourself. You also won’t have to wait as long for people to disperse to capture your composition.
Light is also an important factor to arriving early. Waterfalls are often in woodland areas and in the early hours of the day, the forest canopy can hide harsh sunlight and keep it from producing immense amounts of glare along the water’s surface. During midday, sunlight can make it very hard to get a proper exposure. You will likely have to wait for the sun to pass behind clouds to get the perfect exposure and avoid the glare of the strong midday rays.

#2 Never Venture out Without a Tripod
Many people disdain lugging along a tripod to take photos. The image stabilization systems in today's cameras provide incredible stability for handheld photos in many situations. However, with the longer exposures necessary for waterfall photography, a tripod is essential. In order to get the slow shutter speeds you’re aiming for, to achieve the smooth rendering of water, you will need your camera to be stable for multiple seconds as you take your exposure.
There are many tripod options out there and here are a few important factors to look for in a good tripod:
• How compact the tripod is if you will be hiking with it.
• The weight of the tripod if you are hiking longer distances.
• The height the tripod can be raised or lowered, as this gives you the most options for your composition.
#3 Plan to Venture out After or During a Nice Rainfall
It is always best to plan your trip the day after substantial rainfall. This will help ensure that the waterfalls and streams are flowing at a good rate to capture an image. During warm weather, streams and waterfalls can slow to a trickle after just a few days of dry weather. If you don’t mind venturing out during a rainfall, this can be a great advantage. The trails and waterfall areas are often less occupied during or just after rainfall and can also provide a different image than you would get going to a location on a normal day. Always keep an eye on the weather and plan accordingly.

#4 Filters Are Your Friend
Filters are less essential than they once were now that digital photography has such powerful editing software. But filters are still incredibly helpful tools for certain types of photography, and capturing moving water is one of them. You will want a circular polarizer as well as at least one ND filter. A quality circular polarizer will reduce the glare of the water, which is essential to making great images containing water. ND filters come in various strengths as well as adjustable varieties.
I like to carry a 3 stop and a 10 stop ND filter. This gives you enough light stoppage, even in the middle of a day, to get a proper exposure time of 2-5 seconds which is what you are aiming for to get the smooth water texture that you see in great waterfall images. There are other ways to get this effect, such as stitching together multiple exposures during post processing. Filters however, allow you to get the image you want in one exposure, at the time it is taken in your camera. This means less time processing your images afterwards, and more time to be outdoors finding those images.
#5 Patience Is the Key to Success
Patience is often the key to capturing waterfall images. Sometimes you need to wait for a crowd to disperse to get the composition that you like. Other times, you need to wait for the sun to get behind some clouds for just a few moments so that you can get the properly exposed image without the sun’s glare. If it is a windy day, you may need to wait until the breeze stops to ensure foliage and such near the water is completely still so that your entire image is as sharp as you would like.
It’s important to find the composition you want for your image, set up your camera gear, and then be patient as you wait for the right conditions to take the image. Sometimes this may be a few moments, sometimes it could be 30 minutes or longer. In the end, you will be much happier with your final image if you have the patience to wait for just the right moment.

#6 Monitor Calibration for Accurate Colors
When I first started, I did not know the importance of color and monitor calibration in the photography world. I assumed that my computer was displaying colors properly for my images. I processed and edited my files until they looked great on screen.
It was not until I began printing my images that I learned the importance of having a monitor calibration device such as the SpyderX Pro. My colors in my printed images would vary in saturation and accuracy. It can be a frustrating experience to spend time processing images, only to realize that the colors you saw on screen are not the true colors.
When I integrated the SpyderX Pro into my workflow, it really made a difference. In just a few minutes, it showed the changes that had been made to my monitor’s colors. Once I had calibrated all of my monitors with the SpyderX Pro, my prints came out exactly how they appeared on screen. I now have peace of mind knowing that my colors are correct as I’m going through my editing workflow. I definitely recommend using a calibration device like the SpyderX Pro if you want to save time and have print accuracy.
To view more of Lewis' photos, visit his Intagram page.
- Log in or register to post comments


Waterfall tips
Submitted by Dan Havlik on July 14, 2020 - 6:46am
Great feedback! And yes, much of art is a matter of taste. :-)


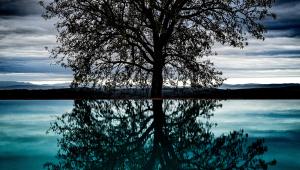


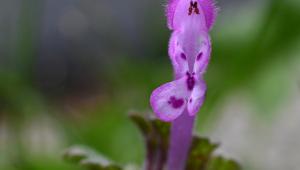


PHOTO OF THE DAY

Today’s photo is Blanket Flower Sunset by JP Gregg
eNEWSLETTER SIGNUP
![]()
Get the Latest Photo Tips, News & Reviews from Shutterbug!
| Camera Reviews Other Reviews | Mobile Reviews Photography Reviews Columns | News | Features | How-To | Resources |
 © 2024 Shutterbug
AVTech Media Americas Inc., USA
All rights reserved