- REVIEWS
Camera Reviews 
More Reviews Mobile Reviews Photography Reviews - GALLERIES
- VIDEOS
- BUYER'S GUIDES
Alien Skin Software’s Snap Art 2; Automated Art From Your Photos
 Do you want to transform your photos into traditional art media that are way beyond your hand and eye skills? Snap Art 2 (SA2) from Alien Skin Software can quickly make your images look like professional oil paint, pastel, pen and ink, watercolor, or even pop art. Whether you want to augment your own artistic expression or expand the services you offer to clients, SA2 makes it strikingly easy and quick. SA2 does not require, nor offer, drawing by your own hand—everything is done for you by the software. Hundreds of preset effects are only a click or two away. You do, however, have a vast array of options to control, via sliders, some variables such as brush size, color saturation, contrast, tone, light direction, and more.
Since the program is a plug-in, in order to use it you must have Adobe’s Photoshop CS3 or later, Elements 4.0.1 or later on Mac, Elements 6 or later on Windows, or Corel’s Paint Shop Pro Photo X2 or later, or Adobe’s Fireworks CS4. Whether you run it on Windows XP or later or Mac OS 10.4.11 or later, SA2 couldn’t be more straightforward. Simply open a photo in one of the host programs, and choose Filter>Alien Skin Snap Art 2. You’ll be presented with 10 art media styles to choose from: Color Pencil, Comics, Impasto (thick textured paint), Oil Paint, Pastel, Pen and Ink, Pencil Sketch, Pointillism (inspired by Impressionist paintings), Stylize (this creates a posterized or silkscreen look), and Watercolor. Choose one of these and a preview opens as SA2 applies the effect. If you like it, click OK. If not, delve into the tabs and submenus to tweak and vary the look.
New In Version 2
Recently released Version 2 has added a number of enhancements and improvements to the original program. One change is that you can control where detail is retained. SA2 can render most of a painting abstractly while maintaining extra detail in critical areas, such as faces. You control this by placing so-called “focus regions” over areas where you want to preserve detail—they’re easily reshaped and moved by dragging them in the preview window. The hard work of finding edges and drawing thousands of brush strokes is then created by SA2.
For all categories of subjects, Version 2 can achieve higher levels of photorealism than Version 1. Most filters now have a Photorealism slider, so you can control the overall degree of abstraction or realism.
Real-world art techniques are carefully emulated by SA2, such as multiple layers of varying stroke size and enhancement of important edges from the original photo. SA2 simulates details down to individual bristles on curved strokes and interaction between the brush and canvas texture.
Also new in Version 2, settings are grouped into categories to help you quickly find the style you are after. There are over 700 presets and you can even create and save more. Version 2 takes advantage of multi-processors and multi-core CPUs, making it significantly faster than Version 1 on computers with these chips, and can work on images of any size, making it suitable for extremely large prints.
 |
|
|
Auto Art
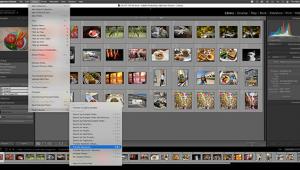
I opened my shot of an exotic butterfly (#1) in Photoshop CS4, and selected Filter>Alien Skin Snap Art 2>Stylize. This brought up the workspace window (#2). At the upper left is a list of variations on the theme of the style you’ve chosen, with the Default setting automatically applied first. For the examples in this article, I began with 300ppi native Photoshop .psd files, about 9MB, 5x7” or so. Rendering the preview usually took less than 5 seconds.
 |
|
|
While the default preview is to show the entire photo—which I prefer initially—you can change the preview size by clicking on the magnifying glass icon at the top left of the window, then click within your photo’s preview to enlarge it, or alt/option click to shrink it. Once you have a look you like, it is a good idea to check the filter effect at 100 percent.
The Preview Split feature, to the right just above the photo preview, allows you to split the image to show half of the original and half of the filter effect in eight different ways (side by side or diagonally). Or, you can choose to see the filter effect on the full image in the preview and toggle between it and the original by clicking and holding the icon to the left of the hand next to the magnifying glass icon.
I clicked on the Basic tab to the left in the preview dialog box to bring up a new set of controls (#3). I always check the box to “create output in new layer above current” so that the effect will be applied on its own layer. That makes it easy to compare the original and the effect, and to perhaps later modify the effect with masks and/or Blend modes in Photoshop’s layers panel. Below this are the Basic controls, which will differ for each media type.
 |
|
|
Here, I left most of the default settings, but for more detail in the stylization, I pumped the Posterization slider up to 12. Pleased with the effect at this point, I clicked OK at the upper right of the dialog window. SA2 then applied the effect to the full-size file, which took less than 30 seconds for most of the effects (#4). The colors are rich and varied (a lower Posterization setting would result in fewer colors), and the layers of shadow add a strong sense of depth. Rendering time will depend on the type of original (how detailed it is), file size, and the effect you’ve chosen.
 |
|
|
|
| |||||||||


![]()
Get the Latest Photo Tips, News & Reviews from Shutterbug!
| Camera Reviews Other Reviews | Mobile Reviews Photography Reviews Columns | News | Features | How-To | Resources |
 © 2025 Shutterbug
AVTech Media Americas Inc., USA
All rights reserved